Are you dreaming of a huge wall bookshelf that not only holds all your favorite books but also becomes the centerpiece of your room? Imagine having a stunning, custom-built shelf that fits perfectly on your wall, giving you space, style, and a sense of pride every time you look at it.
Building it yourself might sound tough, but what if you could follow simple steps that make the process easy and even fun? In this guide, you’ll discover exactly how to create a massive wall bookshelf that matches your space and style.
Ready to turn your empty wall into a powerful storage and display spot? Let’s get started!
Planning Your Bookshelf
Planning your bookshelf is the first step to a successful build. It helps you avoid mistakes and saves time. Careful planning ensures your bookshelf fits perfectly and looks great. Start by thinking about the best place for your bookshelf and what you want it to hold. Make sure to know the size and materials you need before buying anything.
Choosing The Right Wall
Select a wall that has enough space and supports weight well. A solid wall, like one made of brick or wood studs, works best. Avoid walls with pipes or electrical wires inside. Check if the wall is visible and fits your room style. The wall should be easy to reach for placing and taking books.
Measuring The Space
Measure the width, height, and depth of the wall area. Use a tape measure and write down the numbers. Allow extra space for shelves and decorations. Measure twice to prevent errors. Consider the distance from the floor and ceiling. This helps you decide the number and size of shelves.
Selecting Materials And Tools
Choose strong wood or plywood for sturdy shelves. Pick a finish that matches your room decor. You will need screws, brackets, and anchors for support. Get tools like a drill, level, saw, and screwdriver. Quality materials and tools make building easier and the shelf longer-lasting.

Credit: southernyankeediy.com
Designing The Layout
Designing the layout is the first step in building a huge wall bookshelf. This step sets the foundation for your entire project. A clear design helps you use space well and makes the bookshelf look good. Consider the size of your wall and what you want to store.
Deciding Shelf Dimensions
Start by measuring the wall space carefully. Decide how tall and wide your bookshelf should be. Think about the height of your books and objects. Make shelves deep enough to hold large books or decor. Balance shelf height and width for a neat look.
Keep in mind the weight each shelf must hold. Thicker shelves support heavier items better. Use consistent shelf sizes for a clean style or mix sizes for variety.
Incorporating Adjustable Shelves
Adjustable shelves add flexibility to your bookshelf. They let you change shelf height as your collection grows. Use brackets or peg holes to make shelves easy to move. This feature is useful for different book sizes or decor pieces.
Plan space between shelves to fit tall or short items. Adjustable shelves make your bookshelf more useful over time.
Adding Decorative Elements
Decorative elements give your bookshelf character. Add trim or molding to frame the shelves nicely. Use different paint or stain colors to match your room. Consider backing the shelves with wallpaper or wood panels.
Open or closed sections add style and function. Closed cabinets hide clutter. Open shelves show off your favorite books and items.
Preparing The Workspace
Preparing the workspace is the first step to build a huge wall bookshelf. It helps make the project smooth and safe. A clean and organized area lets you focus on building without distractions. Taking time to set up the space properly saves time later. Follow simple steps to prepare your workspace well.
Clearing The Area
Remove all furniture and items near the wall. Make enough space to move and work comfortably. Clear the floor to avoid tripping hazards. A clean area helps you see the wall clearly. It also protects your belongings from dust and damage.
Gathering Supplies
Collect all tools and materials before starting. Include wood, screws, a drill, level, measuring tape, and safety gear. Keep supplies close to the workspace for easy reach. Organize them so you don’t waste time searching. Having everything ready helps you build faster and better.
Setting Up Safety Measures
Wear safety glasses and gloves to protect yourself. Use ear protection if tools make loud noise. Check that your tools are in good condition. Keep a first aid kit nearby for emergencies. Good safety habits prevent accidents and keep you healthy.
Building The Frame
Building the frame is the first step to creating a huge wall bookshelf. It gives your shelf strength and shape. The frame holds all the shelves and books safely. This part needs careful work. Follow simple steps to build a strong frame.
Cutting The Wood Pieces
Start by measuring your wall space. Mark the wood according to these sizes. Use a saw to cut the wood pieces. Cut the base, sides, and shelves carefully. Check each piece for smooth edges. Sand any rough parts to avoid splinters.
Assembling The Base And Sides
Lay the base flat on the floor. Attach the side pieces to the base using screws. Use a drill to make pilot holes first. This stops the wood from splitting. Make sure the sides are straight and square. Tighten the screws to hold everything firm.
Securing The Frame To The Wall
Find the wall studs using a stud finder. Mark these spots clearly. Align the frame with the wall marks. Use long screws to attach the frame to the studs. This keeps the bookshelf stable and safe. Check the frame for level before tightening screws fully.
Installing Shelves
Installing shelves is a key step in building a huge wall bookshelf. Shelves hold your books and decor, so they must be strong and steady. This part involves fixing shelves in place and adding supports. Proper installation keeps the bookshelf safe and long-lasting.
Attaching Fixed Shelves
Fixed shelves give the bookshelf its main structure. Start by measuring the space for each shelf carefully. Use a level to mark straight lines on the side panels. Drill pilot holes to avoid splitting the wood. Secure shelves with screws or nails for a tight fit. Make sure each shelf is flush with the frame. Fixed shelves add strength and hold heavy items well.
Adding Adjustable Shelf Supports
Adjustable shelf supports let you change shelf height anytime. Drill small holes evenly spaced along the inside panels. Insert shelf pins or brackets into these holes. Place shelves on the supports, checking for balance. This system gives flexibility for different book sizes. Adjust shelves easily without extra tools or damage.
Ensuring Level And Stability
Level shelves prevent books from sliding and keep the shelf stable. Use a bubble level to check each shelf after installation. Adjust supports or screws if the shelf tilts. Tighten all fasteners to avoid wobbling. Add wall anchors or brackets for extra safety on large shelves. Stability protects your books and keeps the shelf sturdy over time.
Finishing Touches
Finishing touches make your huge wall bookshelf look complete and polished. These final steps improve both the look and feel of your project. They protect the wood and add character to your shelf. Spend time on these details to get the best results.
Sanding And Smoothing Surfaces
Start by sanding all surfaces with fine-grit sandpaper. Smooth edges and flat areas remove rough spots and splinters. Sanding helps paint or stain stick better. Use a sanding block or electric sander for even pressure. Wipe dust off with a dry cloth before moving on.
Applying Paint Or Stain
Choose paint or stain that matches your room’s style. Paint gives a solid, clean look. Stain shows the wood grain and adds warmth. Use brushes or rollers for even coats. Let each layer dry fully before applying the next. Two or three coats give the best finish and protection.
Adding Trim And Molding
Add trim and molding for a classic, finished look. Use crown molding or baseboards to frame the bookshelf. Cut pieces to fit exactly along edges and corners. Nail or glue trim carefully in place. Fill nail holes with wood filler and sand smooth. Paint or stain trim to match the shelf.
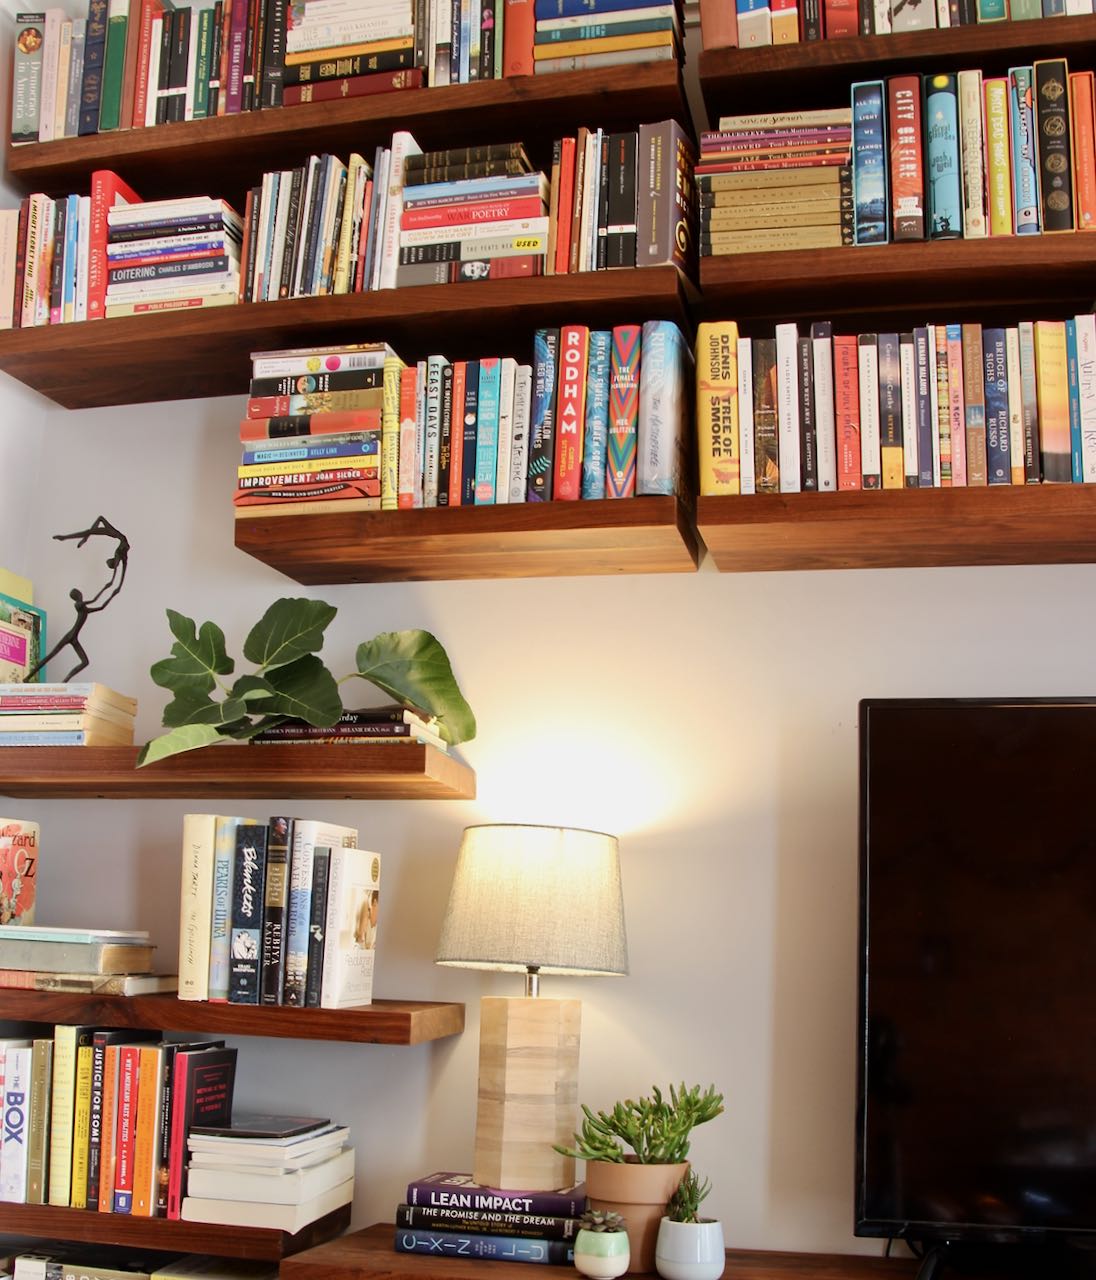
Organizing Your Books
Organizing your books on a huge wall bookshelf makes it look neat and inviting. Good organization helps you find books quickly. It also shows off your collection in a stylish way. You can choose different methods to arrange your books. Mixing books with decorative items adds charm. Smart use of space keeps your shelf tidy and full.
Arranging By Size Or Genre
Sort books by size for a clean look. Place tall books together and small ones in another spot. This creates smooth lines and balance. Grouping by genre helps find books fast. Keep fiction, non-fiction, or hobbies in separate sections. It makes your shelf more organized and easy to use.
Incorporating Decorative Items
Add small plants, photo frames, or art pieces between books. These items break the rows and add interest. Use objects that match your room’s style. Avoid cluttering; leave some space around decorations. This mix makes the shelf feel warm and personal.
Maximizing Storage Space
Use vertical and horizontal stacking to fit more books. Place some books flat and others standing up. Use shelf dividers to keep stacks tidy. Consider adding baskets or boxes for small items. This keeps the shelf organized and uses every inch well.

Credit: www.youtube.com
Maintaining Your Bookshelf
Maintaining your huge wall bookshelf keeps it strong and beautiful for years. Regular care stops damage and makes your shelf last longer. Simple habits help protect your investment and keep books safe.
Regular Cleaning Tips
Dust your bookshelf every week to prevent buildup. Use a soft cloth or a feather duster for gentle cleaning. Avoid wet cloths that may damage the wood or finish. Clean the shelves and the corners carefully to remove all dust.
Checking For Wear And Tear
Look at your bookshelf often to find signs of damage. Check joints, shelves, and screws for any looseness or cracks. Notice if shelves sag under heavy books. Early detection helps avoid bigger problems later.
Making Repairs When Needed
Tighten loose screws and bolts using a screwdriver. Replace any damaged brackets or supports quickly. Fill small cracks with wood filler and sand smooth. Paint or varnish touch-ups keep the shelf looking new. Small fixes keep your bookshelf safe and sturdy.
Credit: southhousedesigns.com
Frequently Asked Questions
What Materials Are Needed To Build A Huge Wall Bookshelf?
To build a huge wall bookshelf, you need wood panels, screws, brackets, a drill, measuring tape, level, and wood finish. Choose sturdy materials to support heavy books and ensure durability.
How Do I Ensure The Bookshelf Is Securely Attached To The Wall?
Use strong wall anchors or studs to secure the bookshelf. Locate studs with a stud finder, then drill screws through brackets into studs for maximum stability.
What Is The Best Wood Type For A Large Bookshelf?
Pine, oak, or plywood are ideal for large bookshelves. These woods are strong, affordable, and easy to work with, providing a durable structure and attractive finish.
How Can I Design A Bookshelf That Fits My Wall Perfectly?
Measure your wall’s height, width, and depth carefully. Sketch a design that maximizes space and matches your room’s style, considering shelf height for different book sizes.
Conclusion
Building a huge wall bookshelf can transform any room. It gives you plenty of space for books and decorations. You only need basic tools and clear steps to start. Take your time, measure carefully, and work safely. Enjoy the process and watch your wall come to life.
This project adds style and function to your home. Try it yourself and see the difference it makes. A strong, beautiful bookshelf will hold memories and stories for years. Simple steps lead to great results.