Are you tired of cluttered spaces and want a stylish way to organize your books? Building a simple wood bookshelf might be easier than you think.
Imagine having a sturdy, beautiful shelf made by your own hands—perfect for your favorite books and decor. In this guide, you’ll discover clear, step-by-step instructions that anyone can follow, even if you’ve never picked up a hammer before. Ready to create something useful and impressive?
Let’s get started!
Materials And Tools
Building a simple wood bookshelf needs the right materials and tools. Choosing good wood and having the proper tools makes the project easier and better. Safety gear keeps you safe while working. This section covers everything you need before starting.
Choosing The Right Wood
Pick wood that is strong and easy to work with. Pine and plywood are good choices for beginners. They cost less and are easy to cut. Avoid wood with many knots or cracks. Smooth wood helps your shelf look neat. Make sure the wood pieces are straight and dry. This stops warping or bending later.
Essential Tools Checklist
You need a few basic tools for this project. A saw is important for cutting wood to size. A drill helps make holes for screws. Sandpaper smooths rough edges and surfaces. A tape measure ensures your cuts are accurate. Use a screwdriver to fasten screws tightly. Clamps hold pieces together while you work. A pencil helps mark where to cut or drill.
Safety Gear
Safety gear protects you during woodworking. Wear safety glasses to guard your eyes from dust and splinters. Use ear protection if you work with loud tools. Gloves protect your hands from sharp edges. A dust mask stops you from breathing sawdust. Always wear closed-toe shoes to protect your feet. Keep a first aid kit nearby for small injuries.
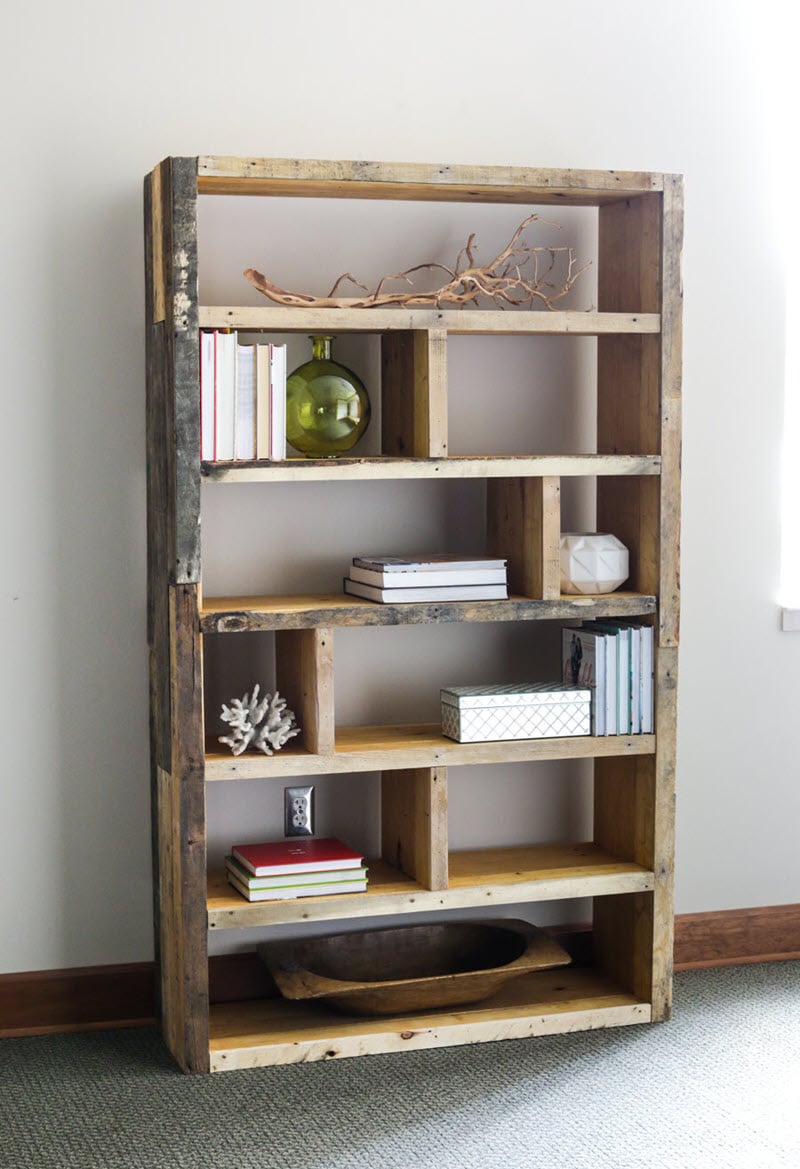
Credit: www.woodpeck.com
Planning Your Bookshelf
Planning your bookshelf is the first step to a successful build. It helps you avoid mistakes and saves time. Careful planning ensures the shelf fits your space and holds your books well. This section guides you through key planning stages.
Determining Shelf Dimensions
Start by measuring the space where the bookshelf will go. Note height, width, and depth limits. Think about what books or items you want to store. Choose shelf height to fit tall books or decorations. Keep shelf depth around 10 to 12 inches for most books. Width depends on room size and stability needs.
Sketching Your Design
Draw a simple sketch of your bookshelf. Include all shelves and their positions. Label the dimensions clearly. This helps visualize the final product. Use graph paper or a digital tool for accuracy. Sketching avoids confusion during building.
Calculating Wood Requirements
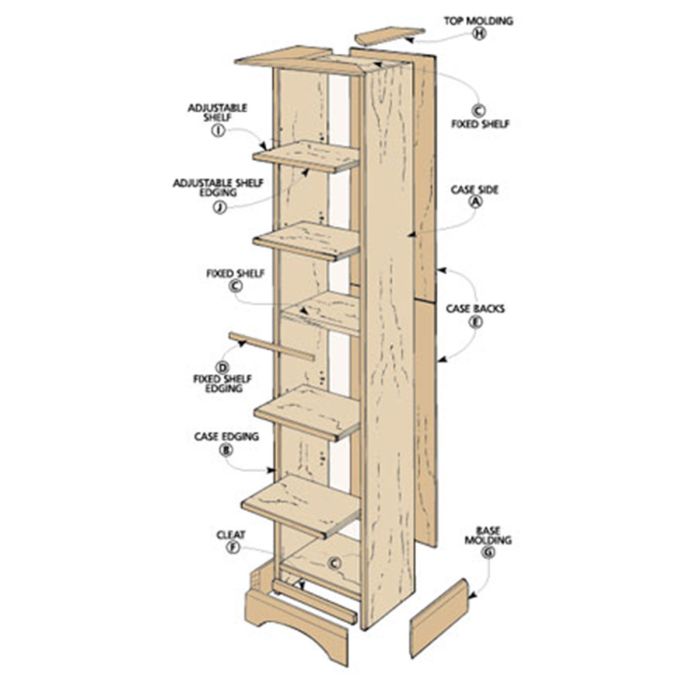
List all pieces needed based on your sketch. Include shelves, sides, top, and bottom panels. Add extra wood for supports or backing if needed. Measure each piece carefully. Calculate total wood length and width before buying. This prevents shortages or waste.
Cutting The Wood
Cutting the wood is a key step in building your bookshelf. It shapes each piece to fit perfectly. Accurate cuts make assembly easier and the shelf stronger. Take your time to measure and cut carefully. This part sets the base for your project’s success.
Measuring And Marking
Start by measuring the wood pieces with a tape measure. Mark the cutting lines clearly using a pencil. Double-check your measurements to avoid mistakes. Straight, visible lines help guide your saw accurately.
Safe Cutting Techniques
Wear safety goggles and gloves before cutting. Use a stable surface to support the wood. Keep your hands away from the blade at all times. Cut slowly along the marked lines for clean edges. Follow your saw’s instructions carefully to stay safe.
Sanding Edges
After cutting, smooth the edges with sandpaper. This removes splinters and sharp spots. Use medium-grit sandpaper and sand evenly. Sanding helps the wood look neat and feel safe to touch.
Credit: jenwoodhouse.com
Assembling The Frame
Assembling the frame is a key step in building your wood bookshelf. This part gives the shelf its shape and strength. Follow these simple steps to connect the main parts securely. A strong frame will hold your books safely and last for years.
Joining Side Panels
Start by placing the two side panels upright. Make sure they are parallel and aligned. Use clamps to hold them steady. This setup creates the vertical support for your shelves. Check the edges for smoothness to ensure a tight fit.
Attaching Shelves
Next, position the shelves between the side panels. Space them evenly based on your design. Mark where each shelf meets the side panels. This helps in placing them accurately. Hold each shelf in place before fixing it.
Securing With Screws And Glue
Apply wood glue on the edges where panels and shelves meet. This adds strength and prevents wobbling. Then, use screws to fasten all pieces together. Drill pilot holes first to avoid splitting the wood. Tighten screws evenly for a firm frame.
Finishing Touches
Finishing touches make your wood bookshelf look neat and last longer. These steps protect the wood and give it a polished look. Small details can change the whole feel of your project.
Filling Gaps And Holes
Check the bookshelf for small gaps or holes. Use wood filler or putty to fill them. Press the filler into the holes with a putty knife. Let it dry completely before sanding. Sand the filled areas smooth to match the wood surface. This step hides imperfections and prepares the wood for painting or staining.
Applying Stain Or Paint
Choose a stain or paint color that fits your room. Apply the stain or paint with a brush or cloth. Work in the direction of the wood grain. Use thin, even coats for the best finish. Let each coat dry well before adding another. Stain brings out the wood’s natural beauty. Paint gives a colorful, solid look.
Adding Protective Coating
A protective coating seals the wood and keeps it safe. Use clear varnish, polyurethane, or lacquer. Apply the coating with a clean brush in thin layers. Let the first layer dry before adding more. This coating prevents scratches and water damage. It also makes cleaning easier and keeps the bookshelf looking new.
Placement And Maintenance
Proper placement and regular maintenance keep your wood bookshelf sturdy and beautiful. Choosing the right spot helps protect the wood from damage. Taking care of the shelf extends its life and keeps it looking fresh.
Choosing The Best Location
Place the bookshelf away from direct sunlight. Sunlight can fade and dry out the wood. Avoid spots near heaters or air conditioners. Extreme heat or cold may cause the wood to crack. Pick a flat and stable surface to prevent wobbling. Make sure the area has good air circulation. This prevents moisture buildup and mold growth.
Weight Distribution Tips
Distribute weight evenly across all shelves. Heavy items should go on the lower shelves. This lowers the center of gravity and adds stability. Avoid placing too many heavy things on one side. Balance is key to prevent tipping or bowing. Use bookends to keep books upright and tidy.
Cleaning And Care
Dust your bookshelf regularly with a soft cloth. Use a damp cloth for sticky spots, then dry immediately. Avoid harsh chemicals that can damage the wood finish. Polish the wood once every few months with a gentle wood cleaner. Check screws and joints often and tighten if loose. This keeps the shelf safe and sturdy.
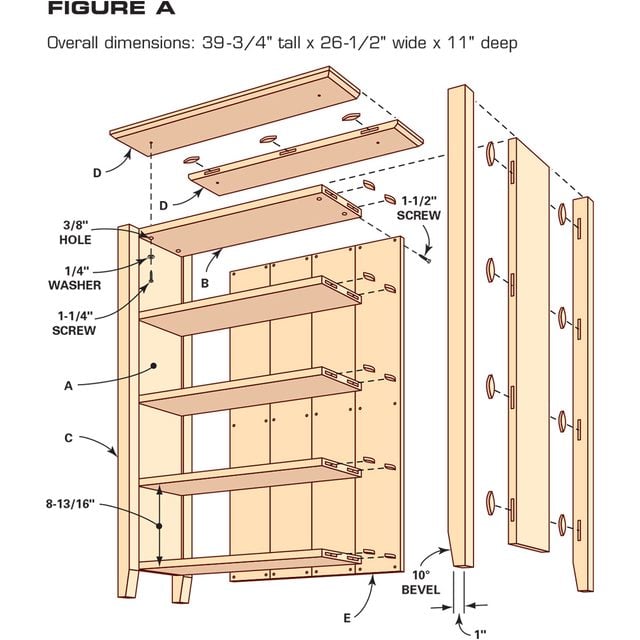
Credit: www.familyhandyman.com
Frequently Asked Questions
What Materials Are Needed To Build A Wood Bookshelf?
You need wood boards, screws, wood glue, sandpaper, and paint or stain. Choose sturdy wood like pine or oak. Also, have a drill, screwdriver, measuring tape, and clamps for assembly and finishing.
How Long Does It Take To Build A Simple Bookshelf?
Building a simple bookshelf typically takes 2 to 4 hours. Time varies based on your experience and tools. Preparing, cutting, assembling, and finishing all affect the total time needed.
Can Beginners Build A Bookshelf Easily?
Yes, beginners can build a simple bookshelf with basic tools. Follow clear instructions and safety guidelines. Start with a simple design to gain confidence and skills gradually.
How Do I Ensure My Bookshelf Is Sturdy?
Use quality wood and strong screws for assembly. Apply wood glue at joints for extra strength. Make sure to level and square all parts during construction.
Conclusion
Building a simple wood bookshelf is easier than you think. Start with basic tools and clear steps. Measure carefully and cut the wood with patience. Assemble the pieces tightly for a strong shelf. Sand the edges to make it smooth and safe.
Finish with paint or stain to suit your style. This project saves money and adds a personal touch. Enjoy your new bookshelf filled with your favorite books. Small efforts bring great results. Give it a try today!
