Are you ready to create the perfect toddler bed that saves space and keeps your child’s room tidy? Building a toddler bed with storage is a smart way to combine comfort and organization.
Imagine having a cozy bed where your little one can sleep peacefully, plus extra drawers or shelves to store toys, clothes, or books. This simple project can transform your child’s room and make your daily routine easier. Keep reading, and you’ll discover easy steps and practical tips to build a sturdy, stylish toddler bed with storage—designed just for your family’s needs.
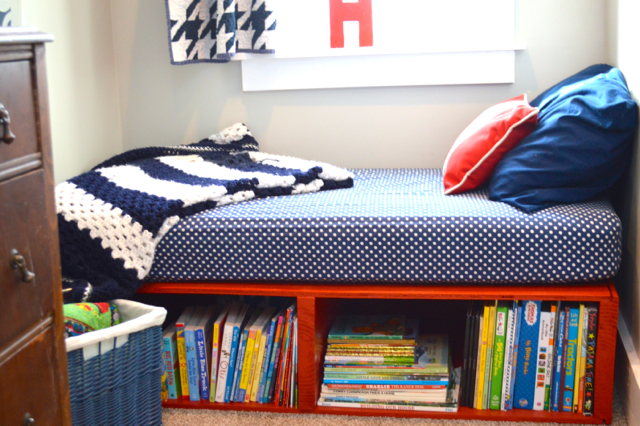
Credit: newlywoodwards.com
Choosing The Right Materials
Choosing the right materials is key to building a sturdy toddler bed with storage. Good materials ensure safety, durability, and a nice finish. The bed must hold weight and last through daily use. Careful selection helps avoid problems like splinters or harmful chemicals. This section guides you through wood types, safe finishes, and tools you need.
Types Of Wood For Durability
Hardwood is strong and lasts long. Oak, maple, and birch are popular choices. They resist dents and scratches well. Softwood like pine is easier to cut but less durable. Choose wood with no cracks or knots. It should be smooth and solid. Avoid treated wood that may have chemicals. Solid wood is better than particleboard for safety.
Selecting Safe Finishes
Finishes protect the wood and make it look good. Use non-toxic, water-based paints or stains. These are safe for children and do not smell strong. Avoid finishes with lead or harmful chemicals. A clear, child-safe varnish can protect wood without changing color. Let the finish dry completely before use. This keeps the bed safe and easy to clean.
Necessary Tools And Supplies
Basic tools include a saw, drill, and screwdriver. Sandpaper smooths rough edges for safety. Clamps hold pieces while you work. Measuring tape and pencil ensure accurate cuts. Use wood glue for extra strength. Safety gear like goggles and gloves protect you. Having the right tools makes building easier and safer.
Designing The Bed Frame
Designing the bed frame is a key step in building a toddler bed with storage. A well-designed frame ensures safety, comfort, and practical use of space. Careful planning helps create a bed that fits your toddler perfectly and offers useful storage options.
The design should balance size, strength, and storage features. This part focuses on measuring, adding storage compartments, and sketching the layout before building.
Measuring For Toddler Size
Start by measuring your toddler’s mattress size. Standard toddler mattresses are usually 28 inches wide and 52 inches long. Add a few inches to allow for a snug fit and room to move. Measure the height from the floor to the top of the mattress. Ensure the frame is low enough for safety. Check room space to make sure the bed fits well without crowding.
Incorporating Storage Compartments
Think about the type of storage you want. Drawers under the bed save floor space. Open shelves offer easy access to toys and books. Consider compartments with lids to keep items dust-free. Make storage strong enough to hold heavy toys. Plan storage placement for convenience and safety. Avoid sharp edges and hard corners near the bed.
Sketching The Layout
Create a simple drawing of the bed frame and storage. Include mattress size and storage compartments in your sketch. Mark dimensions clearly to avoid mistakes. Use graph paper or a digital tool for accuracy. Plan how parts will connect for stability. This helps visualize the final look and function. Share the sketch with anyone helping you build.
Cutting And Preparing Wood Pieces
Cutting and preparing wood pieces is a key step in building a toddler bed with storage. This stage sets the foundation for a strong and safe bed. Careful cutting and smooth edges help the wood fit together perfectly. It also prevents splinters that could harm your child.
Taking time here makes assembly easier and results in a polished look. Use proper tools and follow your measurements closely. Let’s explore how to measure and sand wood pieces correctly.
Accurate Measurements And Cuts
Measure each piece twice before cutting. This avoids mistakes that waste wood and time. Use a tape measure and mark clearly with a pencil.
Cut wood pieces using a saw suited for straight cuts. A circular saw or miter saw works well. Keep the wood steady and cut slowly for precision.
Double-check each piece after cutting. Ensure all parts match the sizes in your plan. Correct cuts make assembly smooth and strong.
Sanding For Smooth Edges
Sand all edges to remove rough spots and splinters. Smooth edges keep the bed safe for toddlers.
Use medium-grit sandpaper first to shape the edges. Follow with fine-grit sandpaper to polish the surface.
Pay extra attention to corners and joints. Sanding here prevents cuts and makes joining pieces easier.
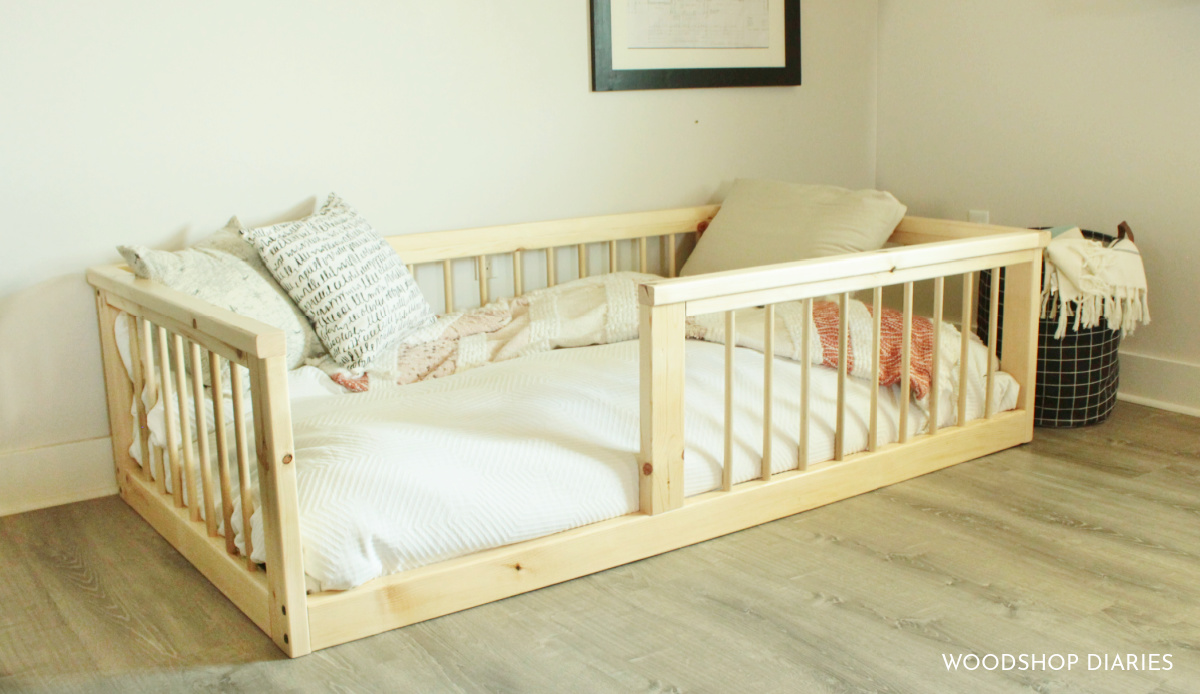
Credit: www.woodshopdiaries.com
Assembling The Bed Frame
Assembling the bed frame is a key step in building a toddler bed with storage. It creates the main structure that holds the mattress and drawers. A strong frame means a safe and durable bed for your child.
Focus on making the frame sturdy and well-aligned. Use the right tools and follow the instructions carefully. A solid frame supports the weight evenly and prevents wobbling.
Joining Techniques For Stability
Use wood screws and corner brackets to join the frame parts. These provide strong connections and reduce movement. Pre-drill holes to avoid wood splitting. Tighten screws fully but avoid over-tightening.
Dowel joints add extra strength. Insert wooden dowels into matching holes on connected pieces. Glue the dowels for a firmer hold. This method keeps the frame tight and stable.
Use glue along with screws for added security. Spread wood glue on contact surfaces before joining. This helps hold the parts together and stops gaps from forming.
Adding Support Slats
Support slats hold the mattress and stop it from sagging. Choose solid, evenly spaced slats for good support. Place them across the width of the bed frame.
Attach slats with screws or small brackets for safety. Leave small gaps between slats for air circulation. This keeps the mattress fresh and dry.
Measure carefully to fit the slats inside the frame. Make sure they are level and secure. Proper slats increase comfort and extend mattress life.
Building Storage Drawers
Building storage drawers for a toddler bed is a smart way to save space. These drawers keep toys, clothes, and bedding organized. They also add extra functionality without cluttering the room.
This section covers the key steps to create sturdy, easy-to-use drawers. Follow along to build storage that fits perfectly under your toddler bed.
Designing Drawer Dimensions
Start by measuring the space under the bed frame. Note the height, width, and depth available for the drawers. Leave some space for smooth movement.
Choose drawer sizes that fit well but do not block the bed supports. Consider what you want to store inside the drawers. This helps decide the best height and depth.
Keep the design simple. Avoid very deep drawers that are hard to pull out.
Constructing Drawer Boxes
Cut wood panels to match your drawer dimensions. Use plywood or solid wood for strength. Assemble the panels into a box using wood glue and nails.
Make sure edges are smooth and corners are square. Reinforce the bottom with extra wood or a panel to hold weight. Sand the surfaces for a clean finish.
Consider painting or sealing the drawers to protect the wood.
Installing Drawer Slides
Choose drawer slides that fit your drawer size and bed frame. Metal ball-bearing slides work well for smooth operation. Attach one side to the drawer box and the other to the bed frame.
Use a level to keep slides straight. Test the drawer by sliding it in and out several times. Adjust screws if the drawer sticks or wobbles.
Secure all screws tightly to ensure safety and durability.
Finishing Touches
Finishing touches bring your toddler bed to life. They improve its look and make it safe. These final steps ensure the bed is ready for use. Focus on three main areas: painting or staining, adding safety features, and the last assembly check.
Painting Or Staining
Choose a paint or stain that is safe for kids. Use non-toxic, water-based products to avoid harmful fumes. Paint or stain the bed evenly for a smooth finish. Let it dry completely before moving to the next step. This protects the wood and adds color or shine.
Adding Safety Features
Safety is key for toddler beds. Attach guardrails to stop falls during sleep. Sand all rough edges until they feel smooth. Cover sharp corners with corner protectors or soft padding. Check that all screws and nails are tight and hidden. These steps keep your child safe and comfortable.
Final Assembly And Inspection
Put all parts together carefully. Make sure the storage drawers slide in and out easily. Test the bed’s stability by gently rocking it. Look for any loose pieces or missing screws. Fix any problems before letting your toddler use the bed. A thorough inspection ensures long-lasting safety and durability.
Tips For Longevity And Safety
Building a toddler bed with storage is a great way to save space and keep your child’s room tidy. To make sure the bed lasts long and stays safe, a few important tips help. These tips protect your child and keep the bed in good shape for years.
Regular Maintenance Advice
Check the bed often for loose screws or parts. Tighten bolts to keep the bed strong. Look for cracks or splinters in the wood. Sand rough edges to avoid splinters. Clean the bed with a soft cloth and mild cleaner. Avoid harsh chemicals that can damage the finish. Test the drawers to make sure they open smoothly. Fix any sticking or broken parts quickly. This keeps the storage safe and easy to use.
Childproofing The Bed
Cover sharp corners with soft guards to prevent injuries. Use non-toxic paint or finish to keep it safe. Make sure the mattress fits snugly to stop gaps. Secure the bed to the wall if it is tall. Check for small parts that a child might swallow. Use safety straps on drawers to stop them from falling out. Keep the bed low to the ground to reduce falls. These steps make the bed safer for your toddler.

Credit: www.roomix.com
Frequently Asked Questions
What Materials Are Needed For Building A Toddler Bed With Storage?
You need wood panels, screws, a drill, measuring tape, sandpaper, paint, and storage bins. Quality wood ensures durability. Choose non-toxic paint for safety. Proper tools make assembly easier and secure.
How Do I Ensure Toddler Bed Safety With Storage?
Use smooth, rounded edges and non-toxic finishes. Secure all parts tightly to avoid gaps. Ensure storage compartments have child-safe latches. Avoid small detachable parts to prevent choking hazards.
Can I Customize Storage Compartments For A Toddler Bed?
Yes, customize compartments by size and number based on needs. Use drawers or open shelves for easy access. Adding labels helps toddlers organize toys. Custom storage maximizes space and functionality.
How Long Does It Take To Build A Toddler Bed With Storage?
Building typically takes 4 to 8 hours depending on complexity and skill. Preparation, cutting, assembly, sanding, and painting all require time. Planning ahead helps complete the project efficiently.
Conclusion
Building a toddler bed with storage saves space and keeps things tidy. You get a cozy place for your child to sleep and extra room for toys or clothes. The steps are simple and use basic tools anyone can handle.
This project adds value to your home and makes daily life easier. Give it a try and enjoy the benefits of a smart, practical bed. Your toddler will love their new space. Easy, useful, and fun to build!