Are you tired of clutter taking over your child’s playroom? Imagine having a single piece of furniture that not only stores toys but also showcases their favorite books.
Building a toy box bookshelf combo is the perfect way to keep your space organized and stylish. In this guide, you’ll discover simple steps to create a functional and beautiful piece that fits your needs. Ready to transform your room and make cleanup easier?
Let’s get started!
Materials And Tools Needed
Before you start building your toy box bookshelf combo, gather all necessary materials and tools. Proper preparation makes the project smooth and enjoyable. Knowing what wood, hardware, and tools you need saves time and effort.
Wood Types And Sizes
Choose sturdy wood like pine or plywood for durability. Pine is easy to cut and affordable. Plywood offers strength and a smooth surface. Common sizes include 1×12 inches for shelves and 1×4 inches for trim. Select wood thickness about ¾ inch for solid support. Avoid warped or cracked pieces.
Hardware Essentials
Get screws and nails suited for wood projects. Use wood screws around 1¼ to 1½ inches long. Hinges for the toy box lid must be strong and smooth. Consider soft-close hinges to prevent slamming. Add handles or knobs for easy opening. Sandpaper and wood glue also help with assembly and finishing.
Tools Checklist
Prepare basic tools like a drill and screwdriver. A saw, either hand or power, cuts wood to size. A tape measure and square ensure accurate measurements and straight lines. Sanding block or electric sander smooths rough edges. Clamps keep pieces steady during gluing or screwing. Safety gear includes goggles and gloves.
Planning Your Design
Planning your design is the first step in building a toy box bookshelf combo. It helps you create a clear vision. You will save time and avoid mistakes. Good planning also makes sure the final product fits your space and needs.
Start by thinking about where you want to place the toy box bookshelf. Consider how much space you have and what you want to store in it. A well-planned design makes the building process easier and more enjoyable.
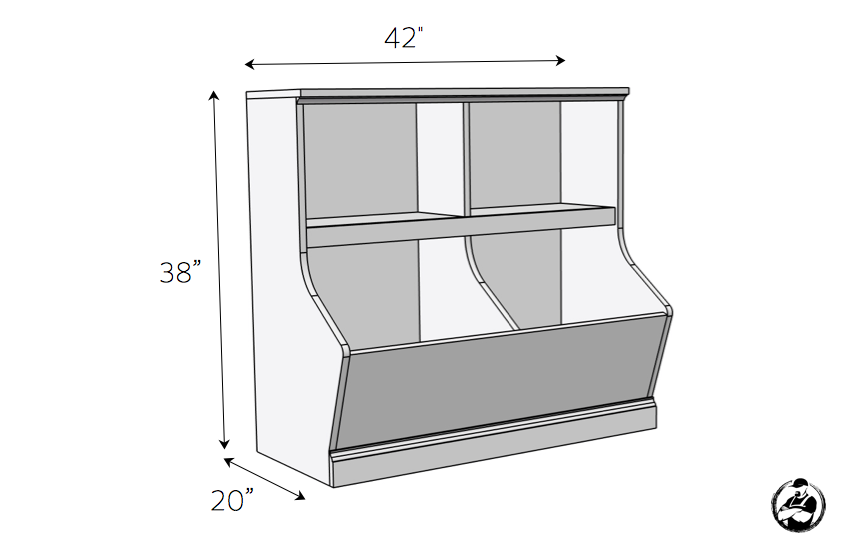
Measuring Space And Dimensions
Measure the area where you want to place the toy box bookshelf. Use a tape measure to get accurate numbers. Write down the width, height, and depth of the space. Leave some extra room for air and easy access. Check for any obstacles like doors or vents.
Sketching The Layout
Draw a simple sketch of your toy box bookshelf design. Include the main parts like shelves and the toy box. Use a ruler to keep lines straight and clear. Label each section to avoid confusion later. This sketch will guide you through the building process.
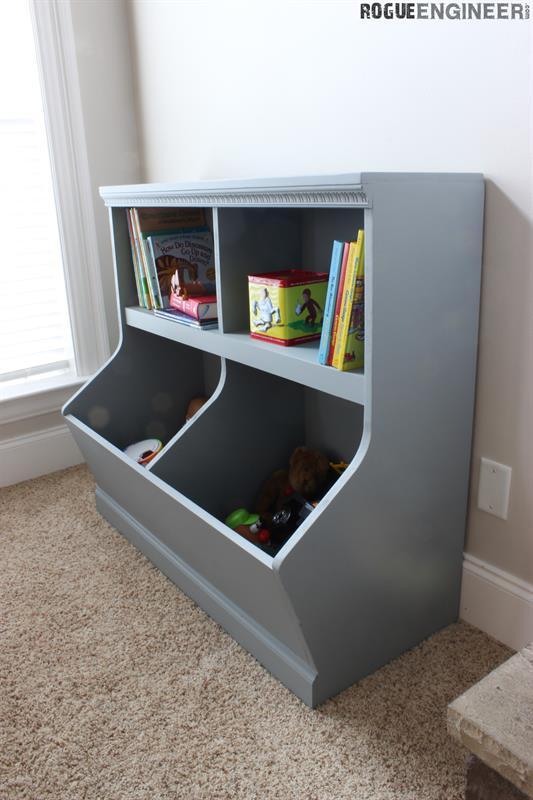
Choosing Storage Compartments
Think about what you want to store in your toy box bookshelf. Select different compartments to fit toys, books, and other items. Use open shelves for books and bins or drawers for toys. Mix sizes to keep everything organized and easy to find.
Cutting And Preparing Wood
Cutting and preparing wood is a key step in building a toy box bookshelf combo. It shapes the wood into the right parts. Proper preparation helps the project fit together well. It also makes the final product strong and smooth. Take your time here for the best results.
Marking Measurements
Start by measuring the wood carefully. Use a tape measure for accuracy. Mark lines with a pencil where you need to cut. Double-check every mark before cutting. Clear, straight lines guide your cuts precisely. Mark all pieces according to your plan.
Safe Cutting Techniques
Wear safety glasses and gloves before cutting. Use a sharp saw for cleaner cuts. Cut slowly along the marked lines. Keep your hands away from the blade. Hold the wood firmly to avoid slips. Follow all safety rules for your tools. Clean up sawdust as you work to keep the area safe.
Sanding And Smoothing Edges
After cutting, sand all edges with sandpaper. Use medium-grit first, then fine-grit paper. Sand until the edges feel smooth to touch. Remove splinters and rough spots carefully. Smooth edges prevent injuries and improve look. Wipe off dust before assembling the parts.
Credit: everestkitchennc.com
Assembling The Toy Box Base
Assembling the toy box base is the first step in creating a sturdy foundation. It provides support for the entire bookshelf combo. Taking care during this step ensures the toy box will hold up to daily use.
Start by organizing all materials and tools for smooth assembly. Follow the instructions carefully to build a solid base. Let’s break down this process into three simple parts.
Building The Frame
Begin by cutting the wooden boards to the correct size. Arrange the side panels and front and back pieces on a flat surface. Join these boards using wood screws or nails. Check that all corners form right angles. Use clamps to hold pieces tightly while fastening.
Attaching The Bottom Panel
Place the bottom panel inside the frame you built. Make sure it fits snugly without gaps. Secure the panel by screwing it from the underside. This step adds strength and prevents the box from sagging.
Securing Corners
Reinforce the corners with metal brackets or wooden corner blocks. Attach them tightly using screws for extra durability. Double-check all joints to ensure there is no movement. Strong corners keep the toy box steady and safe for use.
Constructing The Bookshelf Section
Constructing the bookshelf section is a key step in your toy box bookshelf combo. It creates the space to store books neatly. This part must be strong and well-organized.
Follow clear steps to build a sturdy and practical bookshelf. Use simple tools and materials you have on hand. Take your time to measure and assemble carefully.
Adding Vertical Dividers
Start by placing vertical dividers inside the bookshelf frame. These dividers split the space into smaller sections for books. Cut the wood panels to fit the height of the bookshelf. Attach them securely with screws or nails. Make sure the dividers stand straight and even. This helps keep books upright and organized.
Installing Shelves
Next, install the shelves between the vertical dividers. Measure the width and depth for each shelf. Cut the shelves to fit perfectly. Attach each shelf with brackets or screws. Place shelves evenly to fit different book sizes. Use a level tool to keep shelves flat and balanced.
Reinforcing Structure
Strengthen the bookshelf by adding extra support. Attach corner braces or metal brackets inside corners. These hold the shelves tightly and stop wobbling. Use wood glue along joints for better hold. Check all screws and nails for tightness. A strong structure lasts longer and holds heavy books safely.

Credit: www.reddit.com
Combining Toy Box And Bookshelf
Combining a toy box with a bookshelf creates a practical storage solution. It saves space and keeps toys and books organized. This combination helps children easily find their favorite items. It also encourages tidiness and independence. Building this combo requires careful planning and assembly. The key steps include aligning sections, fastening them, and ensuring stability.
Aligning Sections
Start by placing the toy box and bookshelf side by side. Check that both parts are level and edges match. Use a square tool to confirm right angles. Align shelves so books have enough space. Make sure the toy box lid can open without hitting shelves. Adjust positions until everything fits well.
Fastening Together
Use screws or brackets to join the toy box and bookshelf. Pre-drill holes to prevent wood from splitting. Attach brackets inside where they won’t be visible. Tighten screws firmly but avoid over-tightening. This step keeps the combo from moving apart. Double-check all fasteners for security.
Ensuring Stability
Stability is important for safety and durability. Add corner braces if needed to strengthen joints. Place the combo on a flat surface to avoid wobbling. Attach the unit to the wall with anchors for extra support. Test by gently pushing to confirm it does not tip. This prevents accidents and keeps the combo sturdy.
Finishing Touches
Finishing touches make your toy box bookshelf combo look complete and neat. These small details add charm and improve function. They also help keep the piece safe and practical for kids.
Painting Or Staining
Choose paint or stain that matches your room decor. Paint adds color and covers wood grain fully. Stain shows wood texture while adding warmth. Use non-toxic, child-safe finishes only. Let each coat dry before adding the next. A smooth finish protects wood and looks nice.
Adding Handles Or Knobs
Handles or knobs make opening easier for little hands. Pick simple shapes without sharp edges. Attach them firmly to avoid loosening. Position them low enough for kids to reach. Choose colors that match or contrast the paint. These small details add style and function.
Safety Features For Kids
Safety is key for any kids’ furniture. Sand all surfaces until smooth to avoid splinters. Use corner guards on sharp edges. Make sure hinges have covers or soft-close features. Secure the bookshelf to the wall to stop tipping. These steps keep your child safe and happy.
Maintenance Tips
Keeping your toy box bookshelf combo in good shape takes some care. Regular maintenance helps your piece stay useful and look nice. It also keeps kids safe while they play and read. Follow these simple tips to keep your toy box bookshelf combo in top form for years.
Cleaning And Care
Dust the surface often using a soft cloth. Wipe spills quickly to avoid stains. Use mild soap and water for deeper cleaning. Avoid harsh cleaners that damage paint or wood. Dry the surface well after cleaning to stop water damage.
Repairing Minor Damages
Fix small scratches with a wood marker or crayon. Tighten loose screws or hinges to keep parts steady. Use wood glue to fix small cracks or splits. Sand rough spots gently to smooth the surface. Repair minor damage early to avoid bigger problems.
Extending Lifespan
Place the toy box bookshelf away from direct sunlight. Keep it in a dry spot to prevent warping or mold. Use felt pads under the legs to protect floors. Avoid overloading shelves to prevent bending or breaking. Regular checks and care extend the life of your furniture.
Credit: stogagirlssoccer.com
Frequently Asked Questions
What Materials Are Needed To Build A Toy Box Bookshelf Combo?
You need plywood, screws, wood glue, sandpaper, paint, hinges, and handles. Quality materials ensure durability and safety for kids’ use.
How Much Time Does It Take To Build This Combo?
Building the toy box bookshelf combo typically takes 4 to 6 hours. Time varies based on skill level and tools available.
Can I Customize The Size Of The Toy Box Bookshelf?
Yes, you can customize dimensions to fit your space. Adjust measurements before cutting materials for a perfect fit.
Is This Toy Box Bookshelf Safe For Children?
Yes, with smooth edges, non-toxic paint, and secure hinges, it’s child-safe. Always supervise young children around furniture.
Conclusion
Building a toy box bookshelf combo saves space and keeps things tidy. It offers a smart way to store toys and books together. Simple tools and steps make the project easy to complete. Enjoy creating a useful piece for your home or child’s room.
This combo helps teach kids to organize their belongings. Try this project to add both function and charm to any space. Keep it safe, sturdy, and fun to use every day. A practical and nice addition for any family.