Looking for a simple way to add style and function to your entryway? Building your own wall hanging coat rack is easier than you think.
Imagine having a custom piece that fits perfectly in your space, keeps your coats organized, and impresses your guests. In this guide, you’ll discover step-by-step instructions that anyone can follow, even if you’re new to DIY projects. Ready to transform your wall and make your daily routine smoother?
Let’s get started!
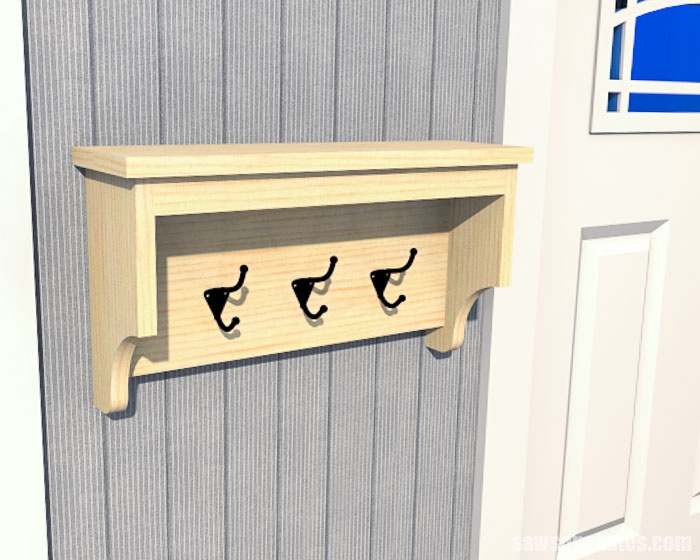
Credit: sawsonskates.com
Materials Needed
Building a wall hanging coat rack starts with gathering the right materials. Choosing good supplies helps the project last long and look great. This section covers the main materials you will need.
Choosing The Wood
Pick a sturdy wood that holds weight well. Pine, oak, or cedar are good options. Measure the size of your wall space before buying wood. Smooth wood makes the rack look clean. Sand the wood to avoid splinters.
Selecting Hooks
Hooks hold coats and bags securely. Choose metal hooks for strength and durability. Decide on the number of hooks based on your needs. Look for hooks with rounded ends to protect clothes. Hooks with a simple design match most decor styles.
Additional Supplies
Gather screws and wall anchors to mount the rack safely. A drill and screwdriver help to fix the hooks and wood. Use a level to keep the rack straight on the wall. Sandpaper smooths rough edges. Finish with paint or varnish for a polished look.
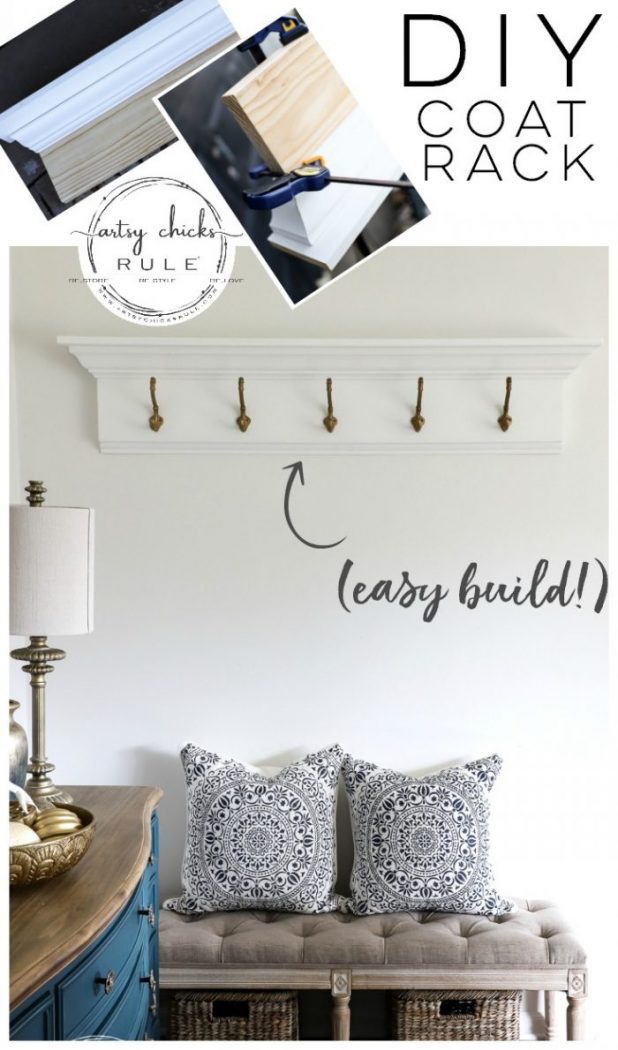
Credit: www.artsychicksrule.com
Tools Required
Building a wall hanging coat rack requires some basic tools. Having the right tools makes the project easier and safer. It also helps create a strong and neat rack. Below are the key tools you need for cutting, drilling, and finishing your coat rack.
Cutting Tools
Cutting tools shape the wood into the right size and form. A hand saw or a power saw works well. Choose a saw that fits your skill level. A fine-tooth blade gives smooth cuts. Always cut slowly and carefully for safety.
Drilling Equipment
Drilling tools make holes for screws and hooks. A cordless drill is easy to handle. Use drill bits that match screw sizes. A drill guide helps keep holes straight. Drill at a steady speed to avoid splintering wood.
Sanding And Finishing Tools
Sanding tools smooth rough edges and surfaces. Use sandpaper or a sanding block. Start with coarse grit, then use fine grit. Sand in the direction of the wood grain. Finishing tools like brushes apply paint or varnish evenly.
Preparing The Wood
Preparing the wood is a key step in building your wall hanging coat rack. It ensures the wood is ready for assembly and looks great. Proper preparation helps the rack last longer and hold weight safely. Take your time to do this carefully.
Measuring And Marking
Start by measuring the wood pieces accurately. Use a tape measure and pencil to mark the length you need. Double-check your marks to avoid mistakes. Clear marks guide your cuts and keep the rack even.
Cutting To Size
Cut the wood along the marks using a saw. Keep your cuts straight and steady. Use a clamp to hold the wood if needed. Proper cuts make assembly easier and the rack look neat.
Sanding The Surface
Sand the wood with fine-grit sandpaper. Smooth all edges and surfaces to remove splinters. This step prevents injuries and gives a polished finish. Wipe off dust before moving on to the next step.

Credit: www.youtube.com
Attaching The Hooks
Attaching the hooks is an important step in building your wall hanging coat rack. The hooks hold coats and bags securely. Proper placement and installation ensure they stay strong and reliable. Follow these simple steps to attach the hooks correctly.
Marking Hook Placement
Start by deciding where each hook will go. Measure equal distances for a balanced look. Use a pencil to mark spots on the wood. Make sure marks are straight by using a level. Clear markings help prevent mistakes during installation.
Drilling Pilot Holes
Drill small pilot holes at each mark. Pilot holes guide screws and stop the wood from splitting. Choose a drill bit slightly smaller than the screws. Drill carefully to avoid making holes too big. This step makes attaching hooks easier and safer.
Securing The Hooks
Place each hook over the pilot holes. Insert screws through the hook holes into the wood. Use a screwdriver or drill to tighten the screws. Do not overtighten, as it may strip the wood. Check hooks for stability before finishing your project.
Finishing Touches
Finishing touches give your wall hanging coat rack a polished look. They protect the wood and make the rack last longer. Taking time on these steps improves the final product. A smooth, attractive finish invites use and admiration.
Applying Stain Or Paint
Choose a stain or paint that suits your style. Stain shows the wood grain and adds color. Paint covers the wood completely and offers many color options. Use a brush or cloth for even coverage. Apply thin coats and let each dry fully. This prevents drips and uneven spots. Light sanding between coats helps the finish stick better.
Sealing The Wood
Sealing protects the wood from water and dirt. Use a clear sealant like polyurethane or varnish. Apply it with a clean brush in thin layers. Let each layer dry before adding another. This builds a strong shield on the wood. A sealed surface is easier to clean and lasts longer. It keeps your coat rack looking fresh over time.
Mounting The Coat Rack
Mounting the coat rack on your wall is an important step. It keeps the rack stable and safe to use. Proper mounting prevents damage to the wall and ensures the rack holds weight well. This section guides you through choosing the right spot, installing anchors, and hanging the rack securely.
Choosing The Location
Pick a spot near your door or entryway for easy access. The wall should be flat and clean. Avoid areas with electrical wires or plumbing behind them. Check the wall material: drywall, plaster, or wood. This affects the type of anchors you use. Choose a height that suits all users.
Installing Wall Anchors
Wall anchors hold the screws firmly in place. Use anchors designed for your wall type. For drywall, plastic or metal anchors work best. Drill holes that match the anchor size. Push the anchor into the hole until flush with the wall. Do not force it to avoid wall damage. Anchors spread the load and keep the rack steady.
Hanging The Rack Securely
Align the coat rack holes with the anchors. Use screws that fit the rack and anchors. Tighten screws with a screwdriver or drill. Check that the rack does not wobble or tilt. Test the rack by hanging a few items. Make adjustments if needed. Secure hanging ensures long-lasting use and safety.
Maintenance Tips
Maintaining your wall hanging coat rack keeps it strong and looking nice. Simple care helps it last longer and hold weight safely. Follow these tips to keep your rack in top shape.
Cleaning Advice
Dust your coat rack often with a soft cloth. Use a damp cloth for sticky spots. Avoid harsh chemicals that can damage wood or metal. Dry the surface well to stop water damage. Clean hooks gently to keep their finish bright.
Periodic Checks
Check your coat rack every few months. Tighten screws and hooks to prevent wobbling. Look for cracks or loose parts. Fix small problems early to avoid bigger damage. Ensure the rack stays firmly attached to the wall.
Frequently Asked Questions
What Materials Are Needed For A Wall Hanging Coat Rack?
You need wood boards, hooks, screws, a drill, and wall anchors. Sandpaper and paint or stain can enhance the rack’s look.
How Do I Choose The Right Hooks For A Coat Rack?
Select hooks based on weight capacity and style. Metal hooks work well for durability and modern designs.
Can I Install A Coat Rack On Drywall?
Yes, use wall anchors or locate studs for secure mounting. Proper installation prevents damage and holds heavier coats safely.
How Do I Finish A Wooden Coat Rack For Durability?
Apply paint, stain, or sealant to protect wood from moisture and wear. Let each coat dry thoroughly before use.
Conclusion
Building a wall hanging coat rack is simple and fun. It adds style and saves space in your home. You only need a few tools and materials. Follow each step carefully for the best results. This project helps you stay organized every day.
Try making one yourself and enjoy the process. A handmade rack brings a personal touch to any room. Start your DIY project today and see the difference it makes.
