Looking to add more storage and style to your room without taking up too much space? A corner bookshelf is the perfect solution.
It fits neatly into unused corners, giving you a cozy spot to display your favorite books, plants, or decorations. In this guide, you’ll discover simple steps to build your own corner bookshelf, even if you’ve never tried woodworking before. By the end, you’ll have a unique piece that not only organizes your space but also shows off your personal touch.
Ready to transform your empty corners into a stunning focal point? Let’s get started!

Credit: www.remodelaholic.com
Choosing The Right Corner Bookshelf Design
Choosing the right corner bookshelf design shapes the whole project. It affects how the shelf fits your room and holds your items. This step helps avoid mistakes and saves time. Think about your needs and space. The right design matches your style and use. Below are key points to consider for a perfect corner bookshelf.
Assessing Your Space
Measure the corner where you want to place the shelf. Check width, height, and depth carefully. Notice any obstacles like vents or outlets. Think about how much space you need around the shelf. Consider the room’s style and color. A good fit makes the shelf both useful and attractive.
Selecting Materials
Choose materials that match your room and budget. Wood is strong and looks warm. Plywood is affordable and easy to work with. Metal adds a modern touch and lasts long. Think about the shelf’s weight capacity. Pick materials that are easy to clean and maintain. The right material ensures durability and style.
Deciding On Shelf Dimensions
Plan the shelf size based on your items. Books need deep shelves, small items need less space. Decide how many shelves you want. Keep space between shelves enough for tall objects. Make sure the shelf height fits under any nearby furniture. Right dimensions make the shelf practical and neat.
Gathering Tools And Supplies
Building a corner bookshelf starts with gathering the right tools and supplies. Having everything ready makes the project smoother and faster. It also helps avoid interruptions during work. This section covers basic tools and optional accessories you might need.
Basic Tools Needed
First, you need a measuring tape to get exact dimensions. A pencil helps mark your cuts and placement. Use a saw for cutting wood pieces to size. A drill makes holes for screws and fasteners. Screwdrivers tighten screws securely. Sandpaper smooths rough edges and surfaces. A level keeps shelves straight and balanced. Safety gear like gloves and goggles protect you while working.
Optional Accessories
Clamps hold pieces steady while you work. Wood glue adds extra strength to joints. Corner braces increase shelf stability. Paint or wood stain finishes the bookshelf with color. Brushes or rags help apply paint or stain evenly. A stud finder finds wall studs for secure mounting. Felt pads protect floors from shelf movement.
Preparing The Workspace
Preparing your workspace is the first step in building a corner bookshelf. A clean and organized area helps you work safely and efficiently. It makes the whole process smoother and more enjoyable.
Before starting, take time to set up a proper work environment. This saves time and prevents mistakes during the build.
Clearing And Cleaning Area
Clear the space where you will build the bookshelf. Remove any furniture or items that may block your work. Dust and sweep the floor to avoid slipping or tripping.
Good lighting is important. Make sure the area is bright enough to see all details clearly. Open windows for fresh air and better ventilation.
Setting Up Workbench
Use a sturdy workbench or table for cutting and assembling parts. Check that the surface is flat and stable. This prevents pieces from moving or falling while you work.
Arrange your tools within easy reach. Keep measuring tape, saw, drill, and screws nearby. Organize materials to save time and reduce frustration.
Cutting And Sanding Wood Pieces
Cutting and sanding wood pieces are key steps in building a corner bookshelf. These steps shape the wood and prepare it for assembly. Proper cutting ensures all pieces fit well. Sanding smooths rough edges and surfaces. This makes the bookshelf safe and attractive.
Measuring And Marking
Start by measuring the wood carefully. Use a tape measure and pencil. Mark the lines clearly where cuts will go. Double-check your measurements to avoid mistakes. Accurate marking saves time and wood.
Safe Cutting Techniques
Wear safety glasses and gloves before cutting. Use a sharp saw for clean cuts. Cut slowly along the marked lines. Keep hands away from the blade at all times. Secure the wood with clamps to prevent movement.
Sanding For Smoothness
Use sandpaper or a sanding block for best results. Start with coarse grit to remove rough spots. Move to finer grit for a smooth finish. Sand all edges and surfaces evenly. Wipe the dust off before assembling the shelf.
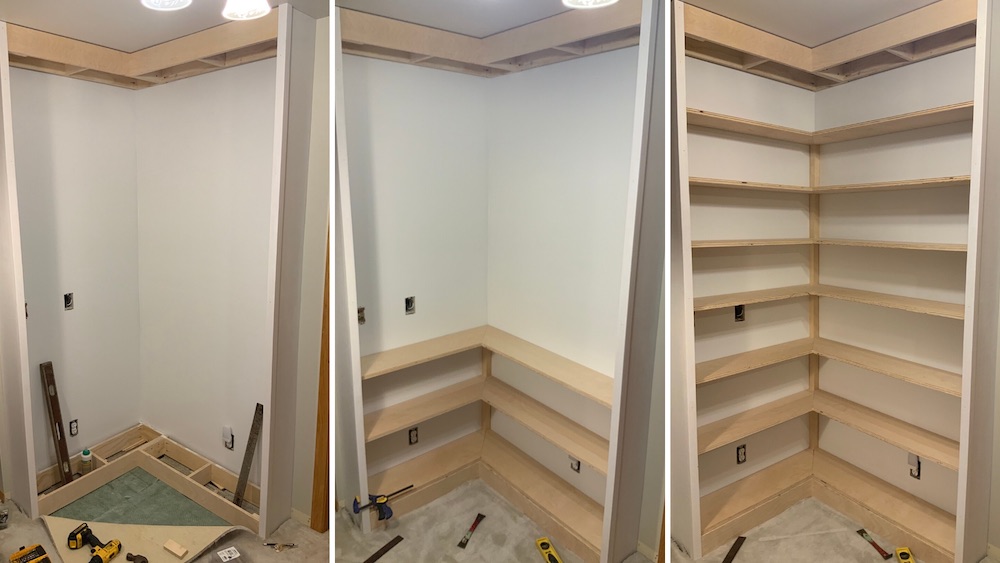
Assembling The Bookshelf Frame
Building the frame is the key step in making your corner bookshelf sturdy. This part holds all pieces together. Careful assembly ensures the shelf stands strong and lasts long. Follow clear steps to join panels, add shelves, and secure corners well.
Joining Side Panels
Start by placing the side panels upright. Align their edges carefully for a perfect fit. Use wood glue along the joints for extra hold. Then, fasten panels with screws or nails. Check the angle; it should form a right corner. Tighten the screws but avoid overdoing it.
Attaching Shelves
Next, position each shelf between the side panels. Measure the height so shelves are even and balanced. Mark spots for screws on both panels and shelves. Drill pilot holes to prevent wood splitting. Secure shelves with screws, pressing firmly. Each shelf should sit flat and steady.
Reinforcing Corners
Strengthen the corners by adding braces or corner blocks. Attach them inside the frame where panels meet. Use strong wood glue and screws for tight bonding. This step stops wobbling and adds durability. Double-check all corners for tightness before moving forward.

Credit: stagg-design.com
Finishing Touches
Finishing touches make your corner bookshelf look complete and polished. They protect the wood and enhance its beauty. Spend time on these steps to achieve a professional result.
Applying Paint Or Stain
Choose paint or stain based on your room’s style. Paint offers bright, solid colors and hides wood grain. Stain highlights the natural wood patterns and adds warmth.
Use a brush or cloth for even coverage. Apply thin coats and let each dry fully. Sand lightly between coats for a smooth finish.
Sealing And Protecting
Seal the wood with a clear finish to protect it from damage. Polyurethane or varnish works well to guard against scratches and moisture.
Apply two or three thin coats. Let each coat dry before adding the next. This step extends your shelf’s life and keeps it looking new.
Adding Decorative Elements
Decorative touches add personality to your bookshelf. Consider adding molding, trim, or small corner brackets for style.
Use simple designs to keep the focus on your books and decor. These details make the shelf unique and match your room’s look.
Installing And Securing The Bookshelf
Installing and securing your corner bookshelf is a key step. It ensures the shelf stands steady and safe. Proper installation prevents accidents and damage. Follow these steps to set up your shelf firmly and neatly.
Positioning In The Corner
Place the bookshelf tightly in the corner. Make sure it fits flush against both walls. Check the floor for levelness. Adjust the shelf base with small shims if needed. This keeps the shelf stable and balanced.
Anchoring To Walls
Use wall anchors to secure the bookshelf. Find studs behind the wall for strong support. Mark anchor points along the shelf frame. Drill pilot holes and insert anchors carefully. Screw the shelf into the anchors tightly. This stops the shelf from tipping over.
Organizing Your Books
Arrange books by size and weight for balance. Place heavier books on lower shelves. Keep lighter books and decorations on top. Leave space between items to avoid overcrowding. This makes the shelf look tidy and prevents damage.
Credit: woodwork.cooperjason.com
Tips For Maintenance And Longevity
Taking care of your corner bookshelf helps it last longer and stay beautiful. Small efforts can keep it strong and looking new. Follow these simple tips to maintain your bookshelf well.
Regular Cleaning
Dust your bookshelf often to prevent buildup. Use a soft cloth or feather duster for gentle cleaning. Avoid using water or harsh chemicals that can damage the wood. Clean inside corners carefully to remove hidden dust.
Checking For Wear
Look at your bookshelf regularly for loose screws or cracks. Tighten any loose parts to keep it stable. Check shelves for signs of bending or warping. Fix small problems early to avoid bigger damage later.
Touching Up Finishes
Keep the finish fresh by applying a wood polish or wax. Use a soft cloth to spread it evenly. For scratches, use a matching wood marker or filler. Touching up finishes protects the wood and improves appearance.
Frequently Asked Questions
What Materials Are Needed To Build A Corner Bookshelf?
To build a corner bookshelf, you’ll need wood panels, screws, wood glue, sandpaper, paint or stain, brackets, and tools like a drill and saw. Choose quality materials for durability and a smooth finish.
How Do I Measure Space For A Corner Bookshelf?
Measure the corner’s width and depth accurately. Consider the wall height and shelf spacing. This ensures the bookshelf fits perfectly without blocking outlets or vents.
What Is The Best Wood Type For Corner Bookshelves?
Pine, oak, or plywood are ideal for corner bookshelves. Pine is affordable, oak is durable, and plywood offers stability. Choose based on budget and desired finish.
How Can I Secure The Bookshelf To The Wall Safely?
Use sturdy brackets and wall anchors to secure the bookshelf. Attach brackets to studs for better support and prevent tipping or falling.
Conclusion
Building a corner bookshelf adds style and storage to any room. Follow the steps carefully to create a sturdy and neat design. Choose materials that fit your space and budget well. Take your time measuring and assembling each part. Enjoy placing your books and decorations on the new shelf.
A corner bookshelf saves space and looks good too. Try this project to improve your home’s organization and feel proud of your work. Simple tools and patience bring great results every time.