Are you ready to create a stunning console table that fits perfectly in your space? Building your own console table is easier than you might think, and it gives you the chance to add a personal touch to your home.
Imagine having a piece of furniture made by your own hands, tailored exactly to your style and needs. In this guide, you’ll discover simple steps, helpful tips, and insider tricks that will make the process smooth and enjoyable. Keep reading, and soon you’ll have a beautiful console table that not only looks great but also tells your story.

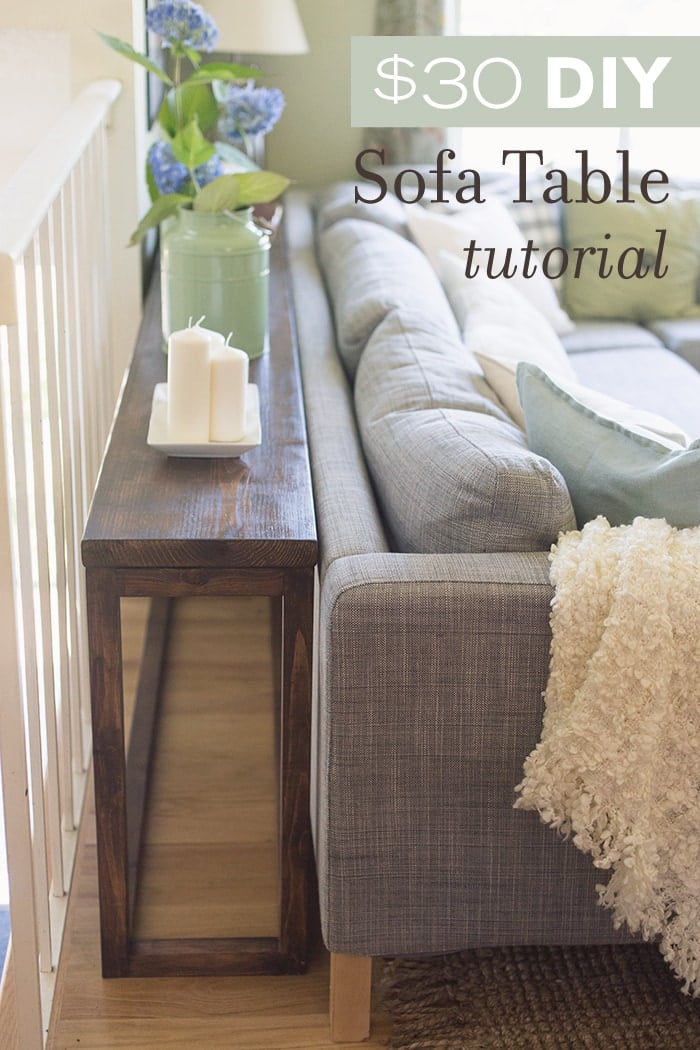
Credit: graceoaksdesigns.com
Choosing The Right Materials
Choosing the right materials is key to building a strong and beautiful console table. The materials affect how the table looks, lasts, and feels. Picking good wood and hardware makes your project easier and more rewarding.
Consider the style you want. Think about the room where the table will go. Choose materials that match your vision and your skill level. This helps create a piece you will love for years.
Selecting Wood Types
Wood is the main part of your console table. Different woods have different colors, grains, and strengths. Pine is soft, easy to cut, and costs less. Oak is hard, strong, and lasts a long time. Walnut offers rich color and smooth texture.
Choose wood that fits your budget and skill. Softwoods are good for beginners. Hardwoods give a polished look but need more care. Think about sanding, staining, and painting. Test a small piece first to see how it looks.
Picking Hardware And Finishes
Hardware includes screws, nails, brackets, and drawer pulls. Pick pieces that hold the table firmly. Choose finishes that protect the wood and add beauty. Clear finishes show the natural wood. Painted finishes add color and style.
Use hardware that matches your table’s style. Simple metal pieces suit a modern look. Vintage knobs fit rustic designs. Choose finishes that are easy to apply and maintain. This keeps your table strong and attractive over time.
Gathering Essential Tools
Before starting your console table project, gathering the right tools is crucial. Having the correct tools makes the work easier and safer. This section covers the essential tools you need for building a sturdy console table.
Prepare your workspace with these tools ready. It helps you stay organized and focused on the building process.
Basic Carpentry Tools
Start with a tape measure for precise measurements. A carpenter’s square keeps your cuts and corners straight. Use a hand saw or power saw to cut wood pieces accurately. Sandpaper or a power sander smooths rough edges and surfaces. A drill with drill bits helps make holes and drive screws. Clamps hold wood pieces together tightly during assembly. A pencil marks your measurements on the wood clearly. These tools form the foundation of your carpentry kit.
Safety Equipment
Protect yourself with safety glasses to guard your eyes from dust and debris. Wear ear protection if you use loud power tools. Gloves protect your hands from splinters and sharp edges. A dust mask prevents inhaling sawdust during sanding or cutting. Proper footwear keeps your feet safe from falling objects. Safety gear is essential for a safe and comfortable building experience.
Planning Your Design
Planning your design is the first step in building a console table. It helps you create a clear vision of the final product. Good planning saves time and materials. It makes the building process smoother and more enjoyable.
Start by thinking about where you will place the table. Consider the style and size of the room. This will guide your design choices.
Measuring And Sketching
Measure the space carefully. Write down the length, width, and height available. Check for any obstacles like outlets or vents. These affect the table size.
Next, sketch your ideas on paper. Draw a simple outline of the table shape. Mark the measurements clearly. Sketching helps you see the design before building.
Customizing Dimensions
Adjust the size to fit your needs. Make the table taller for standing work. Or shorter to fit under a window.
Think about the table’s function. Add space for storage if needed. Change the width to hold larger items. Custom dimensions make the table perfect for your space.
Cutting And Preparing Wood
Cutting and preparing wood is a key step in building a console table. This step shapes the wood to fit your design. It also helps ensure the table is strong and looks good. Taking time here will make the rest of the project easier and better.
Accurate Cutting Techniques
Measure twice, cut once. This old rule saves wood and effort. Use a tape measure and mark the wood clearly. A pencil or chalk works well. Cut along the marks carefully to keep edges straight.
Use a saw that fits your skill level and wood type. A hand saw is good for small cuts. A circular saw is faster for long cuts. Keep the saw steady and move slowly to avoid mistakes.
Sanding For Smooth Surfaces
Sand the wood after cutting to remove rough spots. Sanding makes the surface smooth and safe to touch. Use medium-grit sandpaper first to even out cuts. Then, use fine-grit sandpaper to finish the surface.
Sand along the wood grain, not across it. This prevents scratches and keeps the wood looking natural. Clean off dust with a cloth before moving to the next step. Smooth wood helps paint or stain stick better.
Assembling The Table Frame
Assembling the table frame is the next important step in building your console table. This part gives the table its shape and strength. A well-built frame holds the top and legs firmly. It also keeps the table balanced and safe to use.
Focus on fitting each part carefully. This will help the table last longer and look great in your home. Take your time to join the pieces properly. This process is simple and fun with the right tools and instructions.
Joining Legs And Supports
Start by attaching the legs to the table supports. Use screws or wood glue for a strong hold. Make sure the legs are straight and fit tightly. Check the alignment before tightening the screws fully. This avoids any wobbling later on.
Use clamps to hold the legs in place while the glue dries. This keeps the parts from moving. If needed, drill pilot holes to prevent the wood from splitting. Secure every joint firmly to create a sturdy frame.
Ensuring Stability
Stability is key for a safe and useful table. Add cross supports between the legs for extra strength. These supports stop the legs from shaking or bending. Double-check all screws and joints for tightness.
Place the frame on a flat surface to test balance. Adjust any legs that do not touch evenly. A level frame means your console table will stand steady. This step prevents accidents and keeps your table looking perfect.
Credit: www.jennasuedesign.com
Adding The Tabletop
Adding the tabletop is an important step in building your console table. The tabletop gives your table its final look and function. You want it to be strong and smooth. This part will guide you on attaching and finishing the tabletop.
Securing The Surface
Place the tabletop on the frame carefully. Make sure it fits well and is centered. Use screws or brackets to fix it firmly. Drill pilot holes first to avoid splitting the wood. Tighten all screws evenly. Check if the tabletop is stable by pressing gently on different spots.
Finishing Touches
Sand the tabletop edges and surface to remove rough spots. Use fine-grit sandpaper for a smooth finish. Wipe away dust with a clean cloth. Apply paint, stain, or sealant to protect the wood. Let it dry completely before use. This step helps the table last longer and look great.
Applying Finishes And Paint
Applying finishes and paint is the final step in building your console table. It protects the wood and improves its look. The right finish can bring out the grain or add color. Proper application ensures a smooth, lasting surface. This section covers how to pick the best finish and apply it evenly.
Choosing The Right Finish
Pick a finish that matches the table’s use and style. For natural wood, clear varnish or polyurethane works well. These finishes protect from scratches and moisture. Use paint for a bold color or a modern look. Water-based paints dry fast and have less odor. Oil-based paints offer a strong, durable coat but take longer to dry. Consider the room’s lighting and decor when choosing color or finish type.
Tips For Even Coating
Start with clean, sanded wood for a smooth surface. Use a good quality brush or foam applicator to avoid streaks. Apply thin, even coats instead of thick layers. Let each coat dry fully before adding the next. Lightly sand between coats to remove bumps. Work in a dust-free area to keep the finish clean. Move the brush in the wood grain direction for best results.

Credit: www.youtube.com
Maintaining Your Console Table
Maintaining your console table keeps it looking fresh and lasts longer. Regular care protects the wood and finish from damage. A little effort every week makes a big difference over time.
Cleaning Tips
Dust your console table often with a soft cloth. Avoid rough materials that can scratch the surface. Use a damp cloth for sticky spots, then dry immediately. Choose mild soap mixed with water for deeper cleaning. Never soak the wood to prevent warping or damage.
Repairing Minor Damages
Small scratches or dents are easy to fix at home. Use a wood filler or wax stick matching your table’s color. Gently rub it into the damaged area and wipe off excess. Light sanding smooths rough patches before applying touch-up stain. Regular checks catch problems early before they worsen.
Frequently Asked Questions
What Materials Do I Need To Build A Console Table?
You need wood, screws, wood glue, sandpaper, and paint or stain. Choose quality wood like pine or oak for durability and appearance.
How Long Does It Take To Build A Console Table?
Building a console table usually takes 4 to 6 hours. Time depends on your skill level and complexity of the design.
What Tools Are Essential For Console Table Construction?
Essential tools include a saw, drill, screwdriver, measuring tape, and clamps. These help ensure precise cuts and secure assembly.
Can Beginners Build A Console Table Easily?
Yes, beginners can build a console table by following step-by-step plans. Start with simple designs to gain confidence and skills.
Conclusion
Building your own console table is a fun and rewarding project. It lets you create furniture that fits your space perfectly. You control the design, size, and finish. The tools and steps are easy to follow. You save money compared to buying ready-made tables.
Plus, you gain useful skills for future projects. Take your time and enjoy the process. Soon, you will have a unique table made by your own hands. Give it a try and see the difference yourself!