Do you love your bookshelf but wish it could hold just a little more? Adding a bookshelf extension is a simple way to create extra space without buying a new unit.
Imagine having more room for your favorite books, decorations, or even that growing collection of photo albums. In this guide, you’ll learn how to make a bookshelf extension step-by-step, using easy tools and materials. By the end, you’ll have a custom piece that fits perfectly with your existing shelf.
Ready to transform your space and keep your collection organized? Let’s get started!
Planning Your Bookshelf Extension
Planning your bookshelf extension is the first step to a successful project. Careful planning helps you avoid mistakes and saves time. It ensures the new shelf fits well and looks good with your existing furniture.
Think about how much space you have, the style you want, and the materials to use. This way, your bookshelf extension will be both useful and attractive.
Measuring Available Space
Start by measuring the space where you want the extension. Use a tape measure for length, width, and height. Write down your numbers to avoid confusion later.
Measure carefully around obstacles like doors or vents. Check if the floor is level to keep your shelf stable. Accurate measurements make your work easier and more precise.
Choosing The Right Design
Think about the shape and style of your extension. Match it with your current bookshelf for a uniform look. Decide if you want open shelves or ones with doors.
Consider how many books or items you will store. Choose a design that fits your needs and space. Simple designs are easier to build and look neat.
Selecting Materials
Pick materials that suit your budget and style. Wood is common and sturdy. Choose types like pine, oak, or plywood depending on your preference.
Consider the finish. Paint or stain can protect the wood and improve appearance. Use screws and brackets that match your materials for strong support.

Credit: www.youtube.com
Gathering Tools And Supplies
Gathering the right tools and supplies is the first step to build a bookshelf extension. Having everything ready makes the project smooth and faster. It helps avoid interruptions and mistakes. This section lists all essential tools and recommended materials. Prepare well to create a sturdy and beautiful bookshelf extension.
Essential Tools Checklist
- Measuring tape for accurate dimensions
- Power drill for making holes and driving screws
- Screwdriver set for manual adjustments
- Hand saw or circular saw to cut wood
- Level tool to ensure shelves are straight
- Clamps to hold pieces firmly while working
- Sandpaper or electric sander for smooth edges
- Pencil and square for marking cuts and angles
Recommended Materials
- Wood boards, preferably pine or plywood, for shelves
- Screws suitable for wood, various sizes
- Wood glue for extra strength between joints
- Wood filler to cover holes or cracks
- Paint or wood stain for finishing and protection
- Brackets or supports for added stability
- Protective gear such as safety glasses and gloves
Preparing The Workspace
Preparing the workspace is a key step before starting your bookshelf extension. A clean and safe area helps you work faster and avoid accidents. It also makes the process more enjoyable and organized. Take time to set up everything properly.
Clearing The Area
Remove all items near the bookshelf. This includes books, decorations, and furniture. Clear space gives you room to move and work comfortably. Sweep or vacuum the floor to avoid dust and dirt. A tidy area helps you focus on the task.
Safety Precautions
Wear safety glasses to protect your eyes from dust and wood chips. Use gloves to avoid splinters and sharp edges. Keep tools in good condition and handle them carefully. Make sure the workspace has good lighting. Always work slowly and pay close attention to your actions.
Building The Bookshelf Extension
Building a bookshelf extension is a fun and practical project. It lets you expand your storage space easily. This guide will help you create a sturdy and attractive extension. Follow each step carefully for the best results.
Start with precise measurements and good tools. Accuracy ensures your extension fits perfectly with your existing shelf.
Cutting The Wood
Measure the wood pieces according to your design. Use a saw to cut the panels and supports. Cut slowly to keep straight, clean edges. Sand all cut edges to avoid splinters. Take your time; neat cuts make assembly easier.
Assembling The Frame
Begin by joining the side panels and base. Use screws or nails to connect the parts firmly. Check the frame’s corners with a square tool. Make sure all angles are 90 degrees. Tighten all fasteners to keep the frame strong.
Adding Shelves
Mark the shelf positions inside the frame. Attach supports or brackets for each shelf. Place shelves on the supports and secure them. Ensure shelves are level and stable. This step gives your extension the needed strength.
Finishing Touches
Finishing touches make your bookshelf extension look neat and last longer. Careful work here improves both safety and style. Follow these simple steps to complete your project.
Sanding And Smoothing
Start by sanding all surfaces with medium-grit sandpaper. This removes rough edges and splinters. Next, use fine-grit sandpaper for a smooth finish. Wipe the dust off with a damp cloth. Smooth wood feels better and looks cleaner.
Painting Or Staining
Choose paint or stain that matches your existing bookshelf. Paint gives a solid color and hides imperfections. Stain shows wood grain and adds warmth. Apply with a brush or cloth in thin layers. Let each layer dry before applying the next.
Securing The Extension
Attach the extension firmly to the original bookshelf. Use screws or brackets for strong support. Check that the extension is level and stable. Tighten all fasteners to prevent wobbling. A secure extension keeps books safe and shelves steady.
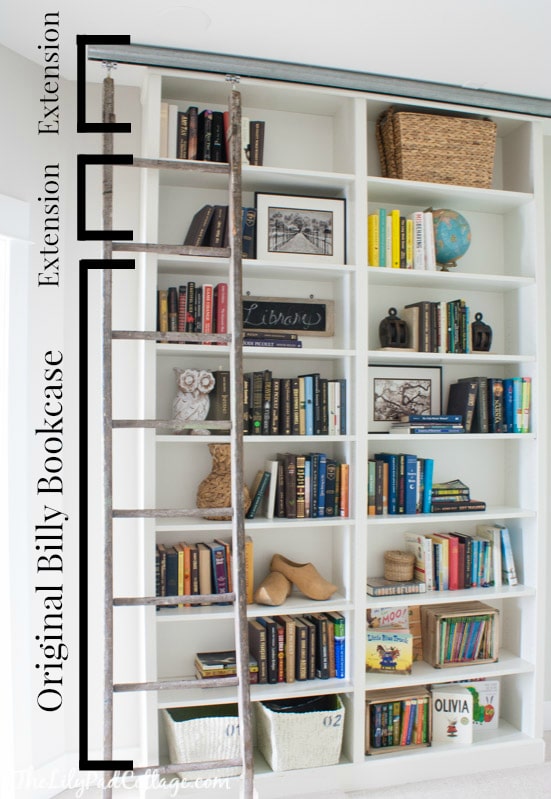
Credit: www.thelilypadcottage.com
Maximizing Storage Efficiency
Maximizing storage efficiency is key when building a bookshelf extension. It helps keep your space tidy and your items easy to find. A well-organized shelf uses every inch wisely, making your room look neat and spacious.
Smart storage means arranging books and other items thoughtfully. It also involves adding tools like bins and dividers to separate and group your belongings. These steps prevent clutter and save time searching for things.
Organizing Books And Items
Start by sorting books by size or category. Place taller books on one side and smaller ones on the other. Group similar topics or genres together to keep your collection clear.
Use vertical space by stacking some books horizontally. This creates layers and allows more books on each shelf. Place frequently used items at eye level for easy access.
Add small decorative items between books to fill empty spots. This breaks the monotony and adds personality to your shelf.
Using Decorative Bins And Dividers
Decorative bins help store loose items like notebooks, pens, or cables. Choose bins that match your room’s style for a clean look. Label each bin to find items quickly.
Dividers keep books and objects upright and separate. They prevent items from falling over and mixing up. Use adjustable dividers for shelves with different sized items.
Bins and dividers make your bookshelf look organized and stylish. They create zones, so everything has a place and stays neat.
Maintaining Your Bookshelf Extension
Maintaining your bookshelf extension keeps it safe and looking good. Regular care helps it last longer and hold more books. Small efforts prevent damage and keep the shelf steady. Follow simple steps to clean and check its stability.
Cleaning Tips
Dust your bookshelf extension often. Use a soft cloth or duster for gentle cleaning. Avoid wet cloths that can damage wood or paint. For sticky spots, use a slightly damp cloth and dry fast. Keep the shelf dry to stop mold or warping. Clean corners and edges carefully to remove all dust. Regular cleaning keeps your shelf fresh and neat.
Checking For Stability
Check your bookshelf extension regularly for loose screws or parts. Gently shake the shelf to see if it wobbles. Tighten any loose screws or bolts with a screwdriver. Look for cracks or splits in the wood or joints. Replace or fix broken parts right away. Make sure the shelf is well balanced on the wall or base. A stable shelf holds books safely and prevents accidents.

Credit: songbirdblog.com
Frequently Asked Questions
What Materials Do I Need For A Bookshelf Extension?
You need wood panels, screws, brackets, wood glue, sandpaper, paint or stain, measuring tape, and a drill. These basic materials ensure a sturdy and visually pleasing bookshelf extension.
How Do I Measure For A Bookshelf Extension?
Measure the width, height, and depth of your existing bookshelf. Ensure the extension matches these dimensions for a seamless fit and proper balance.
Can I Build A Bookshelf Extension Without Professional Tools?
Yes, basic tools like a drill, screwdriver, measuring tape, and level are sufficient. Avoid complex tools to keep the project beginner-friendly and affordable.
How Do I Attach The Extension Securely To The Bookshelf?
Use brackets and screws to connect the extension firmly. Apply wood glue for extra stability and clamp while drying to ensure a tight bond.
Conclusion
Building a bookshelf extension is simple and useful. It saves space and keeps books organized. You only need a few tools and materials. Follow the steps carefully to get good results. Take your time and enjoy the process. A sturdy shelf can last for many years.
Try adding your personal touch with paint or decorations. This project helps you improve your skills too. Start today and see how easy it is to create extra storage.
