Are you looking for a simple and creative way to add storage and style to your space? Making a bookshelf from crates is a fun, budget-friendly project that anyone can tackle.
Imagine turning plain wooden crates into a unique shelf that holds your favorite books, decor, and memories. In this guide, you’ll discover easy steps and smart tips to build a sturdy, eye-catching bookshelf that fits perfectly in your home. Ready to transform your space and impress your guests?
Keep reading to find out how!

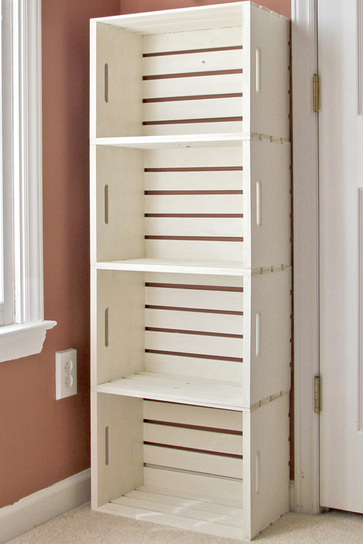
Credit: smokymountainfarmhouse.com
Choosing The Right Crates
Choosing the right crates is key to building a sturdy and attractive bookshelf. The type, size, and material of the crates affect the shelf’s look and strength. This guide helps pick the best crates for your project.
Types Of Crates
Wooden crates are the most popular choice. They offer a natural look and strong support. Plastic crates are lightweight and easy to clean but may not hold heavy books well. Metal crates add an industrial style but can be heavy and hard to work with. Consider the style you want and the weight of your books.
Size And Shape Considerations
Standard crate sizes fit well in most rooms. Square crates create a balanced look and fit many items. Rectangular crates offer more shelf space but may look less uniform. Measure your space before buying. Stack crates that align well for stability. Keep in mind the height of your tallest books.
Material Options
Wood crates come in pine, oak, and plywood. Pine is soft and easy to paint. Oak is stronger and lasts longer but costs more. Plywood is affordable and lightweight but less durable. Plastic crates resist moisture and are easy to clean. Metal crates are tough but can scratch floors. Choose materials based on use and style.
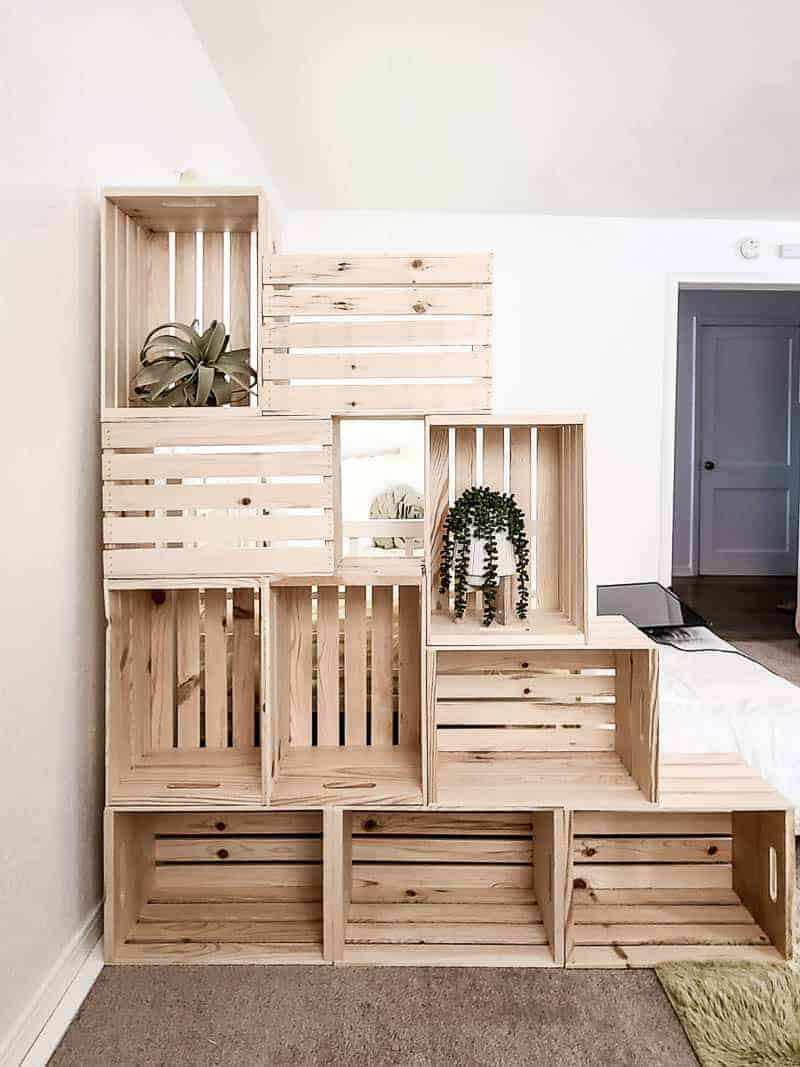
Credit: www.calmcradle.com
Gathering Tools And Supplies
Before starting your bookshelf project, gather all tools and supplies. This step saves time and keeps work smooth. Having the right items helps build a strong and neat bookshelf. Prepare everything in one place before you begin.
Essential Tools
Get a drill for screwing crates together. A screwdriver will help tighten screws manually. Use a measuring tape to check crate sizes and space. A pencil marks cutting lines and drilling spots. Sandpaper smooths rough crate edges. A level makes sure the shelf is straight.
Additional Materials
Collect wooden crates in good condition for the shelf. Buy screws that fit the crate wood. Consider wood glue for extra strength. Paint or wood stain can improve the look. Felt pads protect floors from scratches under the shelf.
Safety Gear
Wear safety glasses to protect your eyes from dust. Use gloves to keep hands safe from splinters. A dust mask stops you from breathing wood dust. Work in a well-ventilated area to avoid fumes from paint or glue.
Preparing The Crates
Preparing the crates is an important step before building your bookshelf. It makes sure the crates look good and last longer. Taking time to clean, sand, and finish the crates helps create a strong and attractive piece of furniture.
Cleaning And Sanding
Start by cleaning each crate with a damp cloth. Remove dust, dirt, and any sticky spots. Check for rough edges or splinters. Use sandpaper to smooth the wood surfaces. Sand all sides, especially corners and edges. This step helps paint or stain stick better. It also makes the crates safe to handle.
Painting Or Staining
Choose paint or stain based on your style choice. Paint offers bright colors and full coverage. Stain shows the wood’s natural grain and texture. Apply a thin, even coat with a brush or cloth. Cover all visible surfaces of the crates. Let the first coat dry, then add a second coat if needed. This improves durability and appearance.
Drying Time
Allow the crates to dry fully before assembling. Drying times vary by paint or stain type. Follow the product’s instructions for best results. Avoid rushing to prevent smudges or damage. Proper drying ensures a clean, strong finish. It also helps your bookshelf last longer.
Designing Your Bookshelf
Designing your bookshelf from crates is a fun and creative process. It allows you to customize the size and shape to fit your space. You can create a simple or complex design based on your needs.
Think about how many books you want to store and the style you prefer. Planning the design helps you avoid mistakes during building. Let’s explore some ideas for layout, stacking, and securing the crates.
Layout Ideas
Start by choosing a layout that suits your room. You can arrange crates in a straight line for a classic look. Try a square or rectangle shape for a compact design.
Consider a staggered layout for a modern style. Mixing crate sizes adds visual interest. Draw your design on paper before you begin.
Stacking Techniques
Stack crates carefully to keep the shelf stable. Place larger crates at the bottom for better support. Align edges to create even rows.
Use a brick-like pattern to increase strength. Avoid tall stacks that may tip over easily. Balance the weight by distributing heavy books evenly.
Securing The Crates
Secure crates to prevent wobbling or falling. Use screws or nails to join crates together. Attach brackets inside the corners for extra support.
For added safety, fix the bookshelf to the wall. Choose hardware that fits your wall type. Double-check all connections before loading books.
Assembling The Bookshelf
Assembling your bookshelf from crates is a fun and simple project. It turns plain crates into a stylish storage space. This part shows how to put everything together safely and neatly.
Step-by-step Assembly
Start by laying out all the crates on a flat surface. Arrange them in the shape you want for your bookshelf. Check if the sides match and fit well. Join the crates one by one. Use clamps or ask for help to hold them steady. Take your time to align edges perfectly. This makes the shelf look good and last long.
Using Screws And Brackets
Secure the crates using screws designed for wood. Pick screws long enough to join two crates firmly. Use a drill to make pilot holes first. This stops the wood from splitting. Place metal brackets inside corners for extra support. Screw them tightly but carefully. Brackets keep the bookshelf strong and prevent wobbles.
Ensuring Stability
Check the shelf’s balance by pressing gently on different parts. Add extra screws or brackets if it feels loose. Fix the shelf to the wall with brackets or straps. This keeps it from tipping over. Place heavier items on the bottom crates. This lowers the center of gravity. Stability makes your bookshelf safe for books and kids.
Credit: www.makingmanzanita.com
Customizing Your Storage
Customizing your storage with crates lets you create a bookshelf that fits your space and style. You can make it simple or add special touches. This section shows easy ways to make your crate bookshelf unique and practical.
Adding Shelves Or Dividers
Adding shelves or dividers helps organize your books better. You can cut wood pieces to fit inside each crate. Place them horizontally or vertically to create smaller sections. This gives each item a proper space and keeps your shelf neat.
Incorporating Decorative Elements
Decorative elements make your bookshelf stand out. Paint the crates in colors that match your room. Use stencils or patterns for a creative touch. You can also sand the wood for a smooth, rustic look that adds charm.
Personalizing With Accessories
Accessories add personality to your bookshelf. Place small plants, photo frames, or candles on the shelves. Use baskets or boxes inside crates to hold loose items. These details make your bookshelf cozy and reflect your style.
Maintaining Your Bookshelf
Maintaining your bookshelf made from crates keeps it strong and looking good. Regular care helps avoid damage and extends its life. Small efforts protect your investment and make your space neat.
Cleaning Tips
Dust your bookshelf often using a soft cloth or duster. Avoid using wet cloths that can damage the wood. For sticky spots, use a damp cloth and dry it quickly. Clean inside the crates to remove hidden dust and dirt. Keep the area around the bookshelf clean to reduce dust buildup.
Repairing Damage
Check your bookshelf for loose nails or screws regularly. Tighten or replace any that are weak. Fill small cracks or holes with wood filler and sand smooth. For broken crates, use wood glue and clamps to fix them. Replace any parts that are too damaged to repair safely.
Long-term Care
Place the bookshelf away from direct sunlight to prevent fading. Keep it away from moisture to avoid warping or mold. Use coasters or mats under plants or drinks on the shelf. Apply a wood sealant or polish once a year to protect the wood. Rotate books and items to avoid uneven wear on the crates.
Frequently Asked Questions
What Materials Are Needed To Make A Crate Bookshelf?
You need wooden crates, screws, a drill, sandpaper, and paint or stain. Optional items include wood glue and brackets for extra support. These materials are affordable and easy to find at hardware stores or online.
How Do I Assemble Crates Into A Sturdy Bookshelf?
Arrange crates in your desired layout, then drill screws through the sides to join them. Sand rough edges and secure with wood glue if needed. Ensure stability by attaching the bookshelf to a wall for safety.
Can I Customize The Size Of My Crate Bookshelf?
Yes, you can customize by choosing the number and size of crates. Stack or arrange crates vertically or horizontally to fit your space. Painting or staining can also personalize the appearance to match your decor.
How Do I Finish And Protect A Crate Bookshelf?
Apply a coat of paint, stain, or sealant to protect wood from wear. Use a brush or spray for even coverage. Allow drying time between coats to ensure durability and a polished look.
Conclusion
Making a bookshelf from crates is simple and fun. You only need a few tools and some creativity. This project saves money and helps recycle old materials. You can paint or stain the crates to match your style. It fits well in any room and holds many books.
Try building one yourself to enjoy a unique and useful shelf. Crafting with crates brings a special touch to your home. Give it a try—you might like the result more than you expect.