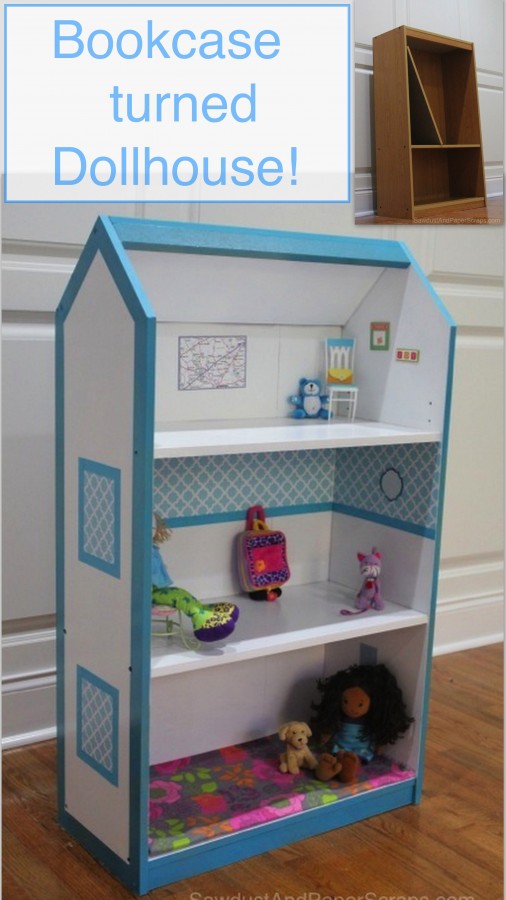
Have you ever thought about turning your old bookshelf into a magical dollhouse? It’s easier than you think, and the result can be a beautiful, custom play space that your child will love.
Imagine transforming plain shelves into cozy rooms filled with tiny furniture and fun decorations. In this guide, you’ll discover simple steps to make your bookshelf come alive as a dollhouse. Ready to bring creativity and charm into your home? Keep reading to find out how you can make this fun project happen!
Choosing The Right Bookshelf
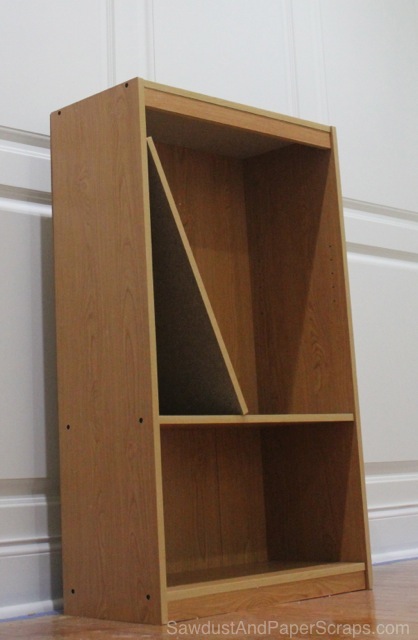
Choosing the right bookshelf is the first step to create a beautiful dollhouse. The bookshelf sets the base for your project. It affects how much space you have and how sturdy the dollhouse will be. Think about size, material, and style before you start. These factors make your project easier and more fun.
Size And Shape Considerations
Pick a bookshelf that fits the space where you want the dollhouse. Tall bookshelves offer more rooms to decorate. Wide shelves give extra play areas. Check shelf height too. Make sure each shelf is tall enough for dolls and furniture. Square or rectangular shapes work best for dollhouses. Odd shapes can be tricky to use.
Material And Durability
Wood bookshelves are strong and last long. They hold weight well and look nice. Particleboard or MDF shelves are cheaper but less sturdy. Avoid very thin or weak shelves. The dollhouse will be used often. It needs to stand up to play without breaking. Smooth surfaces are easier to paint and decorate.
Style And Design Options
Choose a bookshelf style that fits your dollhouse theme. Simple shelves let you add your own decorations. Vintage or rustic styles add character without much work. Some shelves have closed backs; others are open. Open backs allow light inside the dollhouse. This makes it look bright and inviting. Consider shelves with adjustable heights for flexible room sizes.
Credit: sawdustgirl.com
Preparing The Bookshelf
Preparing the bookshelf is the first step to turning it into a dollhouse. This stage sets the base for your project. It helps ensure the dollhouse looks neat and lasts long. Proper preparation makes the next steps easier and more fun.
Start by cleaning, sanding, and adjusting the shelves. Then, paint and finish the surface. Each step changes the bookshelf into a perfect dollhouse frame.
Cleaning And Sanding
Clear the bookshelf of dust and dirt. Use a damp cloth to wipe all surfaces. Let it dry completely before moving on.
Sand the bookshelf to smooth rough areas. Light sanding removes old paint or finish. This helps new paint stick well. Use fine-grit sandpaper for the best results. Sand corners and edges gently to avoid damage.
Painting And Finishing
Choose paint that is safe and non-toxic. Pick colors that fit your dollhouse theme. Use a small brush to reach tight spots.
Apply one or two thin coats of paint. Let each coat dry fully before adding another. Paint inside and outside the bookshelf for a clean look.
Finish with a clear sealant to protect the paint. This makes the dollhouse durable and easy to clean. Use a matte or glossy finish based on your style.
Removing Or Adjusting Shelves
Decide which shelves to keep or remove. Removing shelves creates open spaces for rooms. Adjust shelves to fit furniture and dolls.
Use a screwdriver to take out screws or clips. Store removed shelves safely for future use. Sand and paint shelf edges after removal.
Make sure shelves are stable after adjusting. Secure loose shelves with brackets or glue. This keeps the dollhouse safe for play.
Designing The Dollhouse Layout
Designing the dollhouse layout is a fun and creative step. It shapes how the dollhouse will look and feel. A good layout makes playing or displaying the dolls more enjoyable. It also helps to organize space wisely inside the bookshelf. Careful planning gives each room its own purpose and charm.
Think about the size and shape of the bookshelf shelves. Each shelf can become a different room or space. Visualize how dolls will move from one room to another. This helps to decide the best layout for the dollhouse.
Planning Rooms And Spaces
Start by dividing the bookshelf into rooms. Decide what type of rooms you want. Living room, kitchen, bedroom, or bathroom are common choices. Keep rooms simple and clear. Make sure each room is large enough for the dolls. Use tape or paper to mark room borders on the shelves. This step helps to see the final design before building.
Incorporating Doors And Windows
Doors and windows bring life to the dollhouse. They add realism and charm. Plan where to place doors for easy doll movement. Windows let light in and make rooms look bigger. Use small craft materials or cut shapes from cardboard. Attach them securely to the bookshelf. Think about the style—arched, square, or round windows fit different looks.
Adding Floors And Partitions
Floors and partitions divide space inside each shelf. Use thin wood, cardboard, or foam board for floors. Partitions create walls between rooms. Make sure floors are stable and fit well. Partitions should be tall enough to separate rooms clearly. Glue or small nails work well to fix them in place. This step helps to customize the dollhouse layout perfectly.
Credit: sawdustgirl.com
Decorating And Detailing
Decorating and detailing a bookshelf turned dollhouse brings your creation to life. It transforms plain shelves into cozy, playful rooms. Every detail adds charm and tells a story. Small touches make a big difference. Creativity flows in choosing colors, textures, and accessories. This stage invites imagination and fun.
Wallpaper And Flooring Ideas
Wallpaper sets the mood in each room. Choose bright patterns for playrooms or soft pastels for bedrooms. Use scrapbook paper or fabric for easy wallpaper. Cut it to fit each shelf space perfectly. Flooring can be made with felt, cork, or small pieces of wood. Rugs add warmth and texture. Mixing colors and patterns creates a lively look.
Furniture And Accessories
Mini furniture brings the dollhouse to life. Use small wooden blocks or dollhouse kits for tables and chairs. Handmade pieces from cardboard or clay add a personal touch. Accessories like tiny books, plants, and dishes create a lived-in feel. Keep furniture size in scale with shelf spaces. Simple details make rooms cozy and inviting.
Lighting And Electrical Features
Lighting adds magic to your dollhouse. Battery-operated LED lights work well and are safe. Place small lamps in corners or overhead lights on the ceiling. String lights add a soft glow in bedrooms or living rooms. Think about light switches for easy control. Lighting highlights your decorations and makes playtime more fun.
Safety Tips And Maintenance
Turning a bookshelf into a dollhouse is fun and creative. Safety and maintenance are key to keep it safe and lasting long. Simple steps help protect children and keep the dollhouse neat. This section covers important safety tips and ways to maintain your project.
Using Non-toxic Materials
Choose paints and glues labeled non-toxic. These materials are safe if children touch or smell them. Avoid products with strong fumes or harmful chemicals. Look for water-based paints for easy cleaning. Non-toxic supplies keep your dollhouse safe for play.
Securing Small Parts
Small parts can be choking hazards. Attach tiny decorations firmly to the dollhouse. Use strong glue or small screws that do not come loose. Check parts often for wear or damage. Remove any broken pieces immediately to avoid accidents.
Cleaning And Upkeep
Dust and dirt can build up quickly. Clean the dollhouse gently with a soft cloth. Avoid harsh cleaners that damage paint or materials. Check for loose parts during cleaning. Regular upkeep keeps the dollhouse safe and beautiful for longer.
Creative Variations
Transforming a bookshelf into a dollhouse opens many creative doors. You can design it in different ways to fit your style. Each variation makes the dollhouse unique and fun to play with. Explore creative ideas to make your project stand out.
Themed Dollhouses
Create a dollhouse with a clear theme. A beach house, fairy tale castle, or a modern city apartment. Themes add charm and make decorating easier. Use colors, furniture, and tiny decorations to match the theme perfectly. Themes bring stories to life in the dollhouse.
Interactive Elements
Add interactive parts for more fun and play. Doors that open and close, tiny lights that turn on, or drawers that pull out. These features make the dollhouse feel alive. Kids enjoy exploring and using these moving parts. Simple additions increase the dollhouse’s appeal.
Upcycling Other Furniture
Use old furniture pieces besides bookshelves. Small cabinets, drawers, or wooden crates can become dollhouses. Upcycling saves money and helps the environment. It also gives the dollhouse a unique look. Mix and match furniture to create different shapes and sizes.

Credit: mamapapabubba.com
Frequently Asked Questions
How Do I Convert A Bookshelf Into A Dollhouse?
Start by choosing a sturdy bookshelf. Remove some shelves to create rooms. Paint and decorate each section creatively. Add miniature furniture and dolls to complete the look.
What Materials Are Needed To Transform A Bookshelf?
You’ll need paint, brushes, wallpaper, glue, and miniature accessories. Also, consider tools like a screwdriver for shelf adjustments. Choose child-safe, non-toxic materials for safety.
How Long Does It Take To Make A Dollhouse Bookshelf?
It typically takes 4 to 8 hours depending on complexity. Painting and drying times affect the total duration. Planning and preparation can reduce overall time spent.
Can I Customize The Dollhouse Design On The Bookshelf?
Yes, customization is easy with paint and removable decorations. You can add themed wallpaper, lighting, or unique furniture. Tailor it to your child’s interests or room decor.
Conclusion
Transforming a bookshelf into a dollhouse brings fun and creativity together. You get a unique toy that also saves space. Each step lets you add your personal touch. Kids love playing in a dollhouse they helped make. Plus, it’s a great way to reuse old furniture.
Try different colors and decorations to make it special. This project fits many budgets and skill levels. Enjoy building memories while crafting a charming play area. Start today and watch your bookshelf turn into a magical dollhouse.