Looking for a unique way to organize your coats and add a touch of nature to your home? You can easily create a stunning coat rack using tree branches.
This simple project not only saves money but also brings a rustic charm that store-bought racks can’t match. Imagine turning ordinary branches into a beautiful, functional piece that impresses your guests and keeps your space tidy. Ready to transform your entryway with something handmade and natural?
Keep reading to discover how you can make your own coat rack from tree branches—step by step.
Gathering Materials
Gathering materials is the first step in making a coat rack from tree branches. Choosing the right materials helps create a strong and beautiful rack. This part is simple but important. It sets the stage for the whole project.
Choosing The Right Branches
Select branches that are sturdy and thick enough to hold coats. Look for branches with interesting shapes and few cracks. Avoid dry or weak wood that can break easily. Freshly cut branches work best because they are less likely to snap. Make sure the branches are long enough for your needs. Smooth bark is easier to clean and looks neat on a coat rack.
Additional Supplies Needed
Besides branches, gather a few basic tools and materials. You will need sandpaper to smooth rough spots. A saw helps cut branches to the right size. Wood glue or screws will hold the pieces together. A drill may be necessary for making holes. Finish the rack with paint or varnish to protect the wood. Hooks or pegs are useful for hanging coats securely.

Credit: www.youtube.com
Preparing The Branches
Preparing the branches is the first step in making a coat rack from tree branches. This step ensures the branches are safe, clean, and ready to use. Proper preparation helps your coat rack last longer and look better.
Cleaning And Drying
Start by removing dirt, leaves, and loose bark from the branches. Use a stiff brush or cloth to clean the surface well. This removes dust and small debris that could cause damage later.
Next, dry the branches completely. Place them in a dry, sunny spot for several days. Dry wood is less likely to crack or grow mold. Check the branches often to make sure they dry evenly.
Trimming And Shaping
Trim any small twigs or sharp points from the branches. Use pruning shears or a small saw for this task. Shaping the branches makes them safer and easier to attach to your coat rack base.
Cut the branches to the desired length. Make sure they fit well together in your design. Smooth rough edges with sandpaper to avoid splinters. Well-shaped branches improve both the look and function of your coat rack.
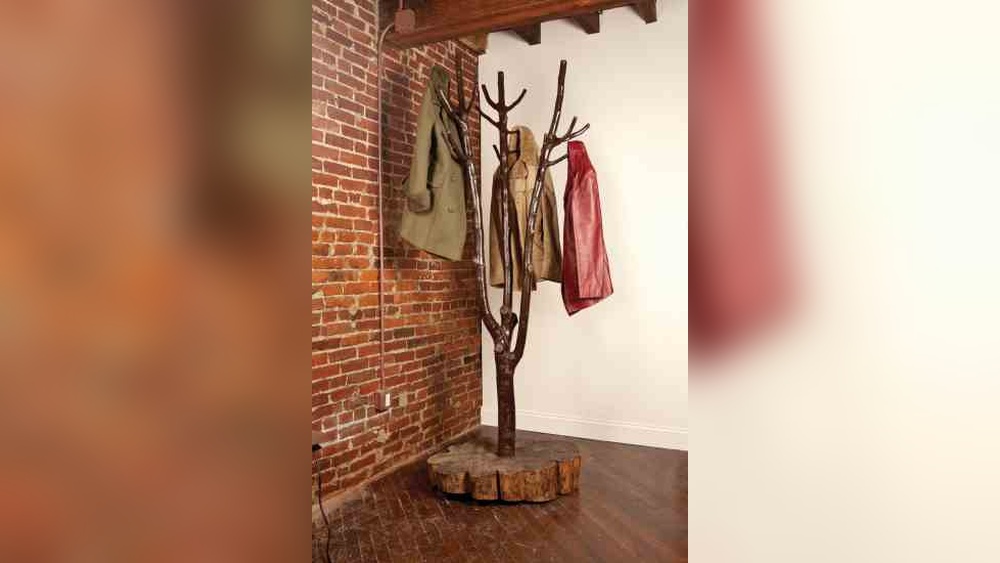
Assembling The Rack
Assembling the coat rack from tree branches is an exciting step. This part turns your ideas into a practical piece. Careful planning and simple tools make the process easier. Focus on stability and style to build a rack that lasts.
Design Layout Options
Choose a design that fits your space and needs. A simple vertical rack uses one main branch with smaller hooks. A ladder style leans against the wall for a rustic look. A horizontal rack with evenly spaced branches works well for many coats. Arrange branches to balance weight and shape. Test different layouts on the floor before building.
Joining Techniques
Secure branches using nails, screws, or strong glue. Wrap joints with natural rope for extra strength and decoration. Drill holes for wooden dowels to connect branches tightly. Use clamps while glue dries for firm bonds. Sand rough edges for a smooth finish. Check all joints to ensure the rack holds weight safely.

Credit: www.manmadediy.com
Finishing Touches
Finishing touches give your coat rack a polished, professional look. These steps protect the wood and make it safe to use. They also bring out the natural beauty of the tree branches. Taking time here makes a big difference in the final product.
Sanding And Smoothing
Start by sanding the branches to remove rough spots. Use medium-grit sandpaper first to smooth large bumps. Then switch to fine-grit sandpaper for a soft finish. Sand all sides, including the ends and hooks. This step prevents splinters and makes your coat rack safe. Take your time. Smooth wood feels better and looks nicer.
Applying Protective Coating
Choose a clear varnish or wood oil to protect the wood. Apply the coating evenly with a brush or cloth. Let the first layer dry completely before adding more. Two or three coats work best for durability. This layer keeps moisture out and stops cracking. It also highlights the wood’s natural colors and patterns. Protecting the wood helps your coat rack last for years.
Mounting And Installation
Mounting and installation are key steps in making your coat rack functional and safe. Proper placement and secure fixing ensure the rack holds coats without falling. Follow these simple tips to mount your coat rack made from tree branches.
Choosing A Location
Pick a spot near the entrance or hallway. This makes it easy to hang coats right away. Avoid places with direct sunlight to prevent wood damage. Choose a wall that can support the weight of coats and branches. Ensure the area has enough space for hanging multiple items.
Secure Wall Mounting Tips
Use strong screws and wall anchors for stability. Mark the wall where the branch will go before drilling. Drill holes that match the size of your anchors. Attach the branch with screws through pre-drilled holes. Check the rack’s balance by gently pulling it before use. Tighten screws if the rack feels loose. Use a level to keep the rack straight on the wall.

Credit: www.reddit.com
Creative Variations
Creative variations make a coat rack from tree branches truly unique. Small changes can add style and function. Simple ideas transform a basic rack into a piece of art.
Explore ways to decorate and customize your rack. These tips help match your home’s style and space.
Decorative Additions
Paint branches in soft or bright colors for a fresh look. Wrap twine or thin rope around parts of the branches to add texture. Attach small hooks or knobs in different shapes and colors. Add natural elements like pinecones or dried flowers for a rustic feel. Use varnish to give the wood a smooth, shiny finish that protects it.
Customizing For Different Spaces
For small spaces, use thinner branches and fewer hooks to save room. Hang the rack horizontally or vertically depending on wall space. In large rooms, create a wider rack with many branches for more hanging options. Add a shelf on top of the branches to hold hats or gloves. Use wall mounts with adjustable heights to fit different users’ needs.
Frequently Asked Questions
What Materials Do I Need For A Branch Coat Rack?
You need sturdy tree branches, sandpaper, screws, a drill, and wall anchors. Optionally, use wood finish or paint for protection and style.
How Do I Prepare Branches For A Coat Rack?
Clean and dry branches thoroughly. Sand the surface to remove rough spots and bark. This ensures a smooth finish and safe usage.
Can I Hang Heavy Coats On A Branch Rack?
Yes, if you select thick, strong branches and secure them properly. Use heavy-duty screws and wall anchors for stability.
How Do I Mount A Coat Rack Made From Branches?
Attach mounting brackets or screws to the back of the rack. Secure firmly into wall studs or use strong wall anchors.
Conclusion
Creating a coat rack from tree branches brings nature into your home. It saves money and adds charm. The steps are simple and fun to follow. You can customize it to fit your space and style. Using natural materials helps the environment too.
Try this project to enjoy a unique and useful item. It’s a great way to use creativity and hands-on skills. Start gathering branches and tools today. You’ll feel proud of your handmade coat rack.