Looking for a simple, stylish way to organize your coats and save space? You’re in the right place.
Making a coat rack out of a pallet is easier than you think—and it adds a unique, rustic touch to your home. Imagine turning a plain wooden pallet into a practical piece that welcomes your guests and keeps your entryway tidy.
Ready to discover how you can create your own coat rack step-by-step? Keep reading, and you’ll be surprised at how quickly this project comes together.

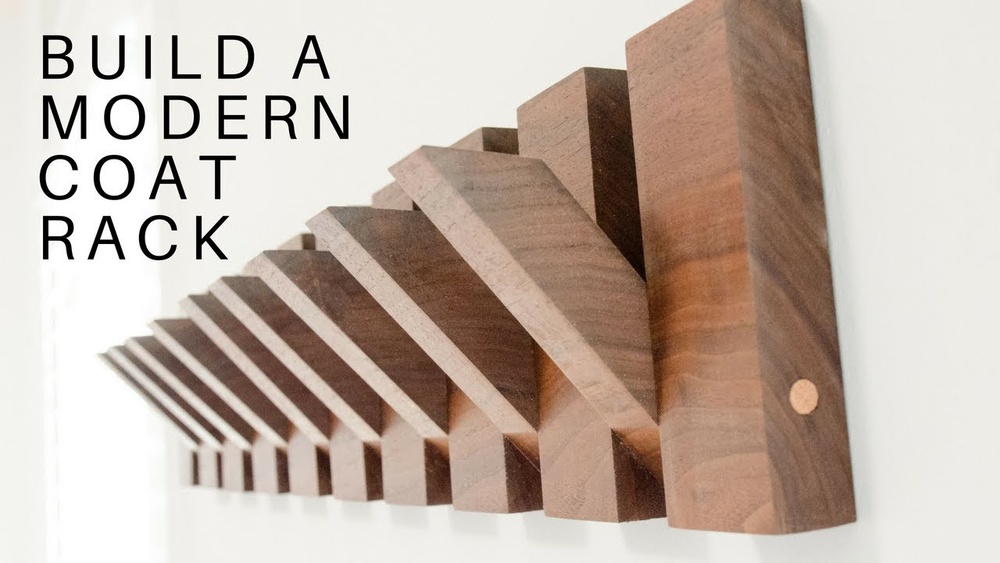
Credit: knickoftime.net
Choosing The Right Pallet
Choosing the right pallet is the first step to making a sturdy coat rack. Not all pallets are the same. Picking the proper one affects the rack’s strength and look. This guide helps you select a good pallet for your project.
Types Of Pallets To Use
Wooden pallets are best for coat racks. They are strong and easy to work with. Avoid plastic or metal pallets because they are hard to cut and shape. Look for hardwood pallets, like oak or maple. Softwood pallets, like pine, can also work but may be less durable.
Inspecting For Quality And Safety
Check the pallet for cracks and broken boards. Weak boards can break when you hang coats. Avoid pallets with mold, dirt, or stains. These can be unsafe or smell bad. Make sure the pallet is dry and clean. Look for stamps that show the pallet is heat-treated, not chemically treated. This keeps your coat rack safe to use indoors.
Gathering Tools And Materials
Starting a pallet coat rack project needs the right tools and materials. Collecting these items first saves time and helps the work go smoothly.
Knowing what tools and supplies are essential makes the process easier. This guide shows what you need to build a sturdy and stylish coat rack.
Essential Tools
Gather a hammer for nails and a screwdriver for screws.
A saw helps cut the pallet to the right size. Sandpaper smooths rough edges for safety.
Use a drill to make holes for hooks or screws. A tape measure ensures accurate cuts and placements.
Wear safety goggles to protect your eyes during cutting and drilling.
Additional Supplies
Find strong hooks or nails to hang coats and bags. Paint or wood stain adds color and protects the wood.
Use wood glue to strengthen joints and hold pieces together. A brush helps apply paint or stain evenly.
Sandpaper or a sanding block finishes the surface smoothly. Clean cloths remove dust before painting or staining.
Preparing The Pallet
Preparing the pallet is the first step in making a coat rack. This step ensures the pallet is safe and ready for use. A well-prepared pallet will make your project easier and the final product stronger. Take your time to clean, sand, and cut the pallet. This will give your coat rack a neat and polished look.
Cleaning And Sanding
Start by cleaning the pallet to remove dirt and dust. Use a brush or a cloth to wipe off loose debris. If needed, wash the pallet with water and mild soap. Let it dry completely before moving to sanding.
Sanding smooths the wood and removes rough spots. Use medium-grit sandpaper for the first pass. Then, switch to fine-grit sandpaper for a soft finish. Pay attention to edges and corners to avoid splinters.
Cutting To Size
Measure the pallet to fit your space. Mark the parts you want to cut using a pencil. Use a saw to cut the pallet carefully along the marks. Cut slowly to keep the wood clean and straight.
Cutting the pallet to size helps make the coat rack fit perfectly. It also removes unwanted parts and creates a good shape. Keep your measurements accurate for the best results.
Designing The Coat Rack
Designing the coat rack is the first step in creating a useful and attractive piece. Planning helps to ensure the rack fits your space and needs perfectly. A good design makes the rack sturdy and easy to use.
Selecting The Layout
Start by choosing the layout of your coat rack. You can go for a vertical or horizontal design, depending on your wall space. A vertical rack saves floor space, while a horizontal one spreads out hooks for easier access. Think about how many coats or items you want to hang. This will guide the size and shape of the pallet you use. Keep the design simple to match your room’s style.
Marking Hook Positions
Marking the hook positions carefully is important for balance and function. Space the marks evenly along the pallet boards. Leave enough room between hooks so coats do not overlap too much. Use a pencil and a ruler for straight, precise marks. Consider the height of users, placing hooks at comfortable levels. This step ensures your coat rack will be practical and neat.
Assembling The Rack
Assembling the coat rack is an exciting step. This is where your pallet starts to transform. Careful assembly ensures a sturdy and useful rack. Follow these simple steps for best results.
Attaching Hooks
Select hooks that fit the style and weight needs. Mark spots evenly across the pallet slats. Use a drill or screwdriver to fix hooks firmly. Make sure hooks face outward for easy hanging. Check that each hook is tight and secure.
Reinforcing Structure
Strengthen the rack by adding support pieces. Attach extra wooden slats behind the pallet if needed. Use screws or nails to hold them in place. Reinforce corners with metal brackets for extra stability. Test the rack by hanging a few items to check durability.
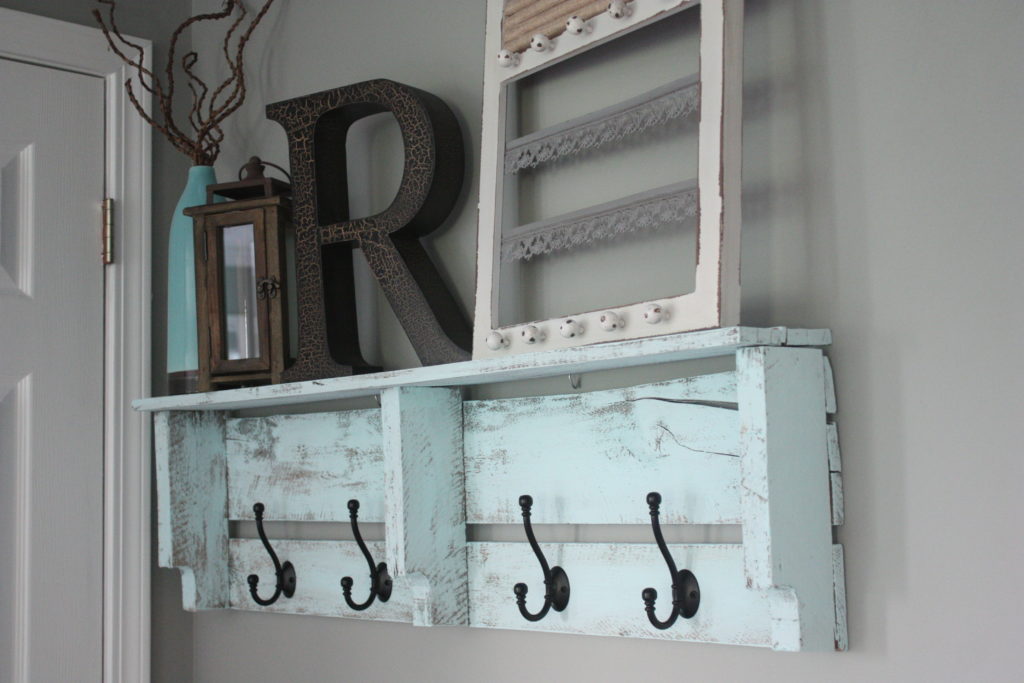
Credit: www.re-fabbed.com
Finishing Touches
Finishing touches give your pallet coat rack a polished, complete look. They protect the wood and make the rack last longer. These steps also let you customize your rack to fit your style and home decor.
Choose the right finish to enhance the wood’s natural beauty or add color. Seal the surface to guard against moisture, dirt, and daily wear. The final steps bring out the best in your handmade coat rack.
Painting Or Staining
Painting adds color and personality to your coat rack. Use a paint made for wood for smooth coverage. Light sanding before painting helps the paint stick better.
Staining shows the wood grain and gives a natural look. Pick a stain color that matches your room’s style. Apply with a brush or cloth, wiping off extra stain for even color.
Both painting and staining protect the wood and add charm. Choose based on your preferred style and the pallet wood condition.
Sealing For Durability
Sealing protects the coat rack from scratches and moisture. Use a clear polyurethane or wood sealer for strong protection. Apply thin coats and let each dry fully before the next.
This step keeps your rack looking new for years. It also makes cleaning easier. Seal both painted and stained surfaces for the best results.
Proper sealing means your pallet coat rack stays sturdy and beautiful. It handles daily use without damage or wear.
Mounting The Coat Rack
Mounting your pallet coat rack securely is essential for safety and function. A well-mounted rack holds coats firmly without risk of falling. This step involves choosing the right wall attachment and making sure the rack stays stable over time. Proper mounting keeps the rack level and ready for daily use.
Wall Attachment Options
There are several ways to attach a pallet coat rack to the wall. Using heavy-duty screws and wall anchors works well for drywall. For concrete or brick walls, use masonry screws or anchors. Picture hangers or French cleats offer an easy way to hang and remove the rack. Choose the method that fits your wall type and weight needs.
Ensuring Stability
Check that the rack is level before fully tightening screws. Use a spirit level for accuracy. Tighten all fasteners securely to avoid wobbling. Add extra brackets if the rack feels loose. Test the rack by gently pulling on it to confirm stability. A steady rack keeps coats safe and your space neat.

Credit: www.instructables.com
Maintenance Tips
Keeping your pallet coat rack in good shape helps it last longer. Simple care steps protect the wood and keep it looking nice. Regular checks stop small problems from growing. Follow these maintenance tips to enjoy your coat rack every day.
Cleaning Advice
Dust the coat rack with a soft cloth weekly. Use a damp cloth for sticky spots, then dry it well. Avoid harsh chemicals that can damage the wood. Mild soap and water work best for cleaning. Keep the rack dry to stop mold and mildew.
Repairing Minor Damages
Fix small cracks or scratches quickly to avoid bigger damage. Use wood filler or glue to mend splits. Sand rough areas gently after repairs. Tighten loose screws or nails to keep the rack stable. Regular repair keeps the rack safe and strong.
Frequently Asked Questions
How Do I Prepare A Pallet For A Coat Rack?
Start by cleaning the pallet thoroughly. Sand the wood to remove splinters. Remove any nails or staples. This ensures a smooth, safe surface for your coat rack.
What Tools Are Needed To Make A Pallet Coat Rack?
You will need a saw, hammer, nails or screws, drill, sandpaper, and a measuring tape. These tools help cut, assemble, and finish the pallet coat rack properly.
How Can I Customize My Pallet Coat Rack?
Paint or stain the wood to match your decor. Add hooks, shelves, or baskets for extra storage. Personalize it with decorative elements like stencils or labels.
How Long Does It Take To Build A Pallet Coat Rack?
Building a pallet coat rack usually takes 2 to 4 hours. Time depends on your skill level and the complexity of the design.
Conclusion
Making a coat rack from a pallet is simple and fun. You need just a few tools and some patience. This project saves money and helps the environment by reusing wood. You can paint or stain the rack to match your home style.
It also adds a personal touch to any room. Try it yourself and enjoy a useful, handmade coat rack. Everyone will notice your creativity and effort. Give your space a fresh, rustic look with this easy DIY idea.