Are you looking for a simple and stylish way to organize your books and display your favorite items? A cube bookshelf might be just what you need.
It’s easy to build, fits perfectly in any room, and lets you customize the size and look to match your space. In this guide, you’ll discover step-by-step instructions to make your own cube bookshelf, even if you’re new to woodworking.
By the end, you’ll have a beautiful, functional piece that brings order and charm to your home. Ready to get started? Let’s dive in!

Credit: www.workshop.bunnings.com.au
Materials And Tools Needed
Building a cube bookshelf needs the right materials and tools. Choosing good wood and having the right equipment makes the project easier and the result stronger. Safety is important too. Prepare everything before starting your build.
Wood Selection
Select wood that is strong and smooth for the bookshelf. Pine, oak, and plywood are good choices. Pine is soft and easy to cut. Oak is tough and lasts a long time. Plywood is stable and cost-effective. Choose wood that fits your budget and style. Make sure the wood pieces are straight and free of cracks.
Essential Tools
Gather all tools before starting your project. You need a saw to cut the wood. A drill helps to make holes for screws. Use a screwdriver or drill bit to fasten screws. Sandpaper smooths rough edges. A tape measure and pencil help with accurate marking. Clamps hold wood pieces in place while you work. A square tool ensures right angles.
Safety Gear
Protect yourself while building the bookshelf. Wear safety glasses to protect your eyes from dust and wood chips. Use ear protection if using loud tools. Gloves protect your hands from splinters. Wear a dust mask to avoid breathing sawdust. Work in a clean, well-lit area to prevent accidents. Safety gear keeps your work safe and comfortable.
Credit: www.familyhandyman.com
Designing Your Cube Bookshelf
Designing your cube bookshelf is the first step to a successful project. A clear design helps you build a sturdy and useful shelf. It also makes the building process smoother.
Think about your space and what you want to store. This will guide your design choices. Planning carefully saves time and materials.
Determining Dimensions
Start by measuring the space for your bookshelf. Note the height, width, and depth available. Decide how many cubes you want. Each cube should fit the items you plan to store.
Keep standard sizes in mind. Cubes often measure 12 to 15 inches per side. Adjust the size to fit books, decor, or baskets. Make sure the shelf will not be too tall or wide for your room.
Choosing The Layout
Think about how the cubes will be arranged. You can stack them vertically or spread them horizontally. A grid layout is common and easy to build. Mixing different cube sizes creates visual interest.
Plan the number of rows and columns. Consider leaving some open spaces for larger items. A balanced layout looks good and works well for storage.
Planning For Finishing Touches
Finishing touches improve the look and durability of your bookshelf. Choose paint or stain that matches your room’s style. Sand the wood smooth before painting or staining.
Think about adding back panels for stability. You can also add feet or casters to raise the shelf off the floor. Small details make a big difference in the final product.
Cutting And Preparing Wood
Cutting and preparing wood is the first step in building a cube bookshelf. It sets the base for a strong and neat shelf. Accuracy and care during this stage ensure all parts fit perfectly. This saves time and effort later.
Measuring And Marking
Start by measuring the wood pieces carefully. Use a tape measure for precise length. Mark each piece with a pencil. Double-check measurements to avoid mistakes. Clear marks guide clean cuts and reduce errors.
Cutting Techniques
Use a saw to cut along the marked lines. Choose a handsaw or power saw based on skill level. Cut slowly to stay on the line. Keep the wood stable with clamps. Smooth, straight cuts make assembly easier.
Sanding And Smoothing
After cutting, sand the edges and surfaces. Use medium-grit sandpaper first to remove rough spots. Follow with fine-grit sandpaper for smoothness. Smooth wood helps paint or stain stick better. It also prevents splinters and gives a clean look.
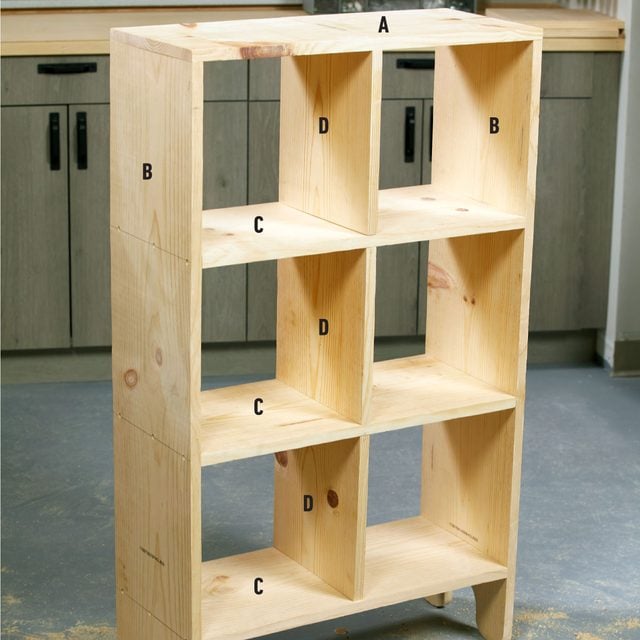
Assembling The Cubes
Assembling the cubes is the key step to build your cube bookshelf. It shapes the overall look and function. Each cube must fit well to hold books safely. Follow clear steps to join and secure them properly. This ensures a neat, strong bookshelf.
Joining Methods
Start by choosing the right joining method. Wood glue works well for smooth edges. Use screws for extra strength. Pocket holes are good for hiding screws. Clamps help hold parts tight while glue dries. Pick the method that suits your tools and skills.
Ensuring Stability
Place cubes on a flat surface during assembly. Check that edges line up exactly. Avoid gaps between pieces. Use a level to keep cubes straight. Stability stops wobbling and protects your books. Test the structure by gently pushing it. Fix any loose parts immediately.
Securing The Structure
Secure the cubes by adding corner braces inside. Attach small metal brackets for stronger joints. Tighten all screws fully but carefully. Reinforce the back with a thin plywood sheet. This adds support and stops swaying. Double-check each connection before finishing.
Finishing Your Bookshelf
Finishing your cube bookshelf gives it a polished, professional look. It also protects the wood from damage. This step makes your bookshelf last longer and look great in any room.
Applying Paint Or Stain
Choose a paint or stain that matches your room style. Use a brush or roller to apply it evenly. Let the first coat dry completely. Apply a second coat for better color and coverage. Stain shows the wood grain, while paint covers it fully.
Adding Protective Coating
Apply a clear protective finish to shield the wood. Polyurethane is a common choice for durability. Use a clean brush and apply thin, even layers. Let each layer dry before adding the next. This coating helps resist scratches and moisture.
Installing Optional Features
Add extra features to customize your bookshelf. Attach small legs to raise it off the floor. Install back panels to keep books from falling. You can also add hooks or small baskets for extra storage. These features make your bookshelf more useful and unique.

Credit: www.instructables.com
Placing And Styling
Placing and styling your cube bookshelf shapes the room’s look and feel. It helps keep your space neat and attractive. Smart placement makes the bookshelf easy to use. Thoughtful styling adds personality to your room. Small touches bring your shelf to life.
Choosing The Location
Pick a spot that fits your daily routine. Near a chair or desk works well for easy access. Avoid places with too much sunlight to protect your books. Make sure the shelf does not block walkways. A corner can save space and look cozy. Check the wall for stability if you plan to mount it.
Organizing Books And Decor
Group books by size or color for a tidy look. Mix vertical and horizontal stacks for visual interest. Use baskets or boxes in some cubes to hide clutter. Add small plants or framed photos to warm up the space. Leave some empty cubes for balance and airiness. Keep heavy items on lower shelves for safety.
Maintenance Tips
Dust your bookshelf regularly to keep it clean. Wipe with a dry or slightly damp cloth. Avoid harsh cleaners that can damage the finish. Tighten screws and check stability every few months. Rotate books and decor to avoid wear spots. Keep the shelf away from damp areas to prevent damage.
Frequently Asked Questions
What Materials Are Needed To Make A Cube Bookshelf?
You need wood panels, screws, wood glue, sandpaper, paint or stain, and a drill. These materials ensure a sturdy and durable cube bookshelf.
How Long Does It Take To Build A Cube Bookshelf?
Building a cube bookshelf typically takes 3 to 5 hours depending on your skill level and tools available. Preparation and drying time may extend this.
What Tools Are Essential For Making A Cube Bookshelf?
Essential tools include a saw, drill, screwdriver, measuring tape, and clamps. These tools help in accurate cutting and assembly of the bookshelf.
Can I Customize The Size Of My Cube Bookshelf?
Yes, you can adjust the dimensions of each cube to fit your space and storage needs. Custom sizes make the bookshelf versatile.
Conclusion
Building a cube bookshelf is a fun and useful project. You need only a few tools and materials. Follow the steps carefully and take your time. The result will be a strong, neat shelf for your books or items. You can paint or decorate it to match your room.
This project helps improve your skills and saves money. Enjoy your new bookshelf and the pride in making it yourself. Simple projects like this bring great satisfaction. Give it a try and see how easy it can be.