Looking for a simple way to organize your entryway and add a personal touch to your home? Making a homemade coat rack might be the perfect project for you.
Not only will it keep your coats, hats, and bags neatly in place, but it also gives you the chance to create something unique that fits your style. In this guide, you’ll discover easy steps and tips to build a coat rack that looks great and lasts long.
Ready to transform your space and enjoy a clutter-free home? Let’s get started!
Choosing The Right Materials
Choosing the right materials is key to building a sturdy and stylish coat rack. The materials affect how strong and durable your rack will be. They also shape how it looks in your home. Picking the right ones makes the project easier and more fun. This section helps you find the best materials for your coat rack.
Wood Options
Wood is a popular choice for coat racks. It feels warm and natural. Pine is soft, easy to cut, and budget-friendly. Oak is harder and lasts longer but costs more. Cedar resists moisture and smells good. Choose wood that fits your style and budget. Sand it smooth to avoid splinters. Finish with paint or stain for protection.
Metal And Other Materials
Metal adds a modern look and strong support. Steel and iron are very durable. They hold heavy coats well. Aluminum is lighter but still strong. You can also use hooks or brackets made of metal. Other materials like plastic or recycled items can work too. Make sure they can hold the weight of coats without bending or breaking.
Tools You’ll Need
Having the right tools makes building easier. A saw helps cut wood or metal to size. A drill creates holes for screws and hooks. Sandpaper smooths rough edges. Screws and nails hold pieces together. A measuring tape ensures accurate cuts. A level keeps your rack straight. Gather these tools before starting your project.

Credit: spec-school.org
Design Ideas For Coat Racks
Choosing the right design for a homemade coat rack can enhance any room’s look. Simple designs work well in small spaces. Bold, creative styles fit larger rooms and add personality.
Think about your space and how much room you have. Consider the number of coats or items you want to hang. This helps pick the best style for your needs.
Wall-mounted Racks
Wall-mounted racks save floor space and keep coats organized. They are easy to install on any wall. Use strong wood or metal for durability. Customize with paint or stain to match your decor. Add a shelf above for hats or small items. Perfect for hallways or entryways.
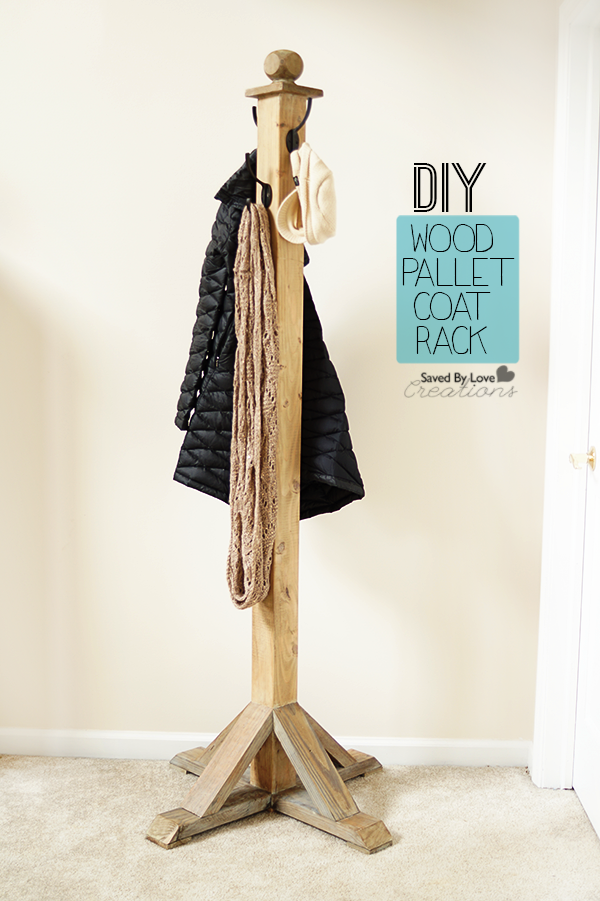
Freestanding Coat Racks
Freestanding racks are versatile and easy to move. Choose wood or metal frames for strength. They come in many shapes and sizes. Place them near doors or in corners. Some models have extra shelves or umbrellas holders. Ideal for rooms with more space.
Creative Hooks And Pegs
Hooks and pegs add charm and function to coat racks. Use different shapes or colors for a fun look. Attach them to a wooden board or directly on the wall. Group several hooks for more hanging space. Mix small and large hooks for coats and bags. A simple way to customize your rack.
Step-by-step Building Guide
Building a homemade coat rack is a simple and fun project. This guide breaks down the process into clear steps. Follow each step carefully to create a sturdy and attractive rack. You will need some basic tools and materials. The instructions suit beginners and experienced DIYers alike.
Measuring And Cutting
Start by measuring the wood pieces. Use a tape measure to get accurate lengths. Mark the wood with a pencil for cutting. Cut the wood with a saw along the marks. Smooth the edges with sandpaper for safety and neatness.
Assembling The Frame
Arrange the cut pieces to form the rack frame. Join the parts using screws or nails. Use a drill to make pilot holes for easy screwing. Check that the frame is square and stable. Tighten all fasteners to keep the frame strong.
Attaching Hooks Or Pegs
Choose hooks or wooden pegs for hanging coats. Space them evenly along the frame. Mark their positions clearly before fixing. Attach hooks with screws or nails. Press pegs firmly into pre-drilled holes for a secure fit.
Finishing Touches
Sand the entire rack to smooth rough spots. Apply paint, stain, or varnish for protection. Let the finish dry completely before use. Add rubber pads under the rack to protect floors. Your homemade coat rack is now ready for use.
Customizing Your Coat Rack
Customizing your coat rack makes it unique and fits your style perfectly. It also helps the rack match your room’s decor. Personal touches make it more than just a place to hang coats. They create a welcoming and organized space.
Painting And Staining
Choose paint or stain that matches your room’s colors. Bright paint can make the coat rack stand out. Wood stain shows the natural grain and adds warmth. Use smooth, even coats for a neat finish. Let each layer dry fully before adding another.
Adding Decorative Elements
Decorative hooks add charm and function. Use metal, ceramic, or wooden hooks for variety. Attach small shelves or baskets for extra storage. Add patterns or stencils with paint for a creative touch. These details make your coat rack more useful and stylish.
Personalizing With Labels Or Names
Labels help keep coats organized, especially in busy homes. Use simple tags or small chalkboards near each hook. Write names or categories clearly for easy use. Personal labels add a fun, practical touch. They help everyone find their spot quickly.
Placement And Installation Tips
Proper placement and installation make your homemade coat rack both useful and safe. Thoughtful positioning helps keep your space tidy. Secure mounting ensures the rack holds coats without falling. Stability keeps the rack steady and durable over time.
Choosing The Best Spot
Select a location near the door or entryway. This spot makes grabbing coats quick and easy. Avoid tight corners or busy areas to prevent bumps. Ensure enough wall space for your rack size. Check the wall type to match your mounting tools.
Mounting Securely
Use strong screws or anchors for heavy coats. Find wall studs with a stud finder for extra support. Drill pilot holes before inserting screws to avoid wall damage. Tighten screws firmly but do not overtighten. Test the rack by gently pulling before hanging items.
Maintaining Stability
Check the rack regularly for loose screws. Tighten any loose parts immediately to keep it stable. Avoid overloading the rack beyond its weight limit. Use wall anchors suitable for your wall type. Keep the rack clean to prevent wear and tear.

Credit: www.youtube.com
Budget-friendly Alternatives
Making a coat rack at home can save a lot of money. Using budget-friendly options lets you create something useful without spending too much. Simple materials and smart ideas help you build a stylish rack that fits your space and needs.
Repurposing Old Materials
Old wood, leftover pipes, or unused furniture parts work well for coat racks. These materials often sit unused but have great potential. Sand and paint old wood for a fresh look. Pipes can become hooks or stand supports. Repurposing reduces waste and keeps costs low.
Using Everyday Items
Household items like wooden spoons, drawer knobs, or branches make unique hooks. Attach knobs to a board for a simple rack. Branches add a natural touch and hold coats firmly. Everyday items bring charm and function without extra cost.
Cost-saving Techniques
Look for sales or buy secondhand materials. Cut and assemble pieces carefully to avoid waste. Use simple tools and avoid complicated designs. Painting or staining adds style without big expenses. Small steps add up to big savings.
Credit: reciclajesostenibleeuropa.com
Frequently Asked Questions
What Materials Do I Need To Make A Homemade Coat Rack?
You need wood, hooks, screws, a drill, sandpaper, and paint or stain. These basic materials help create a sturdy, attractive coat rack suitable for any space.
How Long Does It Take To Build A Coat Rack?
Building a homemade coat rack usually takes 1 to 3 hours. Time depends on design complexity and drying time for paint or stain.
Can I Customize The Coat Rack Design?
Yes, you can customize size, color, hook type, and decoration. Customizing helps match your decor and adds a personal touch to your coat rack.
What Tools Are Essential For This Diy Project?
Essential tools include a drill, screwdriver, measuring tape, level, and sander. These tools make assembly easier and ensure your coat rack is functional and durable.
Conclusion
Making a homemade coat rack is simple and fun. You only need a few tools and some creativity. This project saves money and adds a personal touch to your home. It also helps keep your space tidy and organized. Try different styles to match your room’s look.
Enjoy the process and show off your finished rack to friends. Small projects like this build skills and confidence. Start your coat rack today and see how easy it can be. A little effort brings big rewards.