Are you looking for a unique way to organize your books and add character to your space? A plumbing pipe bookshelf might be just what you need.
It’s sturdy, stylish, and surprisingly simple to make. Imagine turning ordinary pipes and wooden planks into a cool, industrial-style bookshelf that stands out. In this guide, you’ll discover easy steps to create your own plumbing pipe bookshelf, even if you’ve never built anything before.
Ready to transform your room with a project that’s both practical and eye-catching? Let’s get started!
Materials And Tools Needed
Building a plumbing pipe bookshelf needs the right materials and tools. Gathering everything before starting saves time and avoids frustration. This section lists the main supplies needed to create a sturdy and stylish bookshelf.
List Of Pipes And Fittings
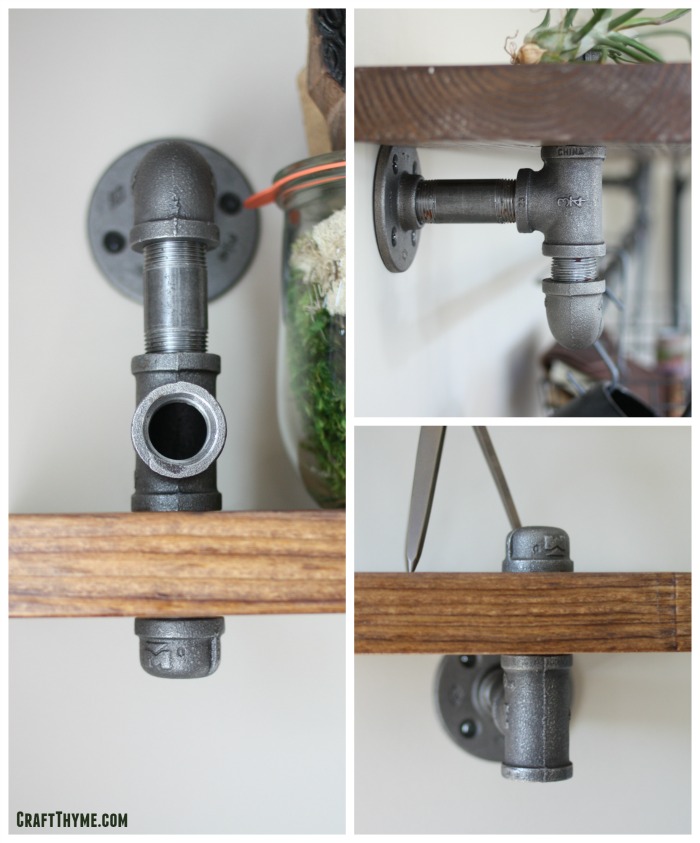
Start with black iron pipes or galvanized steel pipes. Choose pipe lengths based on your shelf size. Common fittings include:
- Flanges to secure pipes to walls or floors
- Elbows for corners and turns
- T-joints to connect pipes
- Couplings to join pipe sections
Ensure all pipes and fittings match in diameter for a snug fit.
Wood And Shelving Supplies
Select wood planks for shelves. Pine or plywood works well and is easy to cut. Sand the wood for smooth edges. You may want to stain or paint the wood to match your room décor. Use wood screws to attach the shelves to the pipe frame securely.
Tools For Assembly
Gather tools before you begin. You will need:
- A pipe wrench or adjustable wrench for tightening pipes
- A drill with drill bits for making holes in wood
- A screwdriver for driving screws
- A measuring tape to measure wood and pipe lengths
- A level to keep shelves straight
- Sandpaper or a sanding block for smoothing wood surfaces
Having these tools ready helps build your bookshelf quickly and safely.

Credit: www.serendipityrefined.com
Designing Your Bookshelf
Designing your plumbing pipe bookshelf is the first step to a great project. It sets the look and function of your shelf. Careful planning helps avoid mistakes and saves time. Think about where you want to place the bookshelf and what you want to store on it. This way, you create a piece that fits your space and needs perfectly.
Focus on size, layout, and finishes. These three parts work together to make your bookshelf both useful and beautiful. Let’s explore each part to help you design a shelf you will enjoy for years.
Choosing The Right Size
Measure the wall space where the bookshelf will go. Consider the height, width, and depth that fit well. Make sure it does not block doors or windows. Think about the books and items you want to store. Choose a size that holds them comfortably without crowding.
Planning Shelf Layout
Decide how many shelves you need. Plan the space between shelves for tall and short items. Pipes can make strong supports for shelves. Arrange shelves evenly or in different heights for style. Visualize the shelf before building to avoid surprises.
Selecting Finishes
Pick finishes that match your room’s style. Use paint or stain for wood shelves to protect and beautify them. For pipes, consider rust-proof paint or leave them raw for an industrial look. Choose finishes that last and are easy to clean.
Preparing The Pipes
Preparing the pipes is a key step in building your plumbing pipe bookshelf. Proper preparation ensures the pipes fit well and the shelf looks good. This step involves cutting, cleaning, assembling, and checking stability. Taking time here makes the project easier and stronger.
Let’s break down the process into simple parts. Follow each step carefully for the best results.
Cutting And Cleaning Pipes
Start by measuring the pipes to the needed length. Use a pipe cutter or saw for straight cuts. Smooth the edges with sandpaper to avoid sharp bits. Clean the pipes by wiping them with a damp cloth. Removing dust and dirt helps the pipes fit tightly.
Assembling Pipe Sections
Match the pipes with connectors and fittings. Screw the parts together by hand first. Tighten the connections with a wrench but do not over-tighten. Check that all sections align properly. Proper assembly prevents gaps and wobbling.
Ensuring Stability
Place the assembled pipe frame on a flat surface. Press gently to test for movement or wobble. Tighten loose joints to improve firmness. Use pipe straps or brackets if needed for extra support. Stability keeps your bookshelf safe and durable.
Building The Shelves
Building the shelves is a key step in creating your plumbing pipe bookshelf. This part brings together wood and pipes to form sturdy platforms. Each shelf needs careful measuring, cutting, and finishing. Then, you attach the shelves securely to the pipes. This ensures your bookshelf is strong and looks great.
Measuring And Cutting Wood
Start by measuring the space between the pipes. This tells you the shelf length needed. Mark the wood boards clearly with a pencil. Use a saw to cut the wood along the marks. Cut slowly and straight for clean edges. Double-check each piece fits before moving on.
Sanding And Finishing
Sanding smooths out rough wood surfaces and edges. Use fine-grit sandpaper for a polished feel. Sand all sides of the shelves carefully. Wipe off dust with a dry cloth. Apply wood finish or paint for protection and style. Let the finish dry fully before assembly.
Attaching Shelves To Pipes
Place the wood shelves on the pipe brackets. Use screws to fix the shelves onto the pipes. Drill pilot holes to avoid wood splitting. Tighten screws firmly but avoid over-tightening. Check the shelves are level and steady. Adjust if needed for a perfect fit.
Final Assembly
The final assembly is the most exciting step in making your plumbing pipe bookshelf. This stage brings all parts together to form a sturdy and stylish piece. Careful attention here ensures your shelf will last and look great.
Securing The Frame
Start by tightening all pipe joints firmly. Use a pipe wrench for a strong grip. Check each connection to avoid any looseness. A stable frame prevents wobbling and keeps the shelf safe.
Adding Support Brackets
Attach support brackets to the wall and frame. Use screws and anchors suitable for your wall type. Brackets add extra strength and hold the shelf securely. Space them evenly to balance the weight.
Checking For Level And Stability
Use a level tool to check the shelf’s alignment. Adjust the pipes or brackets if the shelf tilts. Press gently on different spots to test stability. A balanced shelf looks neat and holds your items well.

Credit: craftthyme.com
Customization Tips
Customizing your plumbing pipe bookshelf makes it unique and personal. Small changes can show your style and match your room decor. This section shares easy tips to customize your shelf. You can paint, add lights, or decorate it in many ways. These ideas help turn a simple shelf into a focal point in your space.
Painting And Staining Ideas
Choose paint colors that match your room’s theme. Use spray paint for a smooth, even finish on pipes. Stain wooden shelves to bring out natural wood grain. Dark stains give a classic look, while light stains feel fresh and modern. Mixing colors on pipes and wood adds depth and interest.
Incorporating Lighting
Add LED strip lights under the shelves for soft glow. Small clip lights highlight special items on display. Warm white lights create a cozy atmosphere. Battery-powered lights avoid extra wiring. Lighting makes your bookshelf stand out and adds function.
Adding Decorative Elements
Use metal brackets or gear-shaped hooks for an industrial look. Attach small plants or succulents for a natural touch. Place vintage books or art pieces to show personality. Rope or leather handles on pipes add texture. Decorative items give your shelf character and charm.
Maintenance And Care
Maintaining your plumbing pipe bookshelf keeps it strong and looking good. Regular care helps avoid problems like rust and loose pipes. Small actions can keep the shelf safe and long-lasting.
Cleaning Tips
Dust your shelf often to stop dirt buildup. Use a soft cloth or duster for gentle cleaning. Avoid harsh chemicals that can hurt the metal. Mild soap and water work well for cleaning. Dry the pipes completely after wiping to prevent water spots.
Preventing Rust And Damage
Keep the shelf away from wet areas. Rust forms faster in damp places. Apply a clear sealant or paint to protect the metal. Check for scratches that expose the metal and touch them up. Use coasters under plants or liquids to stop spills.
Tightening And Repairs
Check pipe joints and screws regularly. Loose parts can cause instability. Use a wrench to tighten any loose connections. Replace damaged pipes or fittings quickly to avoid bigger issues. Keep extra parts on hand for quick fixes.
Credit: craftthyme.com
Frequently Asked Questions
What Materials Are Needed For A Plumbing Pipe Bookshelf?
You need galvanized pipes, flanges, elbows, wood boards, screws, and a drill. These materials ensure a sturdy, industrial-style bookshelf that’s easy to assemble and customize.
How Do You Assemble A Plumbing Pipe Bookshelf?
Start by measuring and cutting pipes, then attach flanges and elbows. Secure wood shelves onto the pipe frame using screws. Follow a step-by-step plan for precise alignment and stability.
Can I Customize The Size Of The Bookshelf?
Yes, you can customize pipe lengths and shelf sizes. Adjust measurements based on your space and storage needs. This flexibility allows you to create a perfect fit for any room.
Is Plumbing Pipe Bookshelf Durable And Stable?
Yes, metal pipes provide strong support and durability. Combined with solid wood shelves, the bookshelf can hold heavy books and decor safely without wobbling.
Conclusion
Building a plumbing pipe bookshelf is a fun and useful project. It uses simple materials and basic tools. You can customize the size and style to fit your space. This project saves money and adds a unique look to your room.
Try it step-by-step, and enjoy the process. Soon, you will have a strong, stylish shelf to hold your books. Give it a try and see how easy it can be!
