Are you looking for a quick and easy way to add storage and style to your space? Making a simple wall bookshelf is the perfect solution.
Imagine having a neat place to display your favorite books, photos, or decor—all without taking up floor space. In this guide, you’ll discover step-by-step instructions that anyone can follow, even if you’re new to DIY projects. By the end, you’ll have a custom bookshelf that fits your style and needs.
Ready to transform your wall and organize your things? Let’s get started!
Credit: southhousedesigns.com
Materials Needed
Gathering the right materials is the first step to build a simple wall bookshelf. Choosing good wood and having the right tools makes the project easier and the result stronger. Prepare everything before starting to avoid interruptions.
Types Of Wood
Pick wood that is strong and easy to cut. Pine wood is a popular choice. It is affordable and light. Oak wood is harder and lasts longer but costs more. Plywood is another option. It is made of layers glued together. It is stable and smooth. Choose the wood thickness between ¾ inch to 1 inch for good support.
Tools Required
You will need a saw to cut the wood. A hand saw or electric saw works well. A drill helps to make holes for screws. Use a screwdriver or electric drill with a screwdriver bit to fasten screws. A measuring tape keeps your cuts precise. Sandpaper smooths the rough edges. A level ensures the shelf is straight on the wall.
Additional Supplies
Get wood screws to hold pieces together tightly. Wood glue adds extra strength to joints. Wall anchors keep the shelf secure on drywall. Paint or wood stain improves the look and protects the wood. A paintbrush or cloth helps apply finish evenly. Safety glasses and gloves protect you while working.
:max_bytes(150000):strip_icc()/6a00d8358081ff69e2019b03b28988970c-800wi-302340cc45e44a26b3afba90dc52b5e4.jpg)
Credit: www.thespruce.com
Choosing The Design
Choosing the design for your simple wall bookshelf is an important first step. It sets the tone for how your shelf will look and fit in your space. The design affects both function and style. Think about what you need from your shelf and how it matches your room’s decor.
Shelf Size And Shape
Decide how much space you want to use on your wall. Measure the area carefully before starting. The size depends on what you plan to store. Books, decorations, or small plants need different shelf sizes. Shapes can be rectangular, square, or even angled. Choose a shape that fits your wall and items well.
Style Options
Pick a style that matches your room’s look. Simple wood shelves suit most rooms. You can paint or stain the wood for a different feel. Floating shelves create a clean, modern look. Rustic styles work well with rough wood and visible nails. Consider the style that feels right for your home.
Placement Considerations
Think about where to place your shelf on the wall. Avoid spots that block light or doors. Place shelves at a height that is easy to reach. Grouping shelves together can create a strong visual impact. Leave enough space around the shelf so the wall does not feel crowded.
Preparing The Wood
Preparing the wood is the first step in making your wall bookshelf. This step ensures the wood is ready for assembly. Proper preparation improves the shelf’s strength and appearance. It also helps the paint or stain stick better. Follow these simple tasks to prepare your wood perfectly.
Measuring And Cutting
Measure the wood pieces carefully. Use a tape measure for accuracy. Mark the cutting lines with a pencil. Double-check each measurement before cutting. Cut the wood using a saw that fits your needs. Straight and clean cuts make assembly easier.
Sanding For Smoothness
Sand all wood surfaces to remove rough edges. Use medium-grit sandpaper first, then fine-grit for a smooth finish. Sand along the grain to avoid scratches. Smooth wood prevents splinters and gives a neat look. Clean off dust with a cloth after sanding.
Painting Or Staining
Choose paint or stain to protect and beautify the wood. Apply a primer if you use paint for better coverage. Use a brush or roller to apply evenly. Let the first coat dry before applying a second. For stain, wipe off excess to avoid blotches. Proper finishing makes your shelf last longer and look great.
Assembling The Shelf
Assembling the wall bookshelf is the step where your project starts to take shape. Careful assembly ensures the shelf is sturdy and looks great. Follow the steps closely to join pieces, secure shelves, and make the unit stable.
Joining The Pieces
Begin by aligning the side panels with the top and bottom boards. Use wood glue on the edges for a strong hold. Insert screws through pre-drilled holes to connect the parts firmly. Check that all corners are square before tightening screws fully. This will keep the shelf frame even and balanced.
Securing The Shelves
Place the shelf boards inside the frame, spacing them evenly. Use small brackets or shelf pins to hold each shelf in place. Attach screws carefully so they do not split the wood. Double-check the shelves are level using a spirit level. Proper securing prevents shelves from wobbling under weight.
Ensuring Stability
Fix the bookshelf to the wall using strong anchors or brackets. This step stops the shelf from tipping forward. Use a stud finder to locate wall studs for better support. Tighten all screws again before mounting. Stability is key for safety and long-lasting use.
Mounting The Bookshelf
Mounting the bookshelf on the wall is a key step. It keeps the shelf secure and holds your books safely. Proper mounting prevents accidents and damage to your wall. Follow these simple steps for a sturdy and level shelf.
Finding Wall Studs
Wall studs provide strong support for your bookshelf. Use a stud finder to locate them behind the drywall. Mark the stud locations with a pencil. This ensures screws hold firmly, keeping the shelf steady.
Using Proper Anchors
If you cannot find studs, use wall anchors. Choose anchors that match the shelf weight and wall type. Insert anchors carefully into drilled holes. Anchors help screws grip the wall and prevent falling.
Leveling The Shelf
Use a spirit level to keep the shelf straight. Place it on the shelf surface and adjust until the bubble is centered. Mark drill points while the shelf is level. This step makes the shelf look neat and professional.

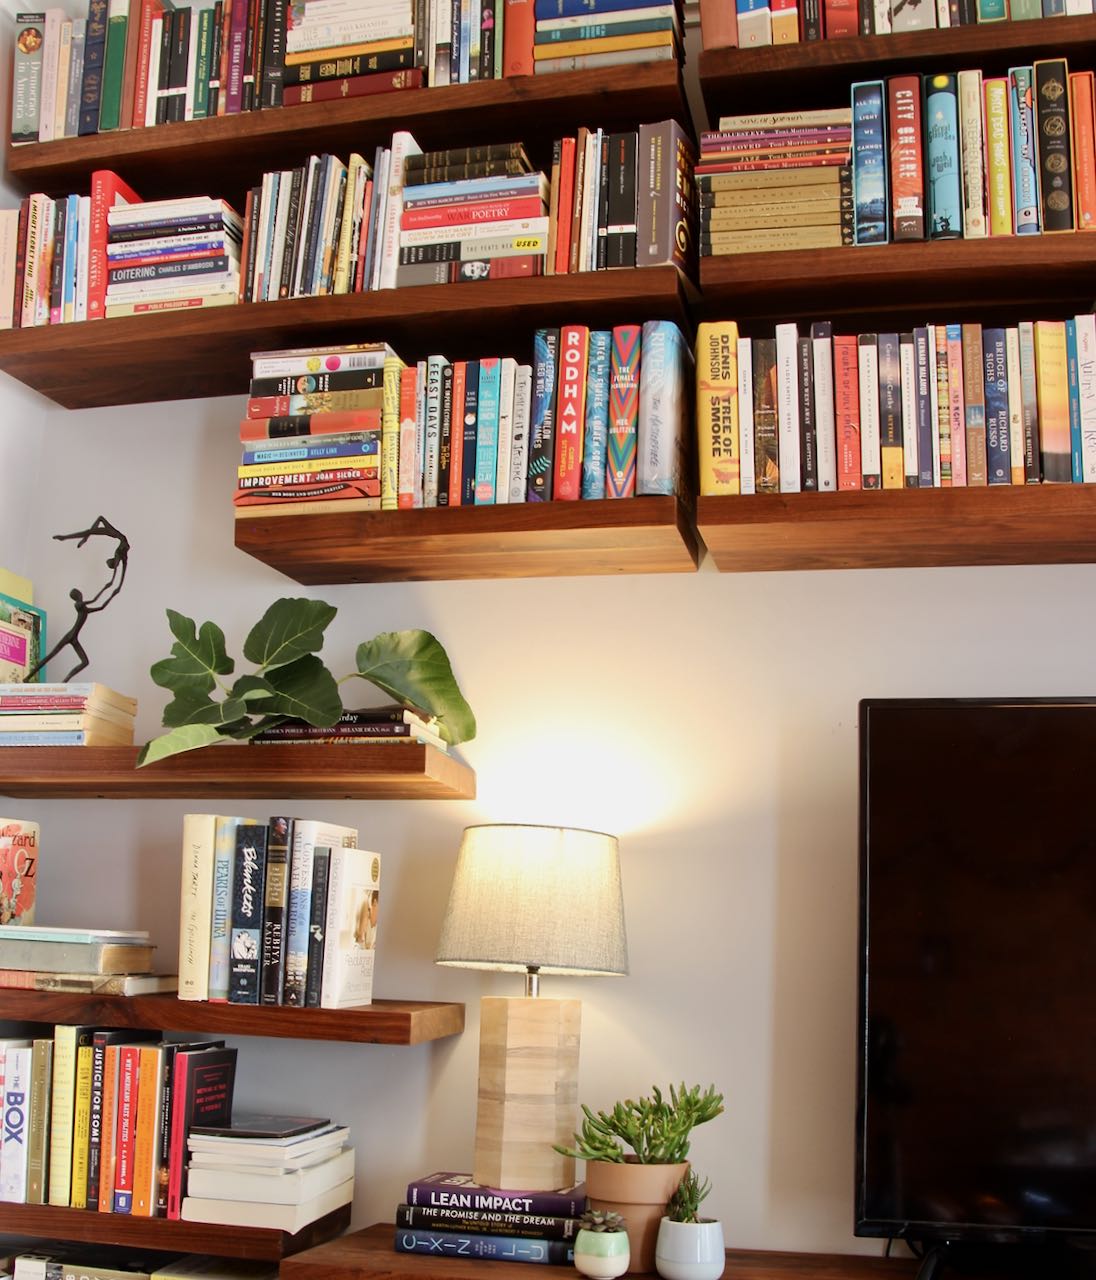
Credit: everestkitchennc.com
Finishing Touches
Finishing touches make your wall bookshelf look complete and polished. They protect the wood and add style. Small details can change the whole look. Take time with these final steps to create a beautiful shelf that lasts.
Sealing The Wood
Sealing the wood protects it from damage and dirt. Use a clear wood sealer or varnish. Apply it with a brush in thin, even coats. Let each coat dry before adding the next. This step keeps your shelf looking fresh and new for years.
Adding Decorative Elements
Decorative elements add personality to your shelf. Choose simple items like small plants or photo frames. Use colorful bookends to make the shelf lively. Keep decorations balanced to avoid clutter. These touches make your shelf unique and inviting.
Organizing Your Books
Organize books by size, color, or type for a neat look. Place larger books at the bottom for stability. Stack some books horizontally to create visual interest. Leave space between books for easy access. A well-organized shelf looks tidy and feels welcoming.
Common Mistakes To Avoid
Building a simple wall bookshelf can be a fun project. Avoiding common mistakes saves time and effort. These errors can cause problems with stability and appearance. Pay close attention to details. Doing it right makes your shelf safe and neat.
Incorrect Measurements
Measure twice, cut once. Wrong measurements lead to uneven shelves. Shelves that don’t fit the wall look messy. Use a good tape measure and level. Mark your lines clearly before cutting. Small errors can cause big problems later.
Using Wrong Hardware
Choose the right screws and anchors for your wall type. Using weak hardware can cause shelves to fall. Wood screws for drywall won’t hold well. Find suitable anchors for brick or plaster walls. The right tools keep your shelf firm and safe.
Ignoring Weight Limits
Every shelf has a weight limit. Overloading shelves can cause damage or accidents. Check the wood type and hardware strength. Distribute books evenly to avoid stress on one spot. Keep your shelf strong by not exceeding its capacity.
Frequently Asked Questions
What Materials Are Needed For A Simple Wall Bookshelf?
You need wood planks, brackets, screws, wall anchors, a drill, a level, and sandpaper. Choose quality wood for durability and appearance.
How Do I Securely Mount A Wall Bookshelf?
Locate wall studs using a stud finder. Use screws and anchors suitable for your wall type. Ensure the shelf is level before tightening.
Can I Customize The Size Of The Bookshelf?
Yes, adjust plank length and width to fit your space. Measure your wall area and select wood accordingly for a perfect fit.
How Much Time Does Building A Wall Bookshelf Take?
It usually takes 1 to 3 hours, depending on your skill level and tools. Preparation and drying time may add to this.
Conclusion
Building a simple wall bookshelf can be fun and rewarding. You only need a few tools and some basic skills. This project helps keep your space neat and stylish. Choose the right spot on your wall for the best look.
Take your time and follow each step carefully. Soon, you will have a shelf ready to hold your favorite books. Enjoy the pride of making something useful with your own hands. Try this easy project and see how it brightens your room.