Looking for a unique way to showcase your favorite books? A sling bookshelf might be just what you need.
It’s simple, stylish, and perfect for any room. You don’t have to be a woodworking expert to make one. In this guide, you’ll discover easy steps to create your own sling bookshelf that looks great and saves space. Ready to add a personal touch to your home?
Let’s get started!
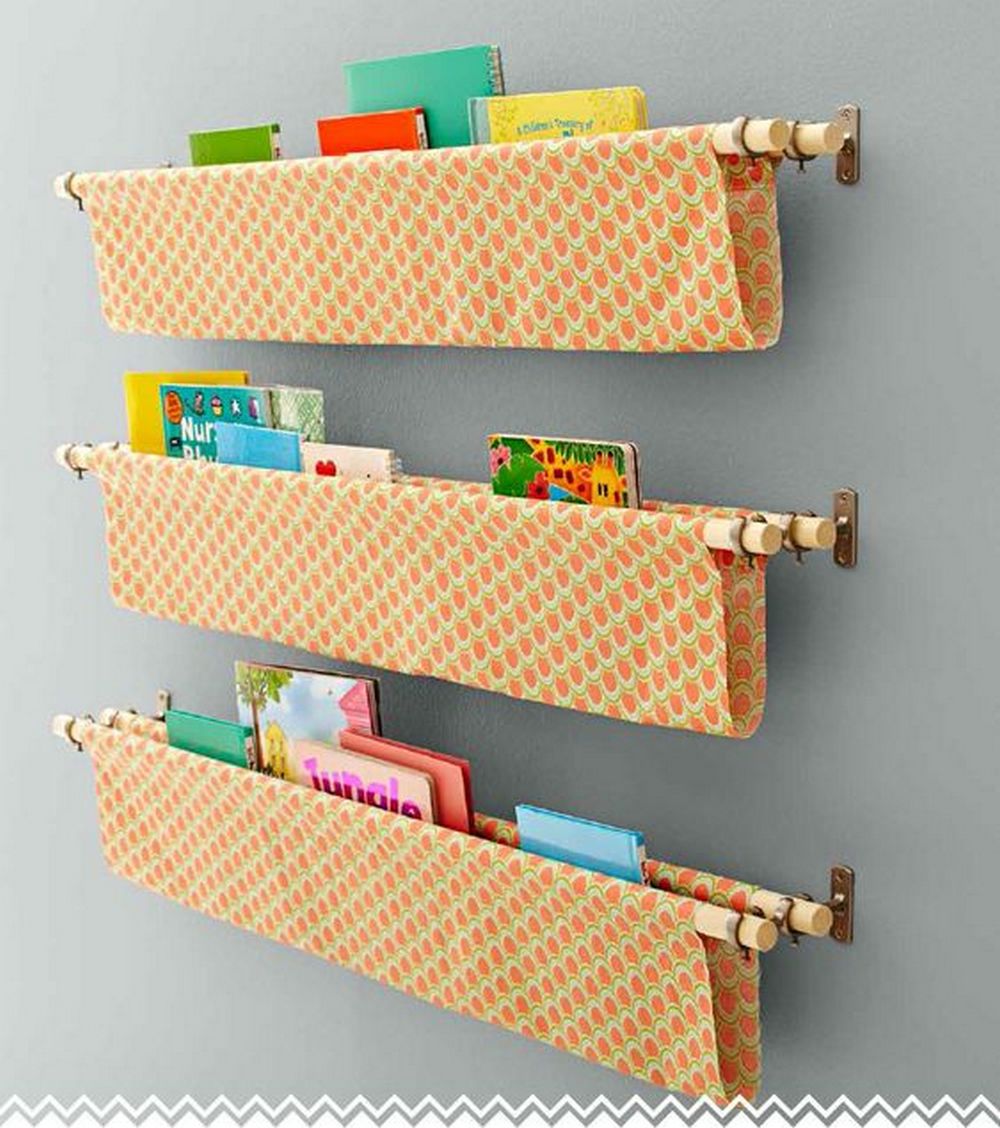
Credit: theownerbuildernetwork.co
Materials Needed
Gathering the right materials makes building a sling bookshelf easier and more fun. Each item plays a key role in the bookshelf’s strength and look. Choose carefully to get the best results.
Choosing The Right Wood
Select wood that is strong but not too heavy. Pine and oak are great choices. Pine is light and easy to work with. Oak is sturdy and lasts longer. Cut the wood into smooth, even planks for the frame.
Selecting The Fabric
Pick fabric that holds weight without stretching. Canvas and denim work well. They are thick and durable. Choose a color or pattern that fits your room style. Make sure the fabric is wide enough for the shelves.
Additional Supplies
You will need screws or nails to secure the frame. Sandpaper smooths rough edges. A drill or screwdriver helps with assembly. Measuring tape keeps your cuts accurate. Don’t forget strong hooks or wall anchors for hanging.

Credit: www.amazon.com
Tools Required
Building a sling bookshelf requires some basic tools. These tools help you cut, measure, and put everything together. Having the right tools makes the job easier and safer. Here is a list of essential tools you need to get started.
Cutting Tools
Cutting tools shape the wood and fabric for the bookshelf. A handsaw or circular saw works well for cutting wood boards. Use sharp blades to make clean cuts. Scissors or a rotary cutter are good for cutting the fabric sling. Keep your tools steady to avoid mistakes.
Measuring Instruments
Measuring tools help you get exact sizes. A tape measure is perfect for checking lengths of wood and fabric. A ruler or a square ensures straight lines and right angles. Marking tools like pencils help you note where to cut or drill. Accurate measurements prevent fitting problems later.
Assembly Tools
Assembly tools join all parts of the bookshelf. A drill is useful for making holes and driving screws. Screwdrivers help tighten screws securely. Clamps hold pieces together while you work. Sandpaper smooths rough edges for a neat finish. These tools make the bookshelf strong and stable.
Preparing The Wood
Preparing the wood is a key step for a strong sling bookshelf. It ensures the wood fits well and looks nice. Careful preparation helps the wood last longer and hold books safely.
Start by measuring and cutting the wood. Then smooth the edges for safety and style. Finally, add a finish to protect the wood and enhance its color.
Cutting To Size
Measure the wood pieces carefully before cutting. Use a saw that suits your wood type. Cut slowly and follow the lines exactly. This step creates the perfect base for your bookshelf.
Sanding The Edges
Sand the edges to remove rough spots and splinters. Use fine-grit sandpaper for a smooth finish. Sanding makes the wood safe to handle and gives it a clean look.
Applying Finish
Choose a finish that protects the wood from moisture and wear. Apply it evenly with a brush or cloth. Let the wood dry fully before assembling the shelf. This step keeps the wood beautiful over time.
Cutting And Preparing The Fabric
Cutting and preparing the fabric is an important step in making a sling bookshelf. It sets the base for a strong and neat sling. The right fabric size and finish make the sling safe for holding books. Proper preparation helps the sling look good and last long.
Follow clear steps to measure, choose, and finish the fabric. This ensures your sling fits perfectly and stays durable. The fabric must be ready before you attach it to the wood frame.
Measuring Fabric Length
Measure the length of the wood frame first. Add extra inches for folding and sewing edges. This prevents the fabric from being too short. Use a tape measure for accuracy. Mark the fabric with chalk or a fabric pen. Cut the fabric straight to avoid uneven edges.
Choosing Fabric Type
Select a strong fabric that can hold heavy books. Canvas and denim are good choices. Avoid thin or stretchy fabrics. They may tear or sag over time. Pick a fabric that is easy to clean. Dark colors hide dirt better than light colors.
Sewing Or Hemming Edges
Fold the edges of the fabric about one inch. This stops the fabric from fraying. Sew the folded edges with a sewing machine or by hand. Use a strong thread to keep the edges tight. Hemming makes the sling look neat and lasts longer. Double stitch the corners for extra strength.
Assembling The Frame
Assembling the frame is the first big step in making your sling bookshelf. The frame forms the base that holds everything together. It must be strong and square. Take your time to connect the parts correctly. This ensures the shelf stays sturdy and lasts long.
Joining Wood Pieces
Start by arranging the wood pieces on a flat surface. Use wood glue on the edges that will join. Press the pieces together firmly. Use clamps to hold the joints while the glue dries. For extra strength, screw the pieces together. Pre-drill holes to avoid splitting the wood.
Ensuring Stability
Check that all joints fit tightly. Add corner braces or metal brackets at the corners. This helps prevent wobbling. Use a carpenter’s square to keep corners at 90 degrees. Tighten all screws well. A stable frame means a safe bookshelf.
Final Frame Check
Look over the frame for any gaps or loose joints. Sand rough edges to avoid splinters. Make sure the frame is level on all sides. Adjust clamps or screws if needed. Your frame is ready when it feels solid and balanced.

Credit: www.youtube.com
Attaching The Fabric Sling
Attaching the fabric sling is a key step in building your bookshelf. It holds the books safely while giving a unique look. This part needs care to ensure the sling stays strong and neat. Follow simple steps to fix the fabric perfectly on the frame. The right attachment keeps the sling tight and ready to hold weight.
Focus on securing, adjusting, and testing. Each step helps create a sturdy shelf that lasts long. Let’s explore how to attach the fabric sling properly.
Securing Fabric To Frame
Start by placing the fabric over the frame. Make sure it covers the area evenly. Use strong staples or screws to fix the fabric edges. Stretch the fabric slightly as you secure it. This prevents sagging later. Attach one side first, then move to the opposite side. Keep the fabric tight but not too stretched. Check corners carefully for neat folding. A firm attachment keeps the sling stable and safe.
Adjusting Tension
After securing, check the fabric tension. The sling should feel firm but flexible. Pull the fabric gently to remove slack. Adjust by loosening or tightening the staples if needed. Keep the tension even on all sides. Uneven tension can cause the fabric to wear out fast. Aim for a smooth surface without bumps or wrinkles. Proper tension gives the sling good support and a clean look.
Testing Support
Now test the fabric sling’s strength. Place a few books on the sling carefully. Watch for any sagging or shifting. If the fabric dips too much, tighten the tension more. Add more staples if the fabric loosens under weight. Check the frame and fabric connection points. They should hold firm without movement. Testing ensures the sling can hold your books safely every day.
Styling And Placement
Styling and placing your sling bookshelf properly can enhance any room. It is more than just storage. It becomes a part of your decor and daily life. Thoughtful placement and decoration highlight its unique design.
Choosing The Perfect Spot
Pick a wall with enough space for your sling bookshelf. Avoid crowded corners. A spot near natural light works well for reading. Make sure the shelf does not block walkways. It should feel part of the room, not in the way.
Consider the room’s function. A sling shelf fits nicely in living rooms, bedrooms, or offices. Place it at eye level for easy access. Keep it away from damp areas to protect your books.
Decorating Ideas
Use a mix of books and small decor items. Add plants for a fresh look. Choose pots that match your room’s style. Place a small lamp or candle to create warmth.
Stack books both vertically and horizontally. It breaks the monotony and looks inviting. Include a few favorite items like photos or souvenirs. Keep some space free to avoid clutter.
Maintaining Your Bookshelf
Dust your sling bookshelf regularly to keep it clean. Check the fabric straps for signs of wear. Tighten screws or bolts as needed. Avoid overloading the shelf with heavy books.
Rotate books and decorations to keep the look fresh. Clean the wood or metal parts with appropriate products. Care helps the bookshelf last longer and look great.
Frequently Asked Questions
What Materials Are Needed To Make A Sling Bookshelf?
You need wood boards, fabric or leather for the sling, screws, brackets, and basic tools like a drill and screwdriver.
How Do You Assemble A Sling Bookshelf Step-by-step?
Attach brackets to the wall, fix wooden boards onto them, and then secure the fabric sling between the boards.
Can A Sling Bookshelf Hold Heavy Books Safely?
Yes, if you use strong materials and secure mounting, a sling bookshelf can hold heavy books safely.
How Much Space Does A Sling Bookshelf Save?
A sling bookshelf saves floor space by mounting vertically on the wall, making it ideal for small rooms.
Conclusion
Building a sling bookshelf brings charm and function to any room. It uses simple materials and easy steps anyone can follow. This project saves space and shows off your favorite books. Enjoy the satisfaction of making something useful by hand.
Try different fabrics or wood to match your style. Now, your books have a cozy, stylish home. Start this project and add a personal touch to your space.
