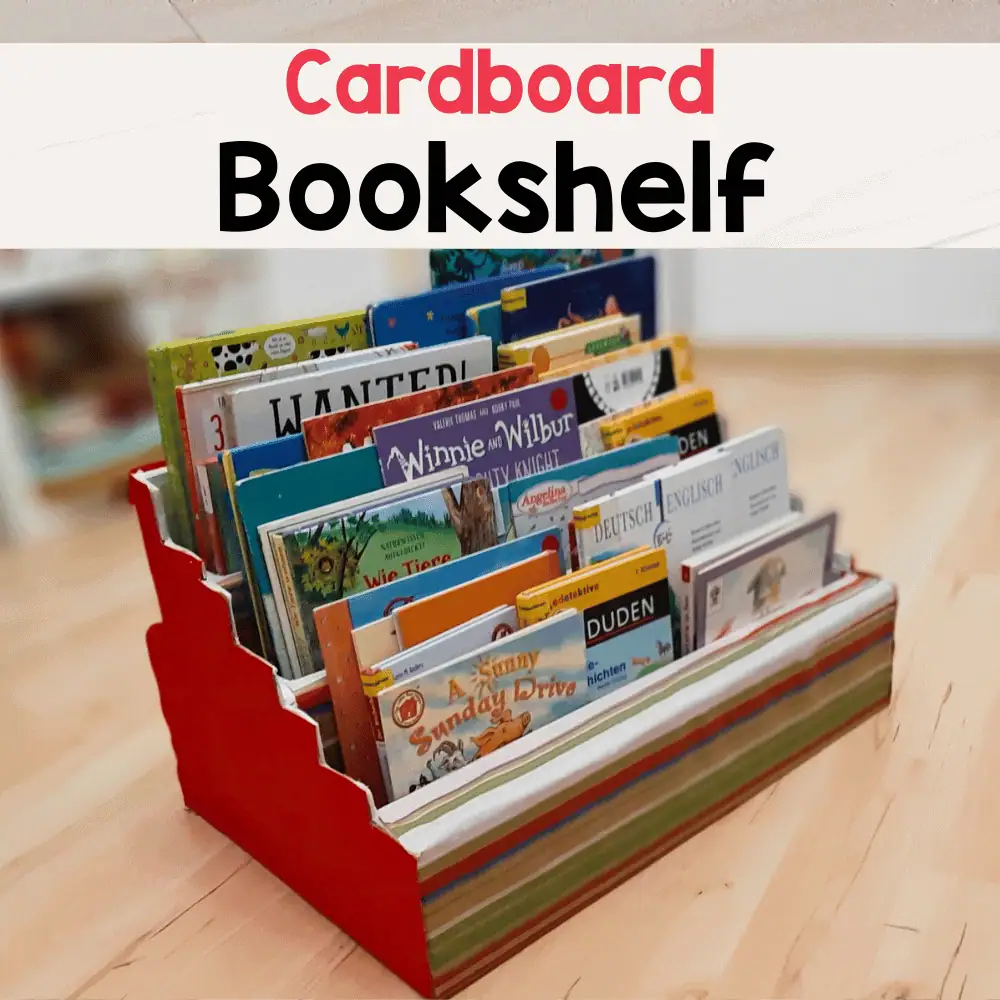
Are you looking for a simple and affordable way to organize your books? Making a small bookshelf out of cardboard might be the perfect solution for you.
It’s easy, fun, and requires just a few materials you probably already have at home. Imagine having a custom bookshelf that fits your space exactly and shows off your creativity. Keep reading, and you’ll discover step-by-step how to build your own sturdy, stylish bookshelf without spending much time or money.
Your books—and your wallet—will thank you!
Credit: www.littleladoo.com
Materials Needed
Building a small bookshelf from cardboard is simple and fun. You need the right materials to make a strong and neat shelf. This section lists the main items required. These materials help you create a bookshelf that holds your books safely.
Choosing The Right Cardboard
Select thick, sturdy cardboard for best results. Look for double-walled cardboard sheets. They provide better strength and durability. Avoid thin or damaged cardboard. It may bend or break under weight. Recycled boxes from appliances or furniture work well. Ensure the cardboard is clean and dry before use.
Essential Tools
Use a sharp utility knife to cut cardboard precisely. A metal ruler helps make straight lines. Cutting on a safe surface protects your workspace. Pencil or marker helps draw cutting lines. A hot glue gun or strong craft glue bonds pieces firmly. Clamps or heavy books hold glued parts while drying.
Additional Supplies
Sandpaper smooths rough cardboard edges. Paint or decorative paper can cover the shelf for a nice look. Measuring tape ensures accurate dimensions. Masking tape holds parts temporarily during assembly. Gloves protect your hands from cuts and glue. A cutting mat prevents damage to tables or floors.
Designing Your Bookshelf
Designing your small bookshelf is the first step to a successful cardboard project. It helps you plan the size and shape before cutting any pieces. A good design saves time and cardboard. It also ensures your bookshelf holds your books safely.
Start by thinking about where you will place the bookshelf. Consider how many books you want to store. Think about the height, width, and depth that fits your space well.
Measuring Dimensions
Use a ruler or measuring tape for accuracy. Measure the space where the bookshelf will sit. Note the width, height, and depth you can use. Check the size of your books. This helps decide shelf height and length. Write down all measurements clearly. Keep your numbers simple and practical.
Sketching The Layout
Draw a simple picture of your bookshelf on paper. Start with a rectangle matching your chosen dimensions. Divide it into sections showing each shelf. Mark where the sides and back will go. Make rough sketches first. Adjust the design until it looks balanced. Keep the lines clean and clear for easy reading.
Planning Shelf Placement
Decide how many shelves you need. Space shelves evenly or vary heights for different book sizes. Leave enough room for tall books or decorations. Mark shelf positions on your sketch. Think about shelf strength and cardboard thickness. Place supports if needed to prevent bending. Plan carefully to keep the bookshelf sturdy and neat.
Cutting The Cardboard
Cutting the cardboard is a crucial step in building your small bookshelf. Accurate cuts ensure the pieces fit well. It also helps the bookshelf stay strong and neat. Take your time to measure and cut carefully. This will make assembly easier and the final product more durable.
Marking Cut Lines
Start by measuring the cardboard carefully. Use a ruler for straight lines. Mark the lines clearly with a pencil. Double-check all measurements before cutting. Mark each piece separately for better accuracy. Clear lines guide your cutting and avoid mistakes.
Safe Cutting Techniques
Use a sharp utility knife or box cutter. Cut on a safe surface like a cutting mat. Hold the cardboard firmly to avoid slips. Make light cuts first, then deepen them gradually. Keep fingers away from the blade path. Cut slowly to keep control and avoid accidents.
Cutting Shelf Supports
Measure the shelf supports precisely for stability. Cut supports from sturdy cardboard pieces. Use the marked lines as a guide. Keep supports the same size for balance. Cut slowly and carefully to avoid bending. Proper shelf supports help hold the weight evenly.
Assembling The Bookshelf
Assembling the bookshelf is an exciting step. It brings your cardboard pieces together into a sturdy unit. Follow these simple steps to build a small bookshelf that holds your favorite books well.
Creating The Frame
Start by joining the two side panels. Place them upright and parallel. Attach the top and bottom panels between the sides. Use strong glue or tape on all edges. Make sure the frame is square and steady. This frame forms the basic shape of your bookshelf.
Attaching Shelves
Measure the space inside the frame for shelves. Cut cardboard pieces to fit snugly across the width. Attach each shelf inside the frame with glue or tape. Space shelves evenly or as you like. Press firmly and allow glue to dry well. Shelves hold your books, so they must be secure.
Reinforcing Joints
Add extra cardboard strips along all joints. Glue them on inside and outside corners for support. This prevents wobbling and increases strength. Let the glue dry completely before using. Reinforced joints keep your bookshelf stable and long-lasting.
Finishing Touches
Finishing touches are important to make your cardboard bookshelf look neat and last longer. These steps improve its feel and style. They also protect the cardboard from damage and wear. Take time to finish well for the best results.
Sanding And Smoothing Edges
Use fine sandpaper to smooth rough edges of the cardboard. This removes bumps and small tears. Sand gently to avoid damaging the cardboard. Smooth edges make the shelf safer and look cleaner.
Painting Or Decorating
Choose paint or markers to add color and style to your bookshelf. Water-based paint works well on cardboard. Apply thin, even coats and let each dry fully. You can also use wallpaper or decorative paper for a unique look.
Adding Protective Coating
Seal the paint or decoration with a clear protective coating. Use a spray or brush-on sealant that dries fast. This layer guards against water and dirt. It keeps the shelf strong and looking fresh for longer.

Credit: www.instructables.com
Tips For Durability
Making a small bookshelf out of cardboard is a fun project. To keep it strong and long-lasting, follow some simple tips. These tips help your bookshelf hold books safely. They also protect it from damage. Taking care of your cardboard shelf means it will serve you well for a long time.
Weight Distribution
Place heavier books at the bottom shelves. This stops the shelf from tipping over. Spread the weight evenly across each shelf. Avoid stacking too many books in one spot. Use small boxes or supports inside to add strength. This helps the cardboard hold more weight without bending.
Avoiding Moisture Damage
Keep your cardboard shelf away from water and damp places. Moisture makes cardboard soft and weak. Use waterproof spray or paint to protect the surface. Wipe off any spills immediately with a dry cloth. Avoid placing the shelf near windows or sinks where moisture is common.
Regular Maintenance
Check your shelf for any signs of wear or damage. Fix small tears or bends right away with glue or tape. Clean the shelf regularly to remove dust and dirt. Make sure the shelf stays dry at all times. Regular care helps the cardboard stay strong and useful.
Creative Variations
Creative variations make your cardboard bookshelf unique and fun. They let you add personal style and extra usefulness. Try different ideas to match your space and needs.
Custom Shapes
Shape your bookshelf beyond simple rectangles. Cut curves, waves, or geometric forms for a fresh look. Custom shapes bring art and function together. Use a pencil to sketch first. Then carefully cut with a sharp blade. This makes your shelf stand out in any room.
Using Recycled Materials
Combine cardboard with other recycled items. Old magazines, fabric scraps, or wooden sticks add texture. These materials make the shelf stronger and eco-friendly. Paint or cover parts with paper for color. This approach helps reduce waste and saves money.
Incorporating Storage Bins
Add small bins or boxes inside your shelf. They organize smaller items like pens or notes. Choose bins that fit snugly in each compartment. Label them for easy access and neatness. This idea keeps your space tidy and practical.

Credit: www.youtube.com
Frequently Asked Questions
How Durable Is A Cardboard Bookshelf?
A cardboard bookshelf is moderately durable for light use. It holds small to medium books well but avoid heavy items. Reinforcing edges with extra cardboard improves strength. Keep it away from moisture to maintain its shape and longevity.
What Materials Are Needed To Make A Cardboard Bookshelf?
You need sturdy cardboard sheets, a cutting knife, ruler, pencil, glue, and tape. Optional items include paint or decorative paper for finishing. These materials are affordable and easy to find, making this a budget-friendly DIY project.
How Do I Prevent The Cardboard Bookshelf From Collapsing?
Use multiple layers of cardboard for each shelf and sides. Apply strong glue and allow it to dry fully. Reinforce corners with tape or additional cardboard strips. Avoid overloading shelves with heavy books to keep structure stable.
Can I Customize The Size Of My Cardboard Bookshelf?
Yes, cardboard is easy to cut and shape. Measure your space and books beforehand. Adjust shelf height and width to fit your needs. Custom sizing makes the bookshelf more functional and suits your room perfectly.
Conclusion
Building a small bookshelf from cardboard is simple and fun. It saves money and helps the environment. You only need a few tools and some patience. This project fits well in small spaces and holds your favorite books. Try different shapes and sizes to match your style.
Enjoy your new, handmade bookshelf every day. Keep experimenting with cardboard for other useful crafts. Crafting brings joy and a sense of pride. Start your project today and see the results yourself.