Are you looking for a simple way to organize your books and add a unique touch to your space? Making a wooden crate bookshelf is easier than you think.
With just a few materials and some basic steps, you can build a sturdy, stylish shelf that fits perfectly in your home. Imagine having a bookshelf that shows off your personality and keeps your favorite reads within reach. Keep reading, and you’ll discover how to create your own wooden crate bookshelf from start to finish—no special skills needed!
Materials Needed
Gathering the right materials is the first step to build a wooden crate bookshelf. Knowing what you need helps make the project smooth and enjoyable. This section covers different types of wood crates, tools, and extra supplies.
Types Of Wood Crates
Choose crates that match your style and size needs. Pine crates are light and easy to paint. Oak crates are strong and last longer. You can also find recycled wood crates for a rustic look. Make sure the crates are sturdy and free from damage.
Tools Required
Basic tools make the building process easier. You need a drill to make holes and screw the crates together. A screwdriver helps tighten screws firmly. A measuring tape ensures correct spacing. Sandpaper smooths rough edges. A level keeps shelves straight and balanced.
Additional Supplies
Besides crates and tools, some extra supplies help complete the bookshelf. Screws or nails hold the crates in place. Wood glue adds extra strength to joints. Paint or stain improves the look and protects the wood. Protective gloves keep your hands safe while working.
Choosing The Right Crates
Choosing the right crates is a key step in building a wooden crate bookshelf. The crates set the foundation for your entire project. Their size, shape, and quality affect the shelf’s look and strength. Picking the right crates also helps match your room style and storage needs.
Size And Shape Options
Crates come in many sizes and shapes. Square crates offer a balanced look and fit well together. Rectangular crates can hold larger books or objects. Measure your space first. Choose crate sizes that fit well without overcrowding. Mixing different sizes can add interest, but keep balance in mind.
Quality And Durability
Good quality crates last longer and support heavy books. Look for solid wood crates, not thin or fragile ones. Check for cracks or loose nails before buying. Smooth surfaces are better for painting or staining. Strong crates keep your bookshelf safe and sturdy over time.
Styling Tips
Natural wood crates bring a warm, rustic feel. Painted crates can add color and brighten a room. Stain crates for a classic, polished look. Arrange crates vertically for tall shelves or stack horizontally for wide shelves. Adding small feet or casters can raise the shelf and protect floors.
Preparing The Crates
Preparing the crates is a key step to build a sturdy bookshelf. It makes sure the wood looks good and lasts long. Proper preparation helps the paint or stain stick well. It also protects the wood from damage over time.
Start with cleaning the crates thoroughly. Then, smooth the surfaces by sanding. After that, choose to paint or stain the wood. Finally, seal the crates to keep them safe from wear and tear.
Cleaning And Sanding
Remove dirt, dust, and old paint from the crates. Use a brush or cloth to clean all corners. Let the crates dry completely before sanding.
Sand the wood to smooth rough spots and edges. Use medium-grit sandpaper for the first pass. Follow with fine-grit paper for a smooth finish. Sanding helps the wood absorb paint or stain evenly.
Painting Or Staining
Pick paint or stain based on the look you want. Paint covers the wood fully and adds color. Stain shows the wood grain and gives a natural look.
Apply paint or stain with a brush or cloth. Use thin, even coats for better results. Let each coat dry well before applying the next. This process gives a neat and lasting finish.
Sealing For Protection
Seal the crates to protect against water and scratches. Use a clear sealant like polyurethane or varnish. Apply a thin coat evenly over the surface.
Allow the sealant to dry fully before using the crates. Sealing helps keep the wood strong and looking fresh. It extends the life of your bookshelf.

Credit: smokymountainfarmhouse.com
Assembling The Bookshelf
Assembling your wooden crate bookshelf is an exciting step. This is when your project starts taking shape. Following clear steps helps ensure a sturdy and attractive result. Focus on planning, joining, and securing the crates properly. Each step builds on the last, so take your time.
Layout Planning
Begin by arranging the crates on a flat surface. Try different layouts to find what fits your space and style. Make sure the crates align evenly for a balanced look. Mark positions lightly with a pencil to guide assembly. Planning the layout first saves effort later. It also helps visualize the final bookshelf.
Joining Techniques
Use screws or nails to join the crates securely. Drill pilot holes to prevent the wood from splitting. Wood glue adds extra strength to the joints. Clamp the crates together while the glue dries. Choose screws that are long enough to hold the crates firmly. Avoid using just glue or nails alone for stability.
Securing The Structure
Check all joints for tightness before moving on. Add corner brackets inside the crates for more support. Secure the bookshelf to the wall to prevent tipping. Use wall anchors suitable for your wall type. A stable bookshelf protects your books and your space. Test the shelf’s strength by gently pushing it. Make adjustments if you notice any wobble.
Finishing Touches
Finishing touches make your wooden crate bookshelf look complete and sturdy. They improve both style and safety. Small details give the project a polished feel. This section covers backing, decorations, and safety tips. These steps help your shelf last longer and look great.
Adding Backing Or Supports
Adding a backing board gives extra strength. It prevents books from falling behind the shelf. Use thin plywood or hardboard cut to size. Attach it with small nails or glue. Supports under shelves stop sagging. Use metal brackets or wooden cleats for support. These keep shelves straight and stable over time.
Decorative Elements
Paint or stain crates to match your room’s style. Use light colors to brighten dark wood. Add stencils or decals for a personal touch. Sand edges smooth to avoid splinters. You can also attach small handles for a rustic look. Decorations make the shelf unique and fit your space well.
Safety Tips
Secure the bookshelf to the wall with brackets. This stops it from tipping over. Check for sharp corners and sand them smooth. Use non-toxic paint or finishes if kids use the shelf. Make sure all nails and screws are flush or hidden. These steps keep your shelf safe for everyone.
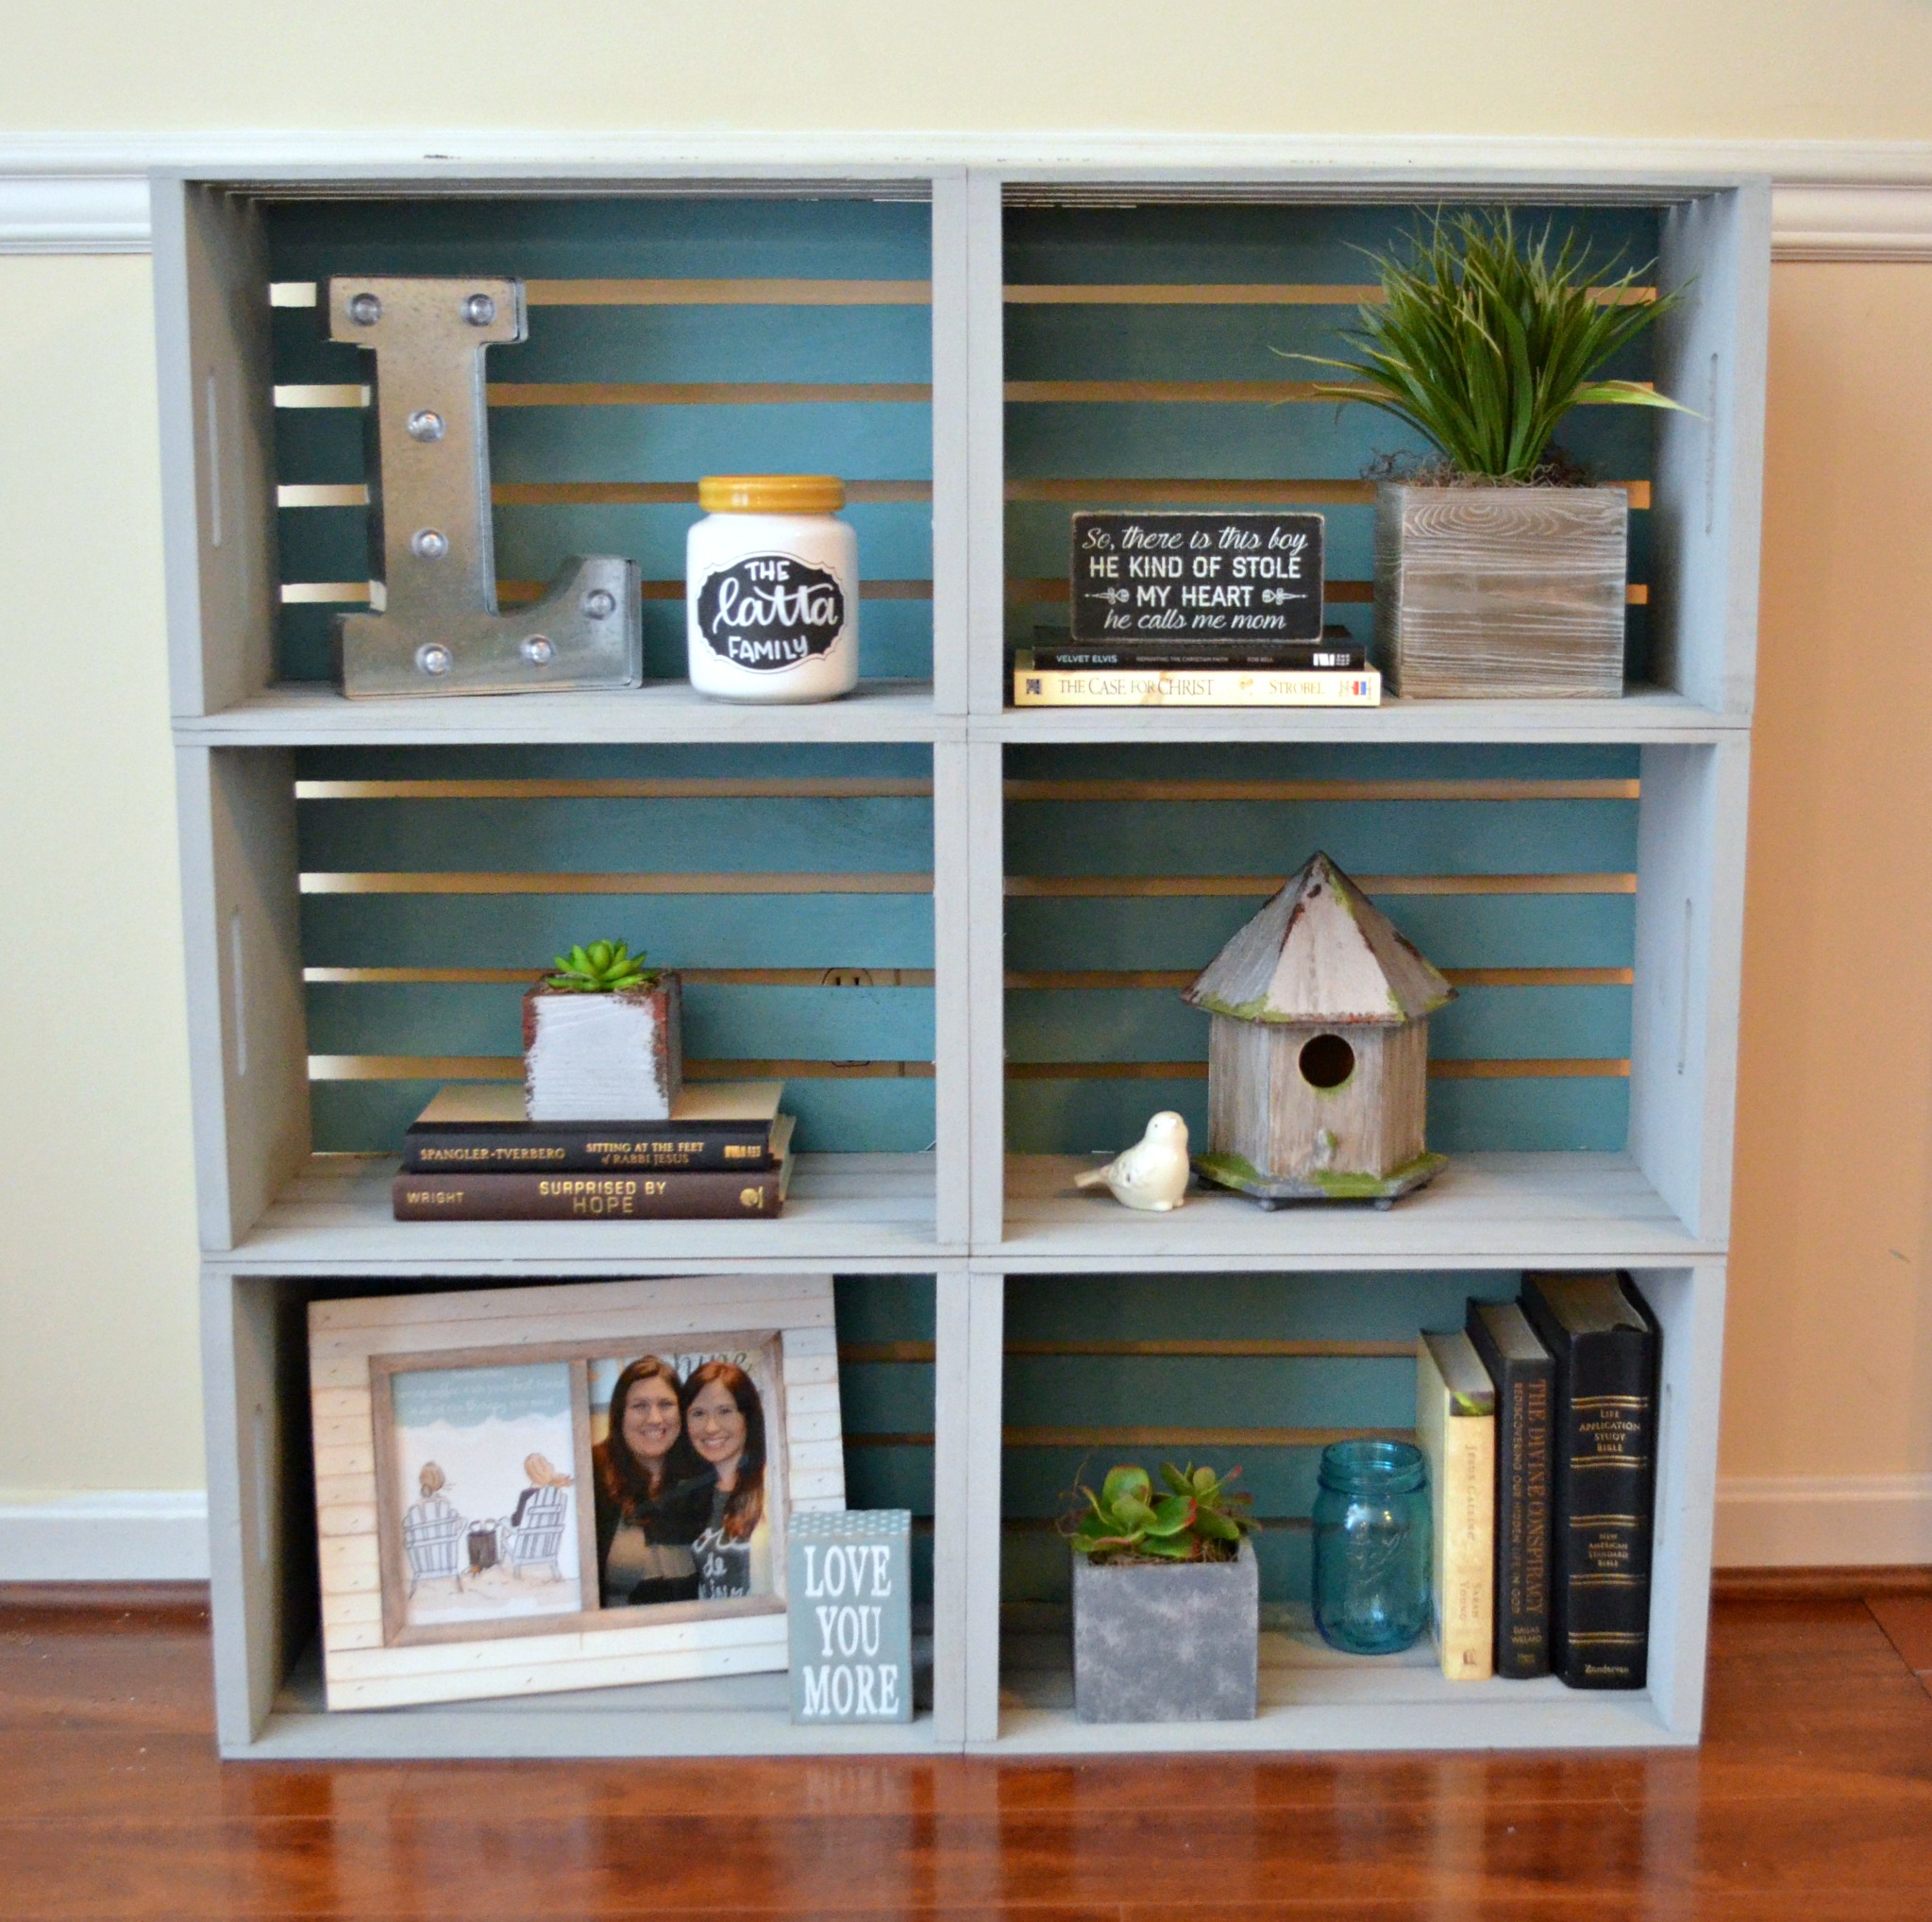
Credit: www.amylattacreations.com
Placement And Styling
Placement and styling are key to making your wooden crate bookshelf both useful and beautiful. The right spot in your home can enhance the room’s look and make your shelf easy to use. Styling the shelf helps to show off your books and items in a neat way. This section covers the best locations, organizing tips, and ways to accessorize your bookshelf.
Best Locations In Your Home
Choose a spot where the bookshelf fits well. Living rooms and bedrooms are popular choices. Hallways can also work if space is tight. Avoid placing the shelf in direct sunlight. Wood can fade or warp in strong light. Near a reading chair is great for easy book access. Make sure the shelf does not block walkways.
Organizing Books And Items
Sort books by size or color for a clean look. Mix standing books with some stacked horizontally. Add small baskets or boxes to hold tiny items. Keep heavy books on the bottom crates. Leave some empty space to avoid clutter. Group similar items together to make finding things easier.
Accessorizing Your Bookshelf
Place small plants on some crates for a fresh feel. Use photo frames or art pieces to add personality. Candles or decorative jars can bring warmth. Keep accessories balanced to avoid crowding. Use natural materials like wood or stone to match the crate. Change accessories seasonally for a new look.

Credit: taramichellehome.com
Frequently Asked Questions
What Materials Are Needed To Make A Wooden Crate Bookshelf?
You need wooden crates, screws, a drill, sandpaper, wood stain or paint, and a measuring tape. These basic tools help you assemble and finish the bookshelf efficiently.
How Do You Assemble Wooden Crates Into A Bookshelf?
Stack crates in your desired arrangement, then secure them using screws or brackets. Sand edges smooth and finish with paint or stain for durability.
Can I Customize The Size Of My Wooden Crate Bookshelf?
Yes, you can use crates of different sizes or stack more crates. Measure your space first to ensure the bookshelf fits perfectly.
Is It Necessary To Treat The Wood Before Assembling?
Treating wood with stain or sealant protects it from moisture and wear. It also enhances the wood’s appearance and extends the bookshelf’s lifespan.
Conclusion
Building a wooden crate bookshelf is a fun and useful project. You only need simple tools and some crates. Follow each step carefully to avoid mistakes. Soon, you will have a unique shelf for books or decorations. This project saves money and adds charm to any room.
Enjoy creating something practical with your own hands. Try different crate arrangements for a personal touch. A wooden crate bookshelf fits well in many spaces. Start building today and see your room change.