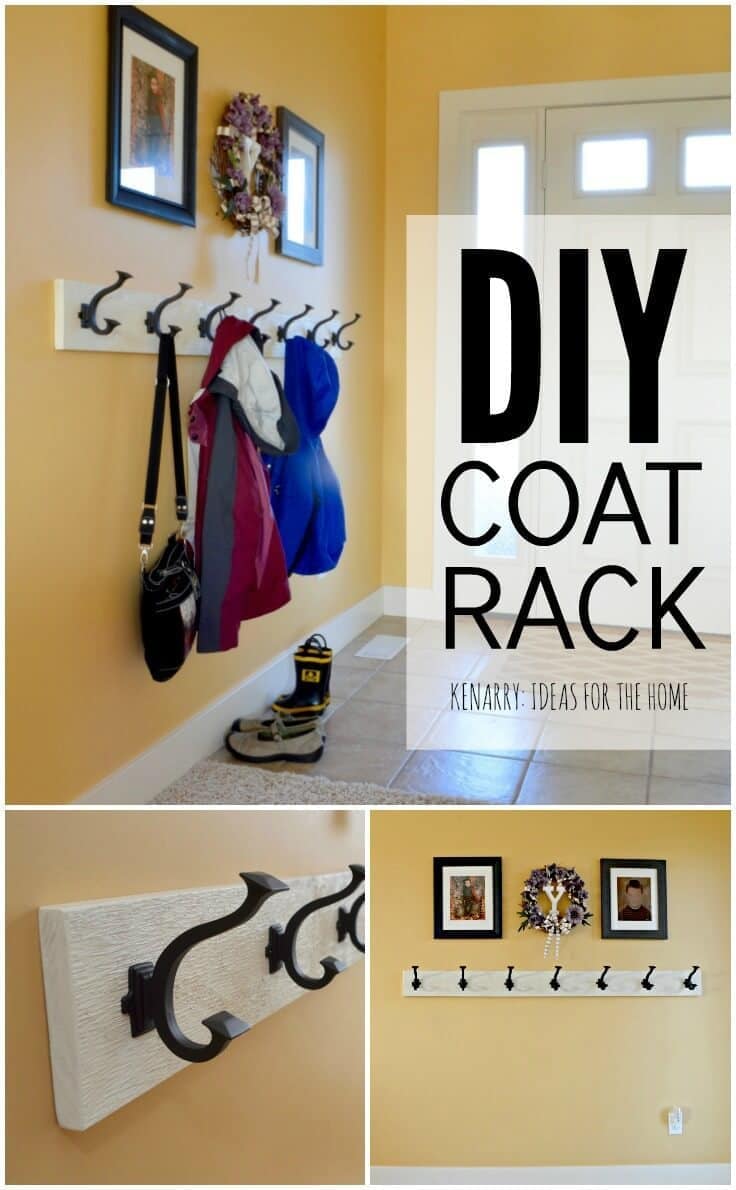
Looking for a simple way to organize your entryway and keep your coats, hats, and bags tidy? You’re in the right place.
Making your own entryway coat rack is easier than you think, and it can add a personal touch to your home. Imagine walking in the door and having a neat, stylish spot to hang everything—no more clutter or lost items.
In this guide, you’ll discover step-by-step instructions that anyone can follow, even if you’re not a DIY expert. Ready to transform your space and save time every day? Let’s get started!
Credit: www.etsy.com
Choosing Materials
Choosing the right materials is key for a strong and stylish coat rack. The materials affect the look, feel, and durability. Picking quality items makes your project last and look good.
Wood Types
Wood is the main material for a coat rack. Pine is soft and easy to work with. Oak is harder and very strong. Cedar resists moisture and smells nice. Choose wood that fits your style and budget. Smooth wood is easier to paint or stain.
Hardware Selection
Hooks hold the coats securely. Metal hooks are common and strong. Brass hooks add a classic look. Stainless steel resists rust and lasts long. Screws must fit the wood thickness. Anchors help if mounting on drywall. Pick hardware that matches your wood and home decor.
Tools Needed
Basic tools make building easier. A drill helps make holes for screws. A screwdriver tightens hardware. Sandpaper smooths rough wood edges. A measuring tape ensures correct size. A level helps hang the rack straight. Safety glasses protect your eyes during work.
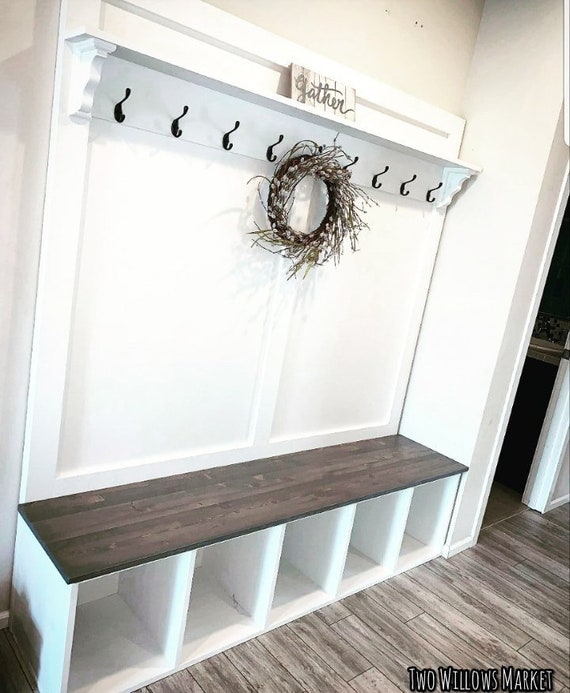
Credit: www.kenarry.com
Design Ideas
Designing an entryway coat rack can be fun and creative. It shapes the first impression of your home. Your rack can be simple, rustic, or modern. Each style offers a unique look and feel. Choose a design that fits your space and personality.
Simple Styles
Simple coat racks use clean lines and few materials. A wooden board with metal hooks works well. Paint it white or a soft color for a fresh look. Simple racks fit small spaces and keep clutter down. They are easy to make and match most decor.
Rustic Looks
Rustic coat racks bring warmth and charm. Use reclaimed wood or branches for a natural feel. Add wrought iron hooks to enhance the rustic style. This design suits country homes or casual spaces. It creates a cozy and inviting entryway.
Modern Touches
Modern coat racks focus on sleek and smooth designs. Use metal or glossy wood for a polished look. Hooks can be geometric shapes or hidden for clean lines. Choose neutral colors like black, white, or gray. Modern racks add a stylish and organized touch to your entry.
Measuring And Planning
Measuring and planning are the first steps to build a perfect entryway coat rack. Good planning saves time and prevents mistakes. Taking careful measurements helps your coat rack fit well in the space.
These steps make sure your rack looks neat and holds all your coats. Prepare tools like a tape measure, pencil, and paper before you start.
Space Assessment
Check the wall space where you want to place the coat rack. Look for any obstacles like light switches or furniture. Measure the height from the floor to the ceiling. Note the width of the available wall space. Consider how many coats you want to hang. Think about the daily use and traffic flow in the entryway. Space assessment helps avoid making the rack too big or too small.
Dimension Planning
Decide the length and height of the coat rack based on your space. Typical coat racks are about 5 to 6 feet long. The height should allow easy reach for all users. Plan the distance between each hook to avoid crowding. Usually, 6 to 8 inches between hooks works well. Keep some extra space on the sides for a balanced look.
Marking Guidelines
Use a pencil and a level to mark the spots for hooks and supports. Mark the height for the top of the rack first. Draw a straight line to align all hooks. Mark the exact points where screws or nails will go. Double-check the marks to avoid errors. Clear markings ensure easy installation and a sturdy rack.
Cutting And Preparing Wood
Cutting and preparing wood is the first step to build a sturdy entryway coat rack. The wood must be the right size and smooth to fit your space. Proper preparation makes the assembly easier and the final product look better.
Safe Cutting Tips
Wear safety glasses and gloves before cutting wood. Use a sharp saw to make clean cuts. Mark the wood with a pencil to guide your cuts. Cut slowly and steadily to avoid mistakes. Keep fingers away from the blade at all times.
Sanding Techniques
Sand each piece of wood to remove rough edges. Start with coarse sandpaper, then use finer grit for smoothness. Sand in the direction of the wood grain. Wipe away dust with a dry cloth after sanding. Smooth wood prevents splinters and improves paint or stain finish.
Pre-assembly Checks
Check all wood pieces for correct size and shape. Make sure edges are even and smooth. Test fit pieces together before gluing or screwing. Confirm all holes are drilled in the right spots. This step saves time and prevents problems later.
Assembling The Rack
Assembling the coat rack is the next step after gathering all materials. This part shapes your project into a functional piece. Follow simple steps to build a sturdy rack that holds coats well.
Joining Pieces
Start by aligning the wooden boards. Use wood glue on edges for a strong bond. Clamp the pieces together and let the glue dry. Add screws for extra support. Drill pilot holes first to avoid splitting the wood. Check that all joints are tight and flush.
Attaching Hooks
Mark the spots for hooks evenly along the front board. Use a ruler to keep spacing consistent. Screw each hook into place using a screwdriver. Ensure hooks face outward and are secure. Choose hooks that fit your style and coat sizes. Test the hooks by pulling gently to check strength.
Securing The Structure
Attach the rack to the wall or a base for stability. Use wall anchors if fixing to drywall. Measure and mark drill points carefully. Secure the rack with screws and a drill. Confirm the rack does not wobble or shift. A solid structure keeps coats safe and organized.
Finishing Touches
Finishing touches give your entryway coat rack a complete and polished look. These small details make a big difference in style and durability. Taking time to finish well ensures your rack looks great and lasts long.
Painting And Staining
Choose paint or stain that matches your home’s style. Paint offers many color options and hides imperfections. Stain highlights the wood’s natural beauty and grain. Apply thin coats and let each dry fully before the next. This creates a smooth and even finish.
Sealing For Durability
Sealing protects your coat rack from moisture and scratches. Use a clear sealant like polyurethane or varnish. Apply two or three thin coats for best results. Let each coat dry well and sand lightly between coats. Sealing helps keep the rack looking new for years.
Adding Decorative Elements
Decorative touches add personality to your coat rack. Add hooks with unique shapes or colors. Use stencils or decals for patterns or words. Attach small shelves or baskets for extra storage. These details make your rack stand out and fit your space perfectly.
Mounting The Rack
Mounting the coat rack properly is very important. It keeps the rack safe and useful. A well-mounted rack holds coats and bags without falling. Follow simple steps to mount it correctly on your wall.
Wall Anchors
Use wall anchors to hold the rack firmly. Drywall alone cannot hold heavy coats. Choose anchors that fit your wall type. Insert anchors before screws for strong support. This helps prevent the rack from pulling out.
Height Considerations
Pick the right height for easy reach. Mount the rack about 5 to 6 feet high. This fits most adults and kids. Avoid placing it too high or too low. The rack should be comfortable for everyone in the home.
Ensuring Stability
Check the rack is level before tightening screws. Use a spirit level for accuracy. Tighten screws firmly but do not overdo it. Test the rack by hanging a coat gently. A stable rack stays fixed and does not wobble.
Maintenance Tips
Keeping your entryway coat rack in good shape helps it last longer. Regular care makes sure it stays strong and looks nice. Simple steps can keep your rack clean, fix small problems, and even make it better over time.
Cleaning
Dust the coat rack often using a soft cloth. Wipe with a damp cloth to remove dirt. Avoid harsh cleaners that can damage the finish. Dry the surface well after cleaning. Clean hooks carefully to keep them rust-free.
Repairing
Check for loose screws or hooks regularly. Tighten them to keep the rack sturdy. Fix small cracks with wood glue or filler. Replace broken parts quickly to avoid bigger issues. Use the right tools for safe repairs.
Upgrading
Add new hooks for extra hanging space. Paint or stain the rack to refresh its look. Attach small shelves for keys or mail. Use decorative elements to match your home style. Upgrade parts to improve function and style.
Credit: www.etsy.com
Frequently Asked Questions
What Materials Do I Need For An Entryway Coat Rack?
You need wood planks, hooks, screws, a drill, sandpaper, and paint or stain. Choose sturdy wood for durability. Select hooks that support heavy coats and match your decor style.
How Do I Measure Space For My Coat Rack?
Measure the wall width and height where you want the rack. Leave enough space for coats and movement. Consider the number of hooks based on household needs to maximize usability.
Can I Customize The Coat Rack Design?
Yes, customize by choosing different wood finishes and hook styles. Add shelves or a bench for extra storage. Personalize size and color to match your entryway decor.
How Do I Install The Coat Rack Securely?
Locate wall studs for strong mounting. Use a level to keep the rack straight. Secure hooks and rack with appropriate screws for stability and safety.
Conclusion
Creating an entryway coat rack adds both style and function to your home. This simple project saves space and keeps your area tidy. You can customize it to fit your needs and décor. Using basic tools and materials makes it easy and affordable.
Enjoy the satisfaction of building something useful with your own hands. Your guests will notice the neat and organized entryway. Try this project to bring order and charm to your home. Small changes can make a big difference.