Have you ever wanted a unique bookshelf but thought it would be too hard or expensive to make at home? What if you could create a stylish, sturdy bookshelf using just paper?
Yes, paper! It’s easier than you think, and you don’t need special tools or skills. In this guide, you’ll discover simple steps to build your own bookshelf that’s not only practical but also a cool conversation piece. Ready to turn ordinary paper into something amazing?
Let’s get started!

Credit: www.amazon.com
Materials Needed
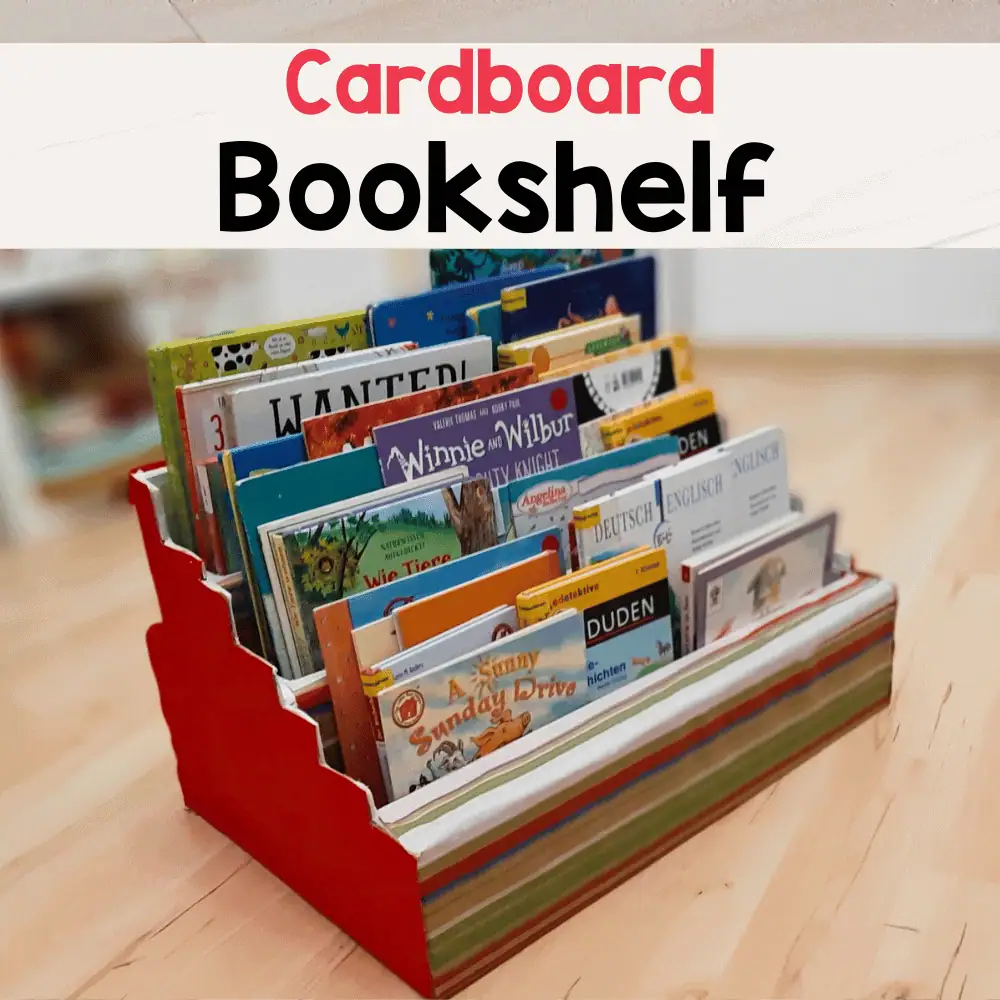
Making a bookshelf at home with paper is a fun and creative project. To start, you need the right materials. Choosing the proper paper and tools helps you build a sturdy and beautiful bookshelf. You can also add some decorations to make it unique. Let’s explore what materials you will need for this project.
Types Of Paper
Use thick paper or cardboard for strong shelves. Cardstock or poster board works well. Avoid thin paper like printer sheets. You want paper that holds weight and keeps shape. Recycled cardboard boxes can be a good choice. They are cheap and eco-friendly. Pick paper that is easy to cut and fold.
Tools And Accessories
Gather scissors or a craft knife for cutting paper. Use a ruler for straight lines and measurements. A pencil helps mark where to cut or fold. You will need glue or tape to stick parts together. Hot glue works fast and holds well. If you use tape, choose strong packing tape. A cutting mat protects your table and helps cut safely.
Optional Decorative Items
Decorate your bookshelf with paint or markers. Stickers or patterned paper add color and style. You can use washi tape for borders and designs. Small stencils help create neat shapes or letters. Clear varnish or spray sealant protects decorations. These items make your bookshelf look nice and personal.
Choosing The Design
Choosing the right design for your paper bookshelf is the first step. It sets the tone for the whole project. The design affects how much space the shelf uses and how it looks in your room. Think about your needs and style before you start.
Simple Shelf Shapes
Start with basic shapes like rectangles or squares. These shapes are easy to cut and fold. They give a clean and neat look. Simple designs hold books well and fit small spaces. Perfect for beginners who want a quick project.
Creative And Modern Styles
Try shapes like hexagons or triangles for a modern look. These styles add a fun twist to your bookshelf. You can stack or arrange them in unique ways. These designs make your shelf a room’s focal point. They need more skill but look very cool.
Size And Capacity Planning
Measure the space where you want to put the shelf. Think about how many books you want to store. Paper shelves need strong folds to hold weight. Plan the height and width carefully for balance. Proper planning avoids weak points and keeps your shelf sturdy.
Preparing Paper Components
Preparing paper components is the first step to build a sturdy paper bookshelf. It sets the foundation for a strong and durable structure. Take your time to prepare each piece carefully. Precision in cutting and folding is key to making your bookshelf last longer.
Cutting Techniques
Use a sharp craft knife or scissors for clean cuts. Cut paper sheets into equal sizes for uniformity. Straight edges help parts fit together well. Measure twice, cut once to avoid mistakes. Cutting on a cutting mat protects surfaces. Keep your cuts smooth to prevent tearing. Cutting slowly improves accuracy and safety.
Folding And Reinforcement
Fold paper along straight lines to create strong edges. Use a ruler to guide your folds. Crease folds sharply for better support. Reinforce folds with glue or tape for extra strength. Folded edges hold weight better than flat sheets. Make sure folds are even to maintain balance. Reinforcement stops paper from bending under load.
Creating Support Structures
Build support frames using folded and glued paper strips. Connect strips at right angles for stability. Layer paper strips to increase thickness and strength. Use triangular shapes inside to add support. Support structures keep shelves from sagging. Test each support piece for firmness before assembly. Strong supports ensure your bookshelf holds books safely.

Credit: www.youtube.com
Assembling The Bookshelf
Assembling the bookshelf made from paper requires patience and attention. This step transforms flat pieces into a sturdy shelf. Follow the instructions carefully to ensure a strong build. Each part must fit well to hold books safely. Take your time and enjoy the process.
Step-by-step Assembly
Start by laying out all paper parts on a clean surface. Identify each piece by size and shape. Begin with the base and side panels. Fold along the creases to create strong edges. Attach the bottom panel to the sides using glue or tape. Next, add the shelves one by one. Make sure each shelf is level before fixing it. Let the glue dry for a few minutes between steps.
Joining And Securing Parts
Use strong glue designed for paper crafts to join parts. Apply glue on edges where pieces meet. Press firmly for a few seconds. Use clips or small weights to hold parts while drying. Avoid using too much glue to prevent soggy paper. Check all joints for gaps and add more glue if needed. Reinforce corners with extra strips of paper for strength.
Ensuring Stability
Place the bookshelf on a flat surface to test balance. Press gently on top to check for wobble. Add extra support by attaching a cardboard back panel. Secure the back with glue or tape. Add small paper braces under shelves if needed. Keep the bookshelf away from moisture and heavy loads. This care helps maintain stability and durability.
Finishing Touches
The finishing touches make your paper bookshelf look complete and strong. These steps improve its style and last longer. Small details can change the whole appearance. Focus on painting, decoration, and protection to create a good finish.
Painting And Coating
Choose paint that works well on paper. Use light coats to avoid warping the shelves. Let each layer dry before adding another. Painting adds color and hides imperfections. A clear coat can make the paint last longer. It also gives a smooth surface and a nice shine.
Adding Decorative Elements
Decorate with washi tape, stickers, or small cut-outs. Simple patterns can make the shelf more fun and personal. Use glue to fix decorations securely. Think about matching colors with your room. Decorations make your bookshelf unique and eye-catching.
Protecting The Bookshelf
Apply a sealant to protect against moisture and dust. This helps the paper stay strong over time. Use spray or brush-on sealants for best results. Keep the shelf away from water and direct sunlight. Proper protection keeps your bookshelf looking great for years.
Maintenance Tips
Maintaining a paper bookshelf is important to keep it strong and good-looking. Paper is delicate, so regular care helps it last longer. Follow simple steps to keep your bookshelf neat and safe from damage.
Cleaning Methods
Use a soft, dry cloth to remove dust gently. Avoid wet cloths or sprays that can damage paper. A small brush can clean tight corners carefully. Clean your bookshelf once a week to prevent dust build-up.
Handling Wear And Tear
Check your bookshelf often for bends or tears. Fix small tears with clear tape to stop them from growing. Do not place heavy items that can cause the paper to bend. Handle the bookshelf gently when moving it to avoid breaks.
Storage Advice
Keep the bookshelf away from water and humidity. Store it in a dry, cool room to prevent warping. Avoid direct sunlight to stop paper fading and weakening. Place the bookshelf on a flat surface for better support.
Credit: www.littleladoo.com
Frequently Asked Questions
How Durable Is A Paper Bookshelf At Home?
A paper bookshelf can be surprisingly sturdy if made with thick, reinforced paper. Using layers and proper folding techniques increases durability. However, it is best for light items and decorative use. Avoid placing heavy books to prevent damage or collapse over time.
What Materials Do I Need To Make A Paper Bookshelf?
You need thick cardboard or heavy paper, glue, scissors, ruler, and pencil. Optional items include paint for decoration and tape for extra support. These materials are affordable and readily available, making the project easy and eco-friendly for home crafting.
How Much Time Does It Take To Build A Paper Bookshelf?
Building a paper bookshelf usually takes 1 to 2 hours depending on complexity. Preparing materials and precise folding add to the time. It is a quick DIY project suitable for beginners and can be completed in one session.
Can A Paper Bookshelf Hold Heavy Books Safely?
No, a paper bookshelf is best for lightweight books or decorative items. Heavy books can cause bending or collapse. For heavy storage, consider wooden or metal shelves to ensure safety and durability.
Conclusion
Making a bookshelf at home with paper is simple and fun. It saves money and helps you recycle. You can create a unique shelf that fits your style. Just follow the steps carefully and use the right materials. This project also improves your crafting skills.
Enjoy your new bookshelf and the pride of making it yourself. Try different designs next time for more creativity. Start today and see how easy it is!