Looking for a smart way to add storage and style to your room? A corner bookshelf might be exactly what you need.
It fits perfectly into those unused corners, saving space while showing off your favorite books and decor. In this guide, you’ll discover simple steps to build your own corner bookshelf—even if you’re new to woodworking. By the end, you’ll have a unique piece that’s both practical and eye-catching.
Ready to transform your space? Let’s get started!
Credit: woodwork.cooperjason.com
Choosing The Right Spot
Choosing the right spot for your corner bookshelf is a key step. It affects how well the shelf fits and how your room feels. A good spot can make your space look neat and cozy. Think about where the shelf will be useful and easy to reach.
Measure Your Corner Space
Start by measuring the height, width, and depth of your corner. Use a tape measure for accuracy. Write down these numbers. These measurements help you pick or build a shelf that fits perfectly. Avoid shelves that are too big or too small for the space.
Consider Room Layout
Look at the room’s layout before placing the shelf. Think about nearby furniture and walking paths. The shelf should not block doors or windows. It should add to the room’s flow, not clutter it. Place the shelf where it complements the room’s style and use.
Selecting Materials
Selecting the right materials is the first step to building a strong corner bookshelf. The materials affect the shelf’s look and how long it lasts. Choose wood and tools that fit your skill level and budget. Quality materials make the building process easier and the final product better. Take time to pick the best wood and tools before starting your project.
Types Of Wood To Use
Softwoods like pine are easy to cut and affordable. They are good for beginners and light to medium weight shelves. Hardwoods like oak and maple are stronger and last longer. They hold heavy books well and have a nice finish. Plywood is another option. It is stable, less likely to warp, and comes in large sheets. Choose smooth plywood to avoid extra sanding. Avoid wood with cracks or knots that may weaken the shelf.
Tools You’ll Need
Basic tools include a saw, drill, and screwdriver. A tape measure helps get exact cuts. Sandpaper or a power sander smooths rough edges. Clamps hold wood pieces steady while gluing or screwing. A level ensures shelves stay straight. Wood glue adds extra strength to joints. A pencil marks measurements and cutting lines. Using good tools makes your work easier and safer.
Designing Your Bookshelf
Cutting and preparing wood is a key step in building a corner bookshelf. It shapes the pieces that will fit perfectly in your space. Careful work here saves time and materials later. Follow simple steps to get clean, smooth wood parts ready for assembly.
Marking Measurements
Start by measuring your wood accurately. Use a tape measure and pencil to mark the cuts. Double-check each measurement before marking. Mark lines clearly on the wood surface. Straight, clear lines guide your saw for precise cuts.
Safe Cutting Techniques
Always wear safety goggles and gloves before cutting. Use a sharp saw for clean cuts and less effort. Cut slowly along the marked lines to avoid mistakes. Keep your fingers away from the blade. Secure the wood firmly with clamps to prevent movement.
Sanding And Finishing Edges
Sand each cut edge with fine-grit sandpaper. This removes splinters and smooths rough surfaces. Sand in the direction of the wood grain for best results. Wipe dust off with a clean cloth after sanding. Smooth edges help pieces fit better and look nice.
Credit: abeautifulmess.com
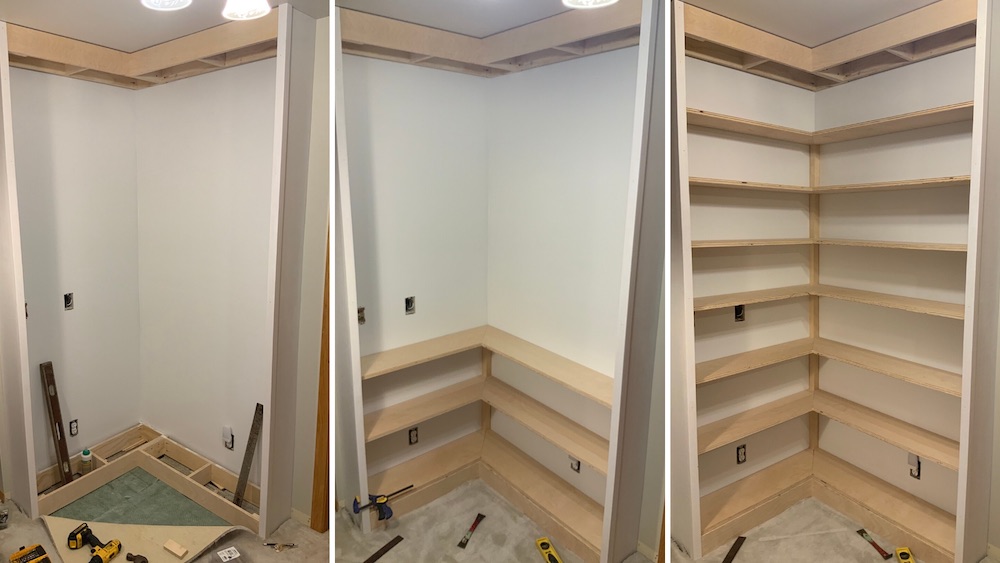
Cutting And Preparing Wood
Assembling the frame is the first big step in building your corner bookshelf. This stage sets the foundation for the entire piece. Taking your time to do it right helps the bookshelf stay strong and stable. Follow each step carefully to make sure the frame fits together well.
Joining Corner Pieces
Start by arranging the corner pieces in an L shape. Use wood glue on the edges for a tight bond. Clamp the pieces together to hold them steady. Drill pilot holes before adding screws. This stops the wood from splitting. Screw the pieces firmly to join them at the corner. Check that the angle is exactly 90 degrees for a perfect fit.
Securing Shelves
Place each shelf inside the frame at the marked spots. Use a level to keep shelves straight and even. Attach shelves with screws through the side panels. Make sure screws go deep enough to hold firmly. Add wood glue on the shelf edges for extra strength. Double-check that all shelves sit flush and secure before moving on.
Assembling The Frame
Adding finishing touches to your corner bookshelf gives it a polished and professional look. These steps protect the wood and secure the shelf safely. Take time to complete these details carefully. The result is a durable and attractive bookshelf.
Applying Paint Or Stain
Choose a paint or stain that matches your room decor. Use a brush or cloth to apply evenly on all surfaces. Let the first coat dry completely before adding a second coat. This process protects the wood and enhances its beauty. Sand lightly between coats for a smooth finish.
Installing Wall Anchors
Wall anchors keep your bookshelf stable and prevent tipping. Find the studs in your wall using a stud finder. Drill pilot holes in the bookshelf and wall for the anchors. Secure the bookshelf with screws into the anchors tightly. This step is important for safety, especially in homes with children or pets.

Credit: woodwork.cooperjason.com
Adding Finishing Touches
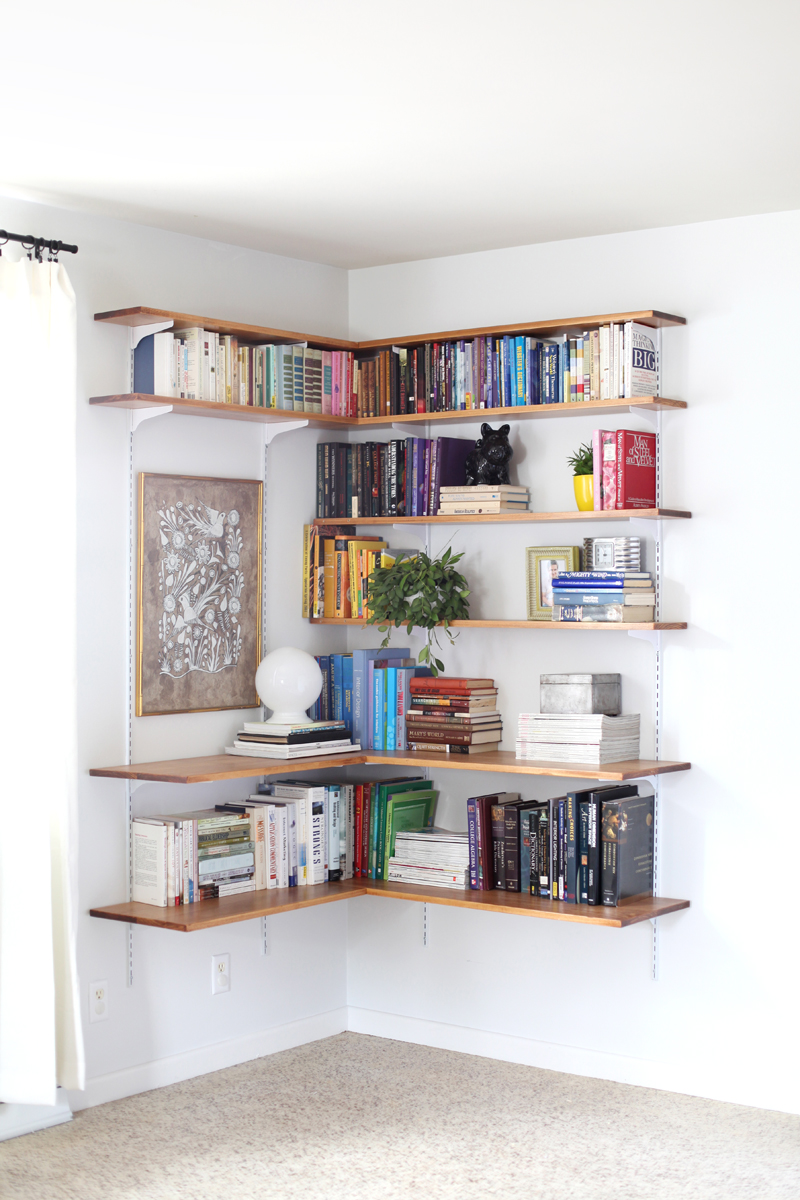
Styling your corner bookshelf can bring life to any room. It is more than just placing books on shelves. Thoughtful styling creates a warm, inviting space. It also shows off your personality and taste.
Start with simple ideas. Use colors and shapes to make your shelf look great. Mix books with small decorations for a balanced look. Keep the style neat and easy to change.
Arranging Books And Decor
Place books both vertically and horizontally for visual interest. Stack a few books to create space for small decor. Use bookends to keep books tidy and stylish. Add plants or small art pieces to add color and texture. Leave some empty space to avoid clutter and keep the shelf airy.
Maximizing Storage Efficiency
Use baskets or bins to store loose items and keep shelves clean. Group similar items together to find things easily. Adjust shelf height for tall books or items. Use the corner space wisely by placing taller items there. Keep everyday items within easy reach for convenience.
Frequently Asked Questions
What Materials Do I Need To Make A Corner Bookshelf?
You need wood panels, screws, brackets, wood glue, sandpaper, paint or stain, and basic tools like a drill and saw.
How Do I Measure The Space For A Corner Bookshelf?
Measure both adjoining walls’ lengths and heights where the shelf will fit. Note the corner angle for accuracy.
What Is The Best Wood Type For Corner Bookshelves?
Pine, oak, and plywood are popular for durability, affordability, and ease of work with common tools.
How Can I Ensure My Corner Bookshelf Is Stable?
Use sturdy brackets, secure shelves well, and evenly distribute weight to maintain balance and prevent tipping.
Conclusion
Building a corner bookshelf is a simple and useful project. You can save space and add style to any room. Just follow the steps carefully and take your time. Use the right tools and materials for a strong shelf. Enjoy placing your books and decorations neatly.
This small project can make a big difference in your home. Try it yourself and see how easy it can be. A corner bookshelf brings order and charm to your space.