Are your outdoor cushions looking tired, faded, or worn out? You don’t have to spend a fortune buying new ones.
Imagine transforming your old cushions into fresh, comfortable pieces that make your outdoor space inviting again. In this guide, you’ll discover simple, step-by-step tips to re-upholster your cushions like a pro. Whether you want to update the fabric or improve the padding, you’ll learn how to bring new life to your outdoor furniture with easy-to-follow instructions.
Ready to refresh your patio without breaking the bank? Let’s get started!
Tools And Materials Needed
Re-upholstering cushions for outdoor furniture needs specific tools and materials. Choosing the right supplies ensures durability and comfort. It also makes the process easier and faster.
Choosing Outdoor Fabric
Pick fabric made for outdoor use. It should resist water, sun, and dirt. Look for fabrics labeled “UV resistant” or “waterproof.” Polyester and acrylic fabrics work well. These fabrics last long and keep colors bright.
Selecting The Right Foam
Use foam designed for outdoor cushions. It should dry quickly and resist mold. High-density foam holds its shape better. Open-cell foam drains water faster. Choose foam thickness based on cushion comfort needs.
Essential Tools
Gather these tools before starting: scissors, staple gun, and measuring tape. A sewing machine helps with fabric edges. Use spray adhesive to hold foam and fabric. Needle and strong thread fix small tears. Having all tools ready saves time.
Preparing The Old Cushions
Preparing old cushions is the first step in re-upholstering outdoor furniture. It helps ensure the new fabric fits well and the cushions stay comfortable. Taking time to prepare cushions saves effort later and improves the final look. Start by removing the old fabric carefully. Then, check and clean the foam inside.
Removing Old Fabric
Begin by turning the cushion over to access the fabric’s underside. Use scissors or a seam ripper to cut any stitches. Pull the fabric gently to avoid damaging the foam. Remove all staples or tacks holding the fabric. Keep the old fabric pieces to use as a pattern for cutting new fabric. Work slowly for best results.
Inspecting And Cleaning Foam
Check the foam for tears, dents, or signs of mold. Small holes can be patched with foam glue. If the foam is too worn, replace it with new foam of the same thickness. Clean foam by gently vacuuming to remove dust and dirt. Let the foam dry fully before covering it again. Dry foam lasts longer and stays fresher.
Measuring And Cutting Fabric
Measuring and cutting fabric is the first important step in re-upholstering outdoor cushions. This step ensures the fabric fits perfectly on your cushions. Accurate measurements help avoid fabric waste and ensure the cushions look neat and professional. Take your time to measure carefully before cutting.
Taking Accurate Measurements
Start by removing the old cushion cover. Use a tape measure to get the length, width, and thickness of the cushion. Measure each side separately for better accuracy. Add an extra 1 to 2 inches to each measurement. This extra fabric allows room for seams and tucking. Write down all the measurements clearly to avoid confusion later.
Cutting Fabric Pieces
Lay the fabric flat on a clean surface. Place the cushion on the fabric to check the size visually. Use a fabric marker or chalk to mark the cutting lines. Cut slowly along the lines using sharp fabric scissors. Cut each piece carefully to match your measurements. Keep the fabric smooth and avoid stretching it while cutting.
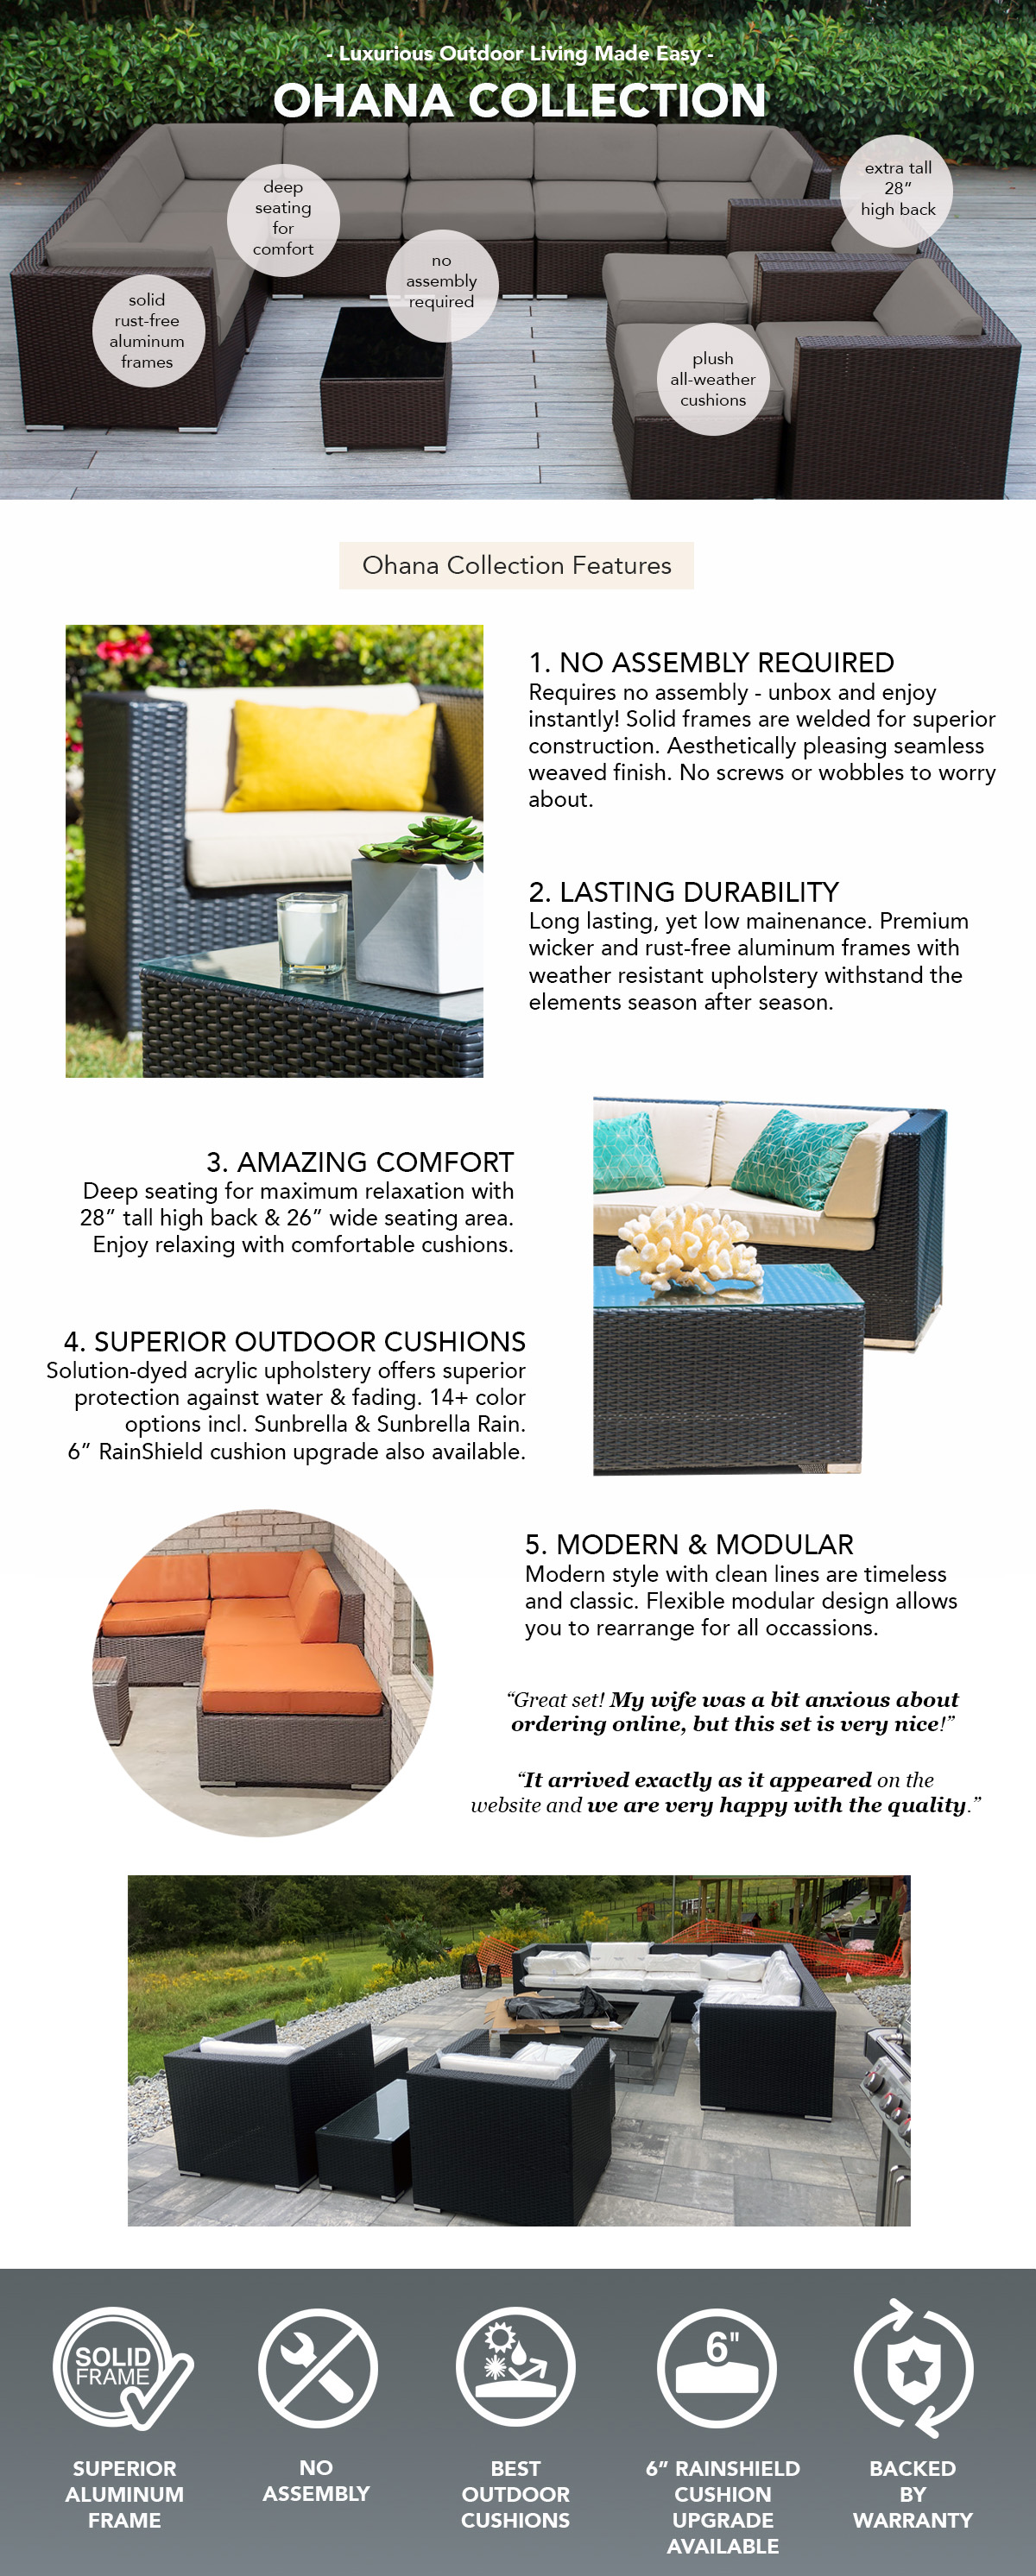
Credit: www.ohanawickerfurniture.com
Sewing The Cushion Covers
Sewing the cushion covers is a key step in re-upholstering outdoor furniture cushions. This process shapes the fabric to fit the cushion perfectly. A well-sewn cover protects the cushion and gives a clean, finished look.
Understanding basic sewing techniques helps create strong seams. Adding zippers or closures makes the covers easy to remove and wash. These skills improve both the look and function of your cushions.
Basic Sewing Techniques
Start by cutting fabric pieces according to your cushion size. Use sharp scissors for clean edges. Pin the fabric pieces together, right sides facing each other. Sew straight seams with a sewing machine or by hand. Backstitch at the start and end to secure the thread. Trim excess fabric near seams to reduce bulk. Turn the cover inside out to hide the seams. Press the fabric with an iron for a smooth finish.
Adding Zippers Or Closures
Zippers or closures let you remove covers easily. Choose a zipper length that matches your cushion size. Place the zipper on one edge of the fabric. Pin it in place, teeth facing down. Sew the zipper carefully using a zipper foot on your machine. Make sure the zipper moves smoothly. Alternatively, use Velcro strips or buttons for simple closures. Attach them securely to keep the cover closed during use.
Assembling The Cushions
Assembling the cushions is a key step in re-upholstering your outdoor furniture. This part brings your work together and makes the cushions ready for use. Handle each step with care to ensure a neat and comfortable finish.
Inserting Foam Into Covers
Start by placing the foam inside the new covers. Make sure the foam fits well and fills every corner. Push gently to avoid tearing the fabric. Smooth out wrinkles for a flat, even surface. Check the thickness to keep comfort and support balanced.
Sealing And Finishing Touches
Close the cushion covers using zippers or Velcro strips. Ensure the closure is tight and secure to keep foam inside. Trim any loose threads for a clean look. Press the seams to flatten edges. Your cushions should now look fresh and inviting.

Credit: www.sunbrella.com
Tips For Maintenance And Longevity
Keeping your outdoor cushions clean and safe helps them last longer. Proper care saves money and keeps furniture looking nice. Follow simple steps to maintain cushions after re-upholstering.
Cleaning Outdoor Cushions
Brush off dirt and dust regularly. Use a mild soap and warm water mix for stains. Gently scrub with a soft cloth or sponge. Rinse with clean water and let cushions dry fully in the sun. Avoid harsh chemicals that can damage fabric and color.
Protecting Against Weather
Store cushions indoors during heavy rain or snow. Use waterproof covers to shield cushions from moisture. Keep cushions away from direct sunlight for long periods. Rotate cushions often to prevent uneven fading. Dry cushions completely before storing to stop mold growth.

Credit: www.amazon.com
Frequently Asked Questions
What Materials Are Needed To Re-upholster Outdoor Cushions?
You need outdoor fabric, foam padding, sewing tools, scissors, and spray adhesive. Waterproof fabric and UV-resistant materials help cushions last longer outdoors.
How Do You Remove Old Fabric From Cushions?
Use a staple remover or flathead screwdriver to carefully pull out staples. Remove fabric slowly to avoid damaging the cushion foam underneath.
Can I Use Indoor Fabric For Outdoor Cushions?
Indoor fabrics are not suitable because they lack water and UV resistance. Use fabrics designed for outdoor use to prevent mold and fading.
How Do You Sew Cushions For Outdoor Furniture?
Cut fabric pieces to size, sew with a heavy-duty needle and thread. Use waterproof thread and double stitching for durability in outdoor conditions.
Conclusion
Re-upholstering cushions for outdoor furniture is a simple way to refresh your space. You save money and create a personalized look. Choose durable fabric that suits your style and weather needs. Take your time measuring and cutting carefully. Sewing or stapling the fabric tight keeps cushions neat and comfy.
Enjoy your refreshed outdoor area with cushions that last longer. This project brings new life to old furniture. Try it yourself and feel proud of your work.

