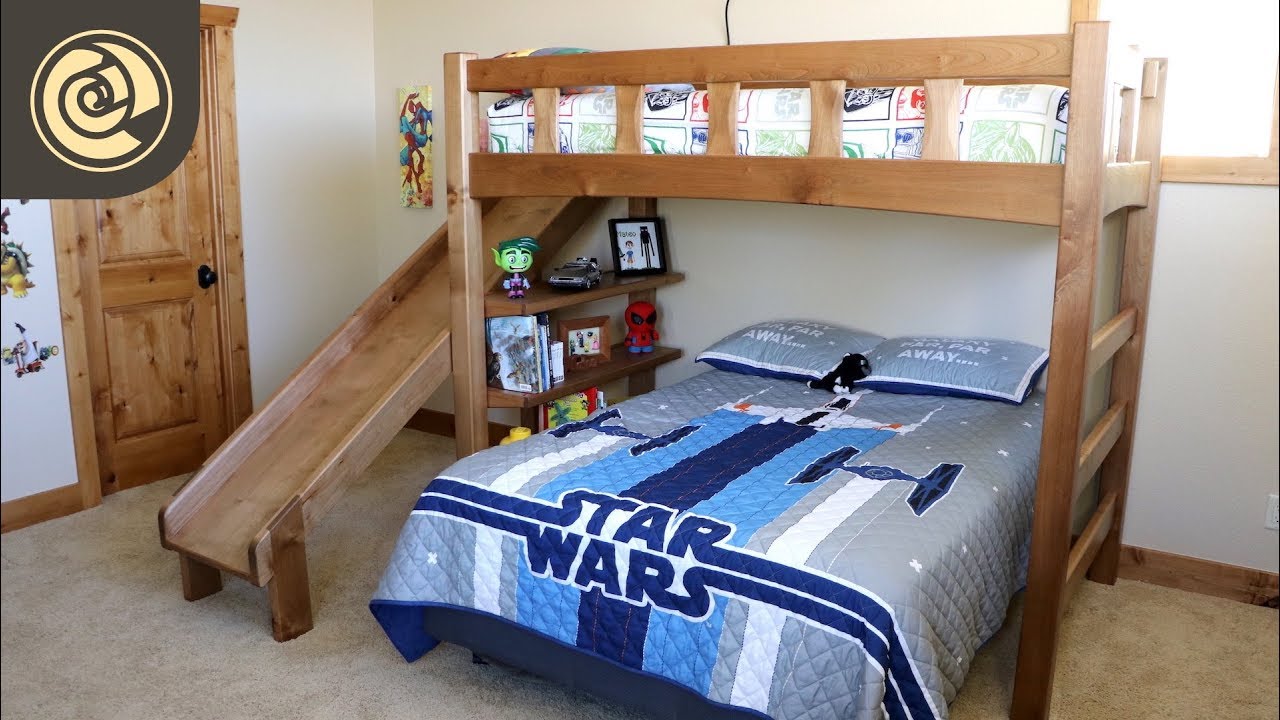
Imagine turning your child’s bunk bed into a fun, exciting playground right at home. A bunk bed slide adds a splash of adventure to any room, making mornings something to look forward to.
If you’ve ever thought, “How can I make my own bunk bed slide? ” you’re in the right place. This guide will show you simple, step-by-step ways to create a safe and thrilling slide that fits your space and style.
Ready to transform your bunk bed and bring endless joy to your kids? Keep reading to discover how easy and rewarding this project can be.
Credit: www.youtube.com
Materials And Tools Needed
Building a bunk bed slide is a fun project. It needs the right materials and tools. Choosing the best wood and tools makes the job easier. Safety gear is important too. Below is a list to help you prepare.
Choosing The Right Wood
Use strong, smooth wood for the slide. Pine and plywood work well. Avoid soft or knotty wood. The wood should be thick enough to hold weight. Check for smooth edges to prevent splinters. Sand the wood before use.
Essential Tools For The Project
Gather these tools before starting. A saw helps cut the wood to size. A drill makes holes for screws. Use screws and a screwdriver for assembly. Sandpaper smooths rough edges. Measuring tape keeps everything precise. Clamps hold pieces while working.
Safety Gear To Wear
Wear safety glasses to protect your eyes. Use gloves to keep hands safe. A dust mask stops inhaling sawdust. Ear protection reduces noise from tools. Dress in close-fitting clothes to avoid snags. Safety gear keeps you safe during work.
Planning Your Slide Design
Start by measuring the space around the bunk bed carefully. Choose strong, safe materials for the slide frame and surface. Plan the shape and angle to ensure a smooth, fun ride for kids.
Measuring Your Bunk Bed
Start by measuring the height of your bunk bed’s top bunk. Measure from the floor to the top rail where you want the slide to attach. Also, measure the length of the bed to find enough space for the slide. Measure the width of the bed frame to match the slide’s mounting points. Accurate measurements ensure the slide fits safely and securely.
Selecting The Slide Angle
Choose a slide angle that balances fun and safety. A steeper angle means a faster slide but more risk. A gentler angle slows the slide and is safer for younger kids. Aim for an angle between 30 and 40 degrees. This provides a smooth, enjoyable ride while keeping control. Consider the space available around the bed for the slide’s length.
Sketching The Layout
Draw a simple sketch of your slide on paper. Include the bed, slide attachment points, and the slide path. Mark the length and angle based on your measurements. Show where the slide will start and end. This helps visualize the project before building. A clear plan reduces mistakes and saves time.
Cutting And Preparing Wood
Cutting and preparing wood is the first big step in making your own bunk bed slide. It sets the stage for a safe and smooth slide. Careful work here makes the rest of the project easier and better.
Measure twice, cut once. This old saying is very true. Accurate cutting helps the slide fit perfectly and keeps it strong.
Marking Cut Lines
Start by measuring your wood pieces carefully. Use a pencil and ruler to draw straight lines. These lines show where you will cut. Make sure the lines are clear and easy to follow. Double-check all measurements before cutting. This step saves time and avoids mistakes.
Cutting The Slide Panels
Use a saw that fits your skill level and tools. A jigsaw or circular saw works well for cutting slide panels. Follow the marked lines slowly and steadily. Keep your hands safe by wearing gloves. Cut outside the line slightly to allow sanding later. Take breaks to avoid rushing and mistakes.
Sanding For Smoothness
After cutting, the wood edges will be rough. Use sandpaper or an electric sander to smooth these edges. Sand all surfaces, especially where children will touch. Smooth wood prevents splinters and makes the slide safe. Check the surface with your hand to find rough spots. Sand again if needed until the wood feels smooth and even.

Credit: www.youtube.com
Assembling The Slide Frame
Assembling the slide frame is the key step in making your own bunk bed slide. A strong frame keeps the slide safe and fun. It supports the weight and holds everything steady. Follow these simple steps to build a reliable frame.
Building The Base Structure
Start with a solid base using sturdy wood pieces. Cut two long boards for the slide’s length. Connect them with shorter boards at each end. Use screws to join the pieces tightly. Check the base is level and even. A strong base stops wobbling and keeps the slide steady.
Attaching Side Rails
Next, add side rails to guide the slide down. Attach two long rails along the base edges. Make sure the rails are smooth and free of sharp edges. Fix the rails firmly with screws or nails. Side rails prevent falls and keep the slide safe for kids.
Securing The Slide Surface
Finally, place the slide surface on top of the frame. Use a smooth board or plastic sheet for sliding. Align it carefully with the base and side rails. Secure the slide surface with screws spaced evenly. Check all parts are tight and safe before use.
Mounting The Slide To The Bunk Bed
Mounting the slide to the bunk bed is a key step in this project. Proper attachment ensures safety and fun. Take your time and follow the steps carefully. Secure the slide firmly to avoid any accidents. The following sections explain how to position, drill, fasten, and check stability.
Positioning The Slide
Decide where the slide will go on the bunk bed. Usually, the side with the most space works best. Align the top of the slide with the bed’s upper rail. Make sure the slide angle is comfortable for sliding down. Mark the spots where you will attach the slide.
Drilling And Fastening
Use a drill to make holes on the marked spots. Choose drill bits that match the screws you use. Insert screws through the slide and into the bed frame. Tighten screws until the slide feels secure but avoid over-tightening. Use washers if needed to prevent damage to the wood.
Checking Stability
Test the slide by applying pressure with your hands. Shake it gently to check for wobbling or loose parts. Sit or slide down slowly to confirm it holds weight. Tighten any screws if the slide moves. Safety first—ensure everything is solid before use.
Credit: www.reddit.com
Finishing Touches
Finishing touches make your bunk bed slide look great and safe. These final steps improve both style and function. They protect the wood and add fun or safety features. Let’s explore easy ways to finish your slide.
Painting Or Staining
Painting or staining protects the wood from wear. Choose bright colors for a fun look. Stains show the wood’s natural grain. Use non-toxic paint or stain for safety. Apply two coats for better coverage. Let each coat dry fully before adding the next.
Adding Non-slip Features
Non-slip features keep the slide safe. Add grip tape or rubber strips on the surface. These materials prevent slipping during use. Place them where feet land or slide down. Check the grip regularly and replace if worn. Safety first, especially for young kids.
Decorative Elements
Decorations make the slide unique and fun. Use stickers, decals, or stencils for patterns. Paint shapes like stars or animals. Attach soft cushions at the bottom for a comfy landing. Personal touches make the slide special and inviting. Keep decorations safe and secure for kids.
Safety Tips And Maintenance
Building your own bunk bed slide is fun and exciting. Safety and maintenance are important for long-lasting use. A well-maintained slide keeps kids safe and happy. Check the slide often to avoid accidents. Simple steps help keep the slide smooth and sturdy.
Regular Inspection
Look over the slide every week. Check for cracks, loose screws, or sharp edges. Make sure the slide is steady and attached well. Watch for splinters or rough spots. Clean the slide to keep it smooth and safe. A quick look can stop problems early.
Preventing Accidents
Teach kids how to use the slide safely. No pushing or crowding on the slide. Keep the area around the slide clear of toys and clutter. Place soft mats or rugs at the bottom to cushion falls. Use guardrails on the bunk bed for extra safety. Rules help prevent most accidents.
Repairing Wear And Tear
Fix small damages right away. Tighten screws and bolts regularly. Sand down rough or splintered wood to avoid cuts. Replace any broken parts quickly. Use safe, child-friendly paint or sealant to protect the slide. Regular care makes the slide last longer and stay safe.
Frequently Asked Questions
How Do I Start Building A Bunk Bed Slide?
Begin by measuring the bunk bed’s height and available space. Choose sturdy, smooth wood or plastic for the slide surface. Gather tools like a saw, screws, and sandpaper. Plan the slide’s angle for safety and fun, then cut and assemble the parts carefully.
What Materials Are Best For A Bunk Bed Slide?
Use smooth plywood or plastic sheets for the slide surface. Choose wood like pine or plywood for the frame. Opt for non-toxic, durable paint or varnish. Also, use screws, brackets, and sandpaper to ensure strength and safety. These materials balance durability and safety perfectly.
How Do I Ensure The Slide Is Safe For Kids?
Secure the slide firmly to the bunk bed frame. Smooth all edges with sandpaper to prevent splinters. Install side rails to keep kids from falling off. Test the slide for stability and proper angle before use. Regularly inspect for wear and damage.
Can I Add A Slide Without Modifying The Bed Frame?
Yes, you can attach a slide using clamps or brackets. Choose a slide design that fits alongside the bed safely. Avoid drilling if you want to keep the bed intact. Ensure the slide is stable and secure before letting children use it.
Conclusion
Building your own bunk bed slide can bring fun to any bedroom. It takes some planning, basic tools, and safety care. The process is simple and enjoyable. Kids will love having their own slide to play on. Plus, it adds a unique touch to the room.
Try it step-by-step and enjoy the results. Creating something with your hands feels great. Give your bunk bed a new twist today!