Is your old bookshelf looking tired and worn out? You don’t have to toss it away or spend a lot on a new one.
With a little paint and some simple steps, you can transform your bookshelf into a stunning piece that fits your style perfectly. Imagine how satisfying it will feel to see your old furniture come back to life with fresh colors.
Keep reading, and you’ll discover easy tips and tricks that make painting your bookshelf a fun and rewarding project you can do yourself.

Credit: www.youtube.com
Gather Supplies
Gathering the right supplies makes painting an old bookshelf easier and better. Start with the basics. Choose the correct paint and tools. Prepare safety gear to protect yourself.
Choose Paint Type
Select paint that sticks well to wood. Latex paint is easy to clean and dries fast. Chalk paint gives a matte, vintage look. Oil-based paint lasts longer but takes more time to dry. Pick paint based on the look and durability you want.
Select Brushes And Tools
Use brushes with soft bristles for smooth paint. A small angled brush works well for corners. A foam roller can help cover large flat areas quickly. Sandpaper or a sanding block smooths the surface before painting. Have a clean cloth to wipe dust away.
Prepare Safety Gear
Wear gloves to keep paint off your hands. Use a mask if paint smells strong or if sanding. Protect your eyes with safety glasses. Work in a well-ventilated space to avoid fumes. Safety gear keeps you safe and comfortable.
Prepare The Bookshelf
Preparing the bookshelf is the first step before painting. It helps the paint stick well and last longer. A clean, smooth surface makes the final look neat and fresh.
Follow these simple steps to get your old bookshelf ready for a new coat of paint.
Empty And Clean
Remove all books and items from the shelves. Dust and dirt can stop paint from sticking. Use a damp cloth to wipe every part of the bookshelf. Clean it well, especially corners and edges. Let it dry completely before moving on.
Remove Hardware
Take off any knobs, handles, or hinges. This makes painting easier and neater. Keep all screws and hardware in a safe place. If you forget this step, paint can get on metal parts and look messy.
Sand The Surface
Lightly sand the entire bookshelf with fine sandpaper. This removes old paint and smooths rough spots. Sanding helps the new paint stick better. Wipe the dust away with a clean cloth after sanding. Now, the shelf is ready for painting.
Prime The Surface
Priming the surface of your old bookshelf is a key step before painting. It helps paint stick better and last longer. Primer also hides stains and uneven colors. This step prepares the wood or material for a smooth, even finish.
Pick The Right Primer
Choose a primer that fits your bookshelf material. For wood, use a wood primer. For laminate or metal, pick a special primer made for those surfaces. A good primer prevents peeling and improves paint coverage.
Apply Primer Evenly
Use a brush or roller to spread primer evenly. Cover all corners and edges well. Avoid thick layers; thin coats dry faster and look smoother. Take your time to get full coverage on the surface.
Allow Primer To Dry
Let the primer dry fully before painting. Check the label for drying times. Dry primer creates a strong base for paint. Rushing this step can cause paint to peel or bubble later.
Apply Paint
Applying paint on an old bookshelf needs care and patience. It shapes the final look and protects the wood. Use smooth, even strokes to cover the surface well. Avoid thick layers that can drip or peel later. Follow a clear process to get the best results.
First Coat Tips
Start with a thin, light layer of paint. Use a good brush or roller for smooth coverage. Paint along the grain of the wood for a neat finish. Avoid pressing too hard to stop streaks. Cover all corners and edges carefully.
Drying Time
Let the first coat dry fully before the next step. This usually takes 2 to 4 hours. Check the paint feels dry to touch and not sticky. Proper drying stops smudges and helps the paint stick better. Be patient; rushing spoils the finish.
Second Coat Application
Apply the second coat the same way as the first. This layer makes the color rich and even. Use smooth strokes and cover any thin spots. Check for drips and smooth them out quickly. Let the second coat dry completely before use.
Add Finishing Touches
Adding the finishing touches brings your painted bookshelf to life. This step makes sure your work looks complete and lasts longer. Take your time to do these final tasks carefully. They help protect the paint and keep the shelf functional.
Reattach Hardware
Start by putting back any knobs or handles you removed. Clean the hardware before attaching it. Use a screwdriver to fix each piece tightly. Check if doors or drawers open smoothly. Proper hardware makes your shelf easy to use.
Protect With Sealant
Apply a clear sealant to protect the paint. Choose a sealant that matches your paint type. Use a brush or spray for an even coat. Let it dry completely before touching the shelf. Sealant guards against scratches and water damage.
Final Inspection
Look over the entire bookshelf carefully. Check for missed spots or uneven paint. Fix any small mistakes with a brush. Test the stability of shelves and doors. Your final check ensures your bookshelf looks great and works well.
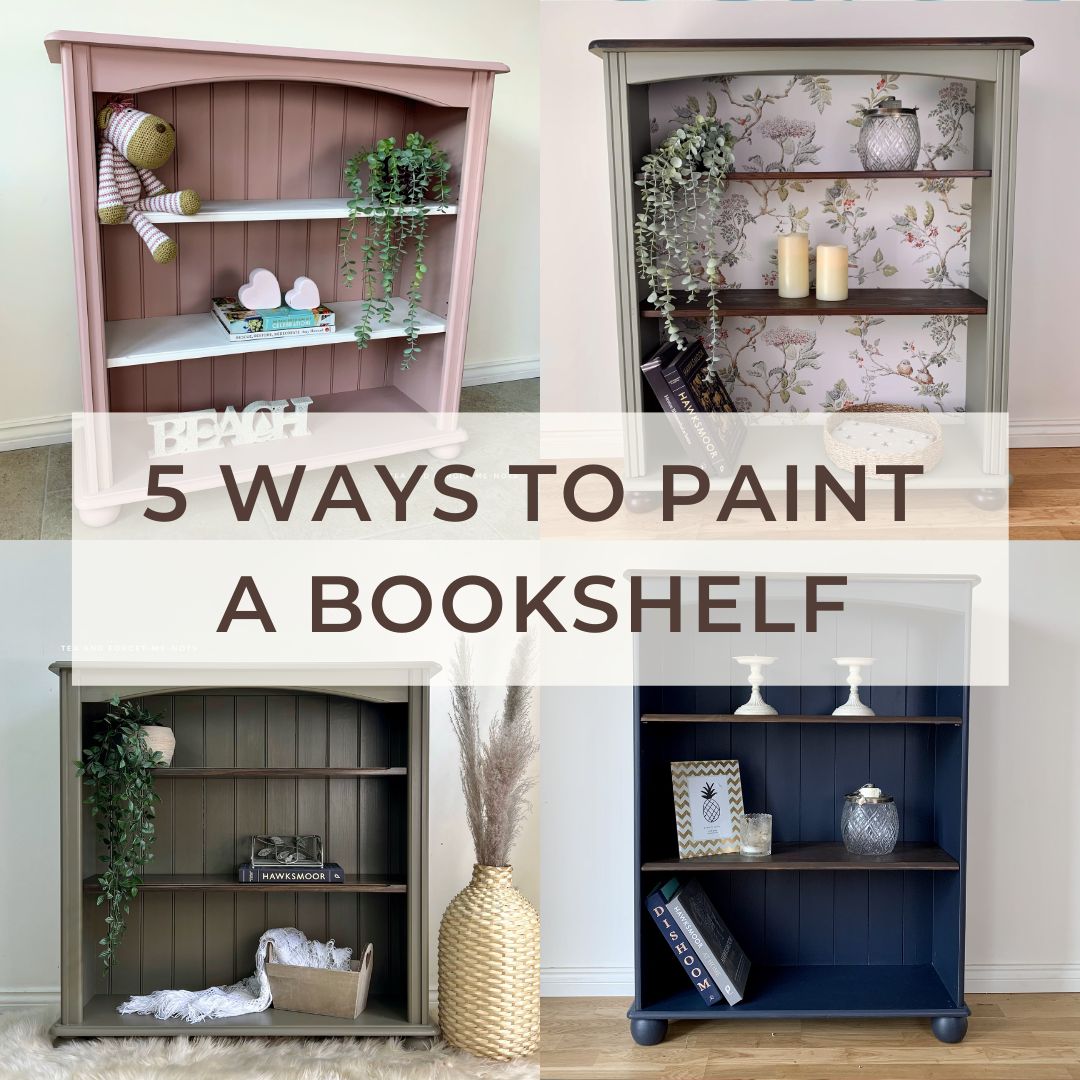
Credit: www.teaandforgetmenots.com
Maintenance Tips
Maintaining your painted bookshelf keeps it looking fresh and new for years. Regular care protects the paint and the wood underneath. Small efforts can prevent big problems later. Here are some simple tips to help you maintain your painted bookshelf.
Cleaning Painted Surfaces
Dust your bookshelf often with a soft cloth. Avoid using rough materials that can scratch the paint. For deeper cleaning, use a damp cloth with mild soap. Wipe gently and dry immediately. Do not soak the wood to prevent damage.
Touch-up Advice
Keep some leftover paint for touch-ups. Check for chips or scratches regularly. Use a small brush to fix any marks. Apply thin layers to blend with the rest of the paint. Let the paint dry fully before using the shelf again.
Long-term Care
Keep the bookshelf out of direct sunlight to avoid fading. Avoid placing heavy objects that can cause dents. Use coasters or pads under items to protect the surface. Repaint every few years to maintain a fresh look. Store the bookshelf in a dry area to prevent moisture damage.

Credit: www.youtube.com
Frequently Asked Questions
How Do I Prepare An Old Bookshelf For Painting?
Start by removing all items from the shelf. Clean the surface with mild soap and water. Sand the bookshelf lightly to remove old paint and smooth rough spots. Wipe away dust with a damp cloth before painting.
What Type Of Paint Works Best On Wood Bookshelves?
Use acrylic latex paint for durability and easy cleanup. It adheres well to wood and resists chipping. Choose a semi-gloss finish for a smooth, washable surface. Avoid oil-based paints unless you want extra durability but expect longer drying times.
Should I Use Primer Before Painting The Bookshelf?
Yes, apply a primer to help paint stick better. Primer seals the wood and blocks stains or knots. It ensures an even paint finish and increases durability. Use a wood-specific primer for best results.
How Many Coats Of Paint Are Needed For An Old Bookshelf?
Typically, two coats of paint are ideal for coverage. Let the first coat dry completely before applying the second. More coats may be needed for darker colors or rough surfaces to achieve a smooth finish.
Conclusion
Painting an old bookshelf can bring new life to your space. Start with good preparation to get smooth results. Choose the right paint for a lasting finish. Take your time and work in small sections. Let each coat dry fully before the next.
This simple project can refresh your room without much cost. You’ll enjoy seeing old furniture look fresh and bright again. Give it a try and see how easy it is!