Are you ready to transform your space with a single bunk bed but unsure where to start? Putting a single bunk bed together might seem tricky, but with the right steps, you can build it quickly and safely.
Imagine having a cozy, space-saving bed ready in no time—giving you more room and comfort. This guide will walk you through each step clearly, helping you avoid common mistakes and feel confident as you build. Stick with me, and you’ll have your bunk bed set up before you know it.
Let’s get started!
Gather Tools And Parts
Gathering all the tools and parts before starting is very important. It saves time and helps avoid frustration. Having everything ready makes the assembly process smoother and safer.
Check The Package Contents
Open the box carefully. Look at the instruction manual first. It lists all parts included in the package. Check each item against the list. Make sure no part is missing or damaged. Check for screws, bolts, boards, and side rails. Sort the parts by size and type. This helps find them quickly during assembly.
Prepare Necessary Tools
Get all tools needed before you start. Most bunk beds require simple tools like a screwdriver or Allen wrench. Sometimes a hammer or a wrench may be needed. Use the tools suggested in the manual. Have a clean, flat workspace ready. Keep tools nearby to avoid interruptions. This preparation speeds up the building process and reduces errors.
Read The Instructions
Reading the instructions is the first and most important step in assembling a single bunk bed. It helps avoid mistakes and saves time. Clear instructions guide you through each part of the process. This step ensures safety and a strong bed frame.
Familiarize With Assembly Steps
Start by reading the entire instruction manual carefully. Understand the order of the steps before starting. Knowing what comes next keeps the process smooth. It also helps you prepare tools and space needed for each step.
Pay attention to any warnings or tips in the manual. These notes often prevent damage or injury. Take your time to visualize each step as you read. This makes the physical assembly easier and faster.
Identify Key Components
Check all the parts listed in the manual before assembly. Identify the frame pieces, screws, bolts, and special fittings. Lay them out in a clean and organized area. This helps find the right part quickly during assembly.
Match each component with the pictures or diagrams in the instructions. Knowing each part’s function helps avoid confusion. Missing or wrong parts can delay the build and cause frustration.
Keep small parts in a container to prevent loss. Organizing components saves time and reduces stress during the build.
Assemble The Bed Frame
Assembling the bed frame is the first step in building a single bunk bed. A strong frame keeps the bed safe and stable. Follow the steps carefully to make sure all parts fit well. Take your time and check each piece before attaching. A well-assembled frame makes the rest of the process easier.
Attach Side Rails To Headboard
Start by placing the headboard upright. Align the side rails with the slots on each side of the headboard. Use the bolts or screws provided in your kit. Tighten them securely but do not over-tighten. Make sure the rails are level and straight. This connection forms one side of the bed’s base.
Connect Footboard To Frame
Next, position the footboard at the opposite end of the side rails. Match the bolt holes on the footboard with the ends of the rails. Insert the screws or bolts and tighten firmly. Check that the frame forms a solid rectangle. The bed frame should feel sturdy with no loose parts. This step completes the basic structure of the bunk bed.
Credit: www.pkolino.com
Install Support Slats
Installing support slats is a key step in assembling a single bunk bed. These slats hold the mattress and ensure the bed stays strong and safe. Proper placement and securing of the slats prevent the mattress from sagging.
Take your time with this part. A well-installed support system keeps the bed stable for years. Follow the steps carefully to get the best results.
Position Slats Evenly
Place each slat across the bed frame from side to side. Space them evenly to spread the mattress weight. Equal gaps help the mattress rest flat without bending. Check the instructions for the right distance between slats. Use a tape measure for accuracy. Uneven slats can cause discomfort and damage.
Secure Slats Firmly
Fix each slat tightly to the bed frame. Use screws or brackets provided with your bed kit. Tighten all fasteners to stop movement. Loose slats can shift and make the bed unstable. Double-check every slat after installation. Firm support stops noise and extends bed life.
Attach Safety Rails
Attaching safety rails is a key step in building a single bunk bed. These rails keep sleepers safe and prevent falls. Proper attachment makes the bed sturdy and secure. Take your time to position and fasten the rails correctly.
Position Guardrails Correctly
Place the guardrails on the sides of the bed frame. Make sure the rails cover the open edges fully. Align the rails so they sit flush against the bed’s side panels. Check the height of the rails to protect the sleeper well. The top edge should be above the mattress level.
Fasten Rails Securely
Use the screws or bolts provided with the bed kit. Tighten each fastener firmly but avoid stripping the threads. Double-check all connections to ensure no parts are loose. A secure rail will not wobble or shift under pressure. Confirm the guardrails are stable before moving on.
Set Up Ladder
Setting up the ladder is an important step in assembling a single bunk bed. The ladder allows safe access to the top bunk. Proper alignment and secure attachment keep it stable and safe to use. Follow the steps carefully for a sturdy setup.
Align Ladder With Bed Frame
Place the ladder next to the bed frame. Match the ladder’s side rails with the bed’s ladder slots or brackets. Ensure the ladder is straight and fits well. Check that the ladder steps are level and easy to climb. Proper alignment prevents wobbling and accidents.
Secure Ladder In Place
Use the screws or bolts provided with the bunk bed. Attach the ladder firmly to the frame at the top and bottom. Tighten each screw evenly to avoid loose parts. Double-check the ladder by gently pulling it. A secure ladder supports weight safely and lasts longer.
Check Stability
Checking the stability of your single bunk bed is very important. A stable bed keeps the sleeper safe and comfortable. It also stops the bed from shaking or making noise. This step comes after assembling the bed frame and fixing the parts together. Take your time and check every part carefully. A stable bed lasts longer and feels stronger.
Tighten All Screws
Use a screwdriver or an Allen key to tighten every screw. Loose screws can cause the bed to wobble. Go over all the screws on the frame, ladders, and guardrails. Tighten them firmly but avoid stripping the screws. Check screws twice to make sure none are loose. A solid frame means a safer bed.
Test Bed For Firmness
Press down on different parts of the bed to check for movement. Sit and gently bounce on the bed to feel any wobble. Listen for creaking sounds that show weak spots. If the bed shifts, find the loose areas and tighten screws again. A firm bed gives better support and peace of mind.

Credit: funkybunkbeds.com
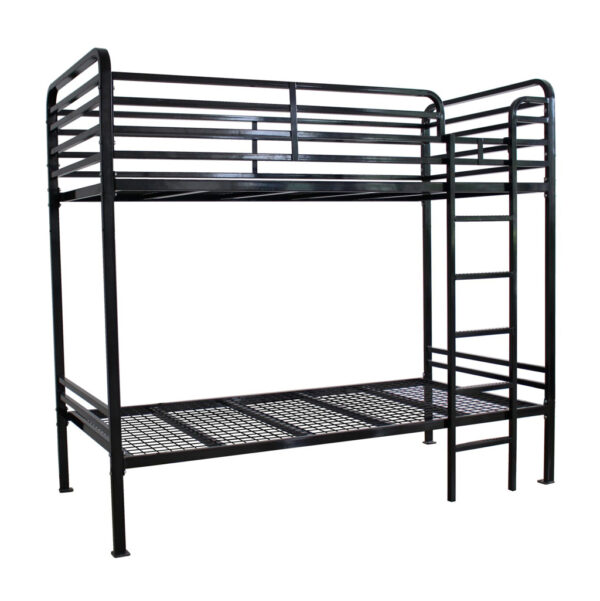
Credit: heavydutybunkbeds.com
Frequently Asked Questions
How Long Does It Take To Assemble A Single Bunk Bed?
Assembling a single bunk bed typically takes 1 to 2 hours. It depends on your experience and tools available. Following the instructions carefully speeds up the process and ensures safety.
What Tools Are Needed To Put A Bunk Bed Together?
You generally need a screwdriver, Allen wrench, and a hammer. Some bunk beds come with the necessary tools included. Having a power drill can also make assembly faster and easier.
Are Single Bunk Beds Safe When Properly Assembled?
Yes, single bunk beds are safe if assembled correctly. Ensure all screws and bolts are tightly secured. Regularly check the bed for stability to prevent accidents.
Can One Person Assemble A Single Bunk Bed Alone?
Yes, one person can assemble a single bunk bed alone. However, having an extra person helps with lifting and aligning parts. It makes the process faster and safer.
Conclusion
Putting a single bunk bed together can be simple and quick. Follow each step carefully and use the right tools. Take your time to check all parts fit well. Tighten screws firmly to keep the bed safe. A well-built bunk bed lasts longer and feels sturdy.
Enjoy the extra space and comfort it brings. Now, you have a cozy bed ready for rest or play.