Is your coat rack wobbling or feeling unstable? A loose base can make your coat rack unsafe and frustrating to use.
But don’t worry—you don’t need to call a professional or buy a new one. In this guide, you’ll discover simple and effective ways to tighten the base of your coat rack. By following a few easy steps, you can make your coat rack sturdy again and keep your space organized.
Ready to fix it yourself? Let’s get started!

Credit: www.amazon.com
Identify Loose Areas
Identifying loose areas is the first step to tightening the base of a coat rack. This step helps find weak spots that cause wobbling or instability. Careful inspection ensures the coat rack becomes sturdy and safe to use.
Check Connection Points
Start by examining where different parts join. Look for screws, bolts, or nails that may be loose or missing. Gently wiggle each joint to feel for any movement. Tighten any loose screws or replace missing ones. Secure connection points prevent the coat rack from shaking or tipping over.
Inspect Base Components
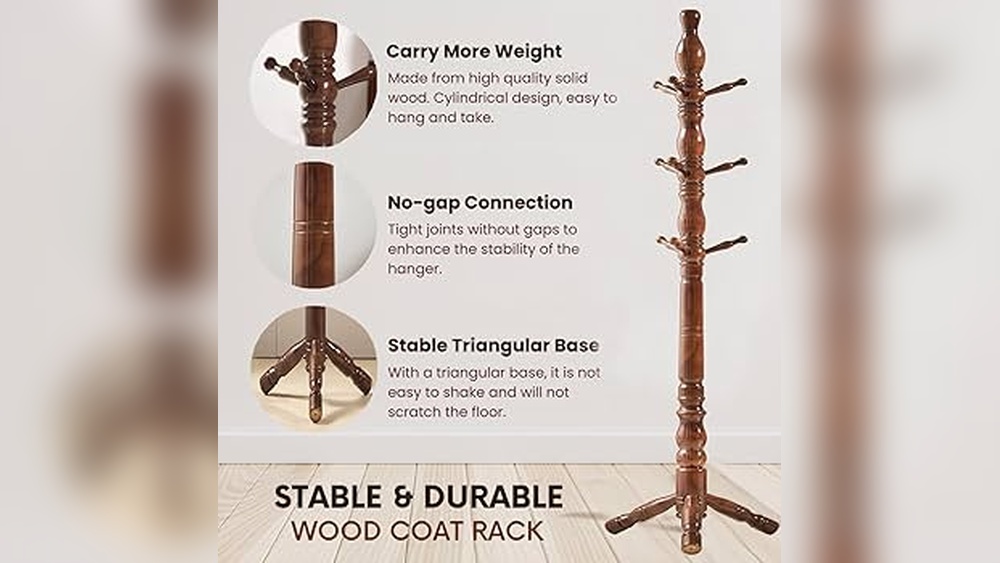
Focus on the base structure that supports the coat rack. Check for cracks or splits in the wood or metal. Look for loose feet or pads that keep the rack stable on the floor. Make sure all parts fit tightly together with no gaps. Fixing base components strengthens the entire coat rack.
Gather Necessary Tools
Before tightening the base of your coat rack, gather the right tools. Having everything ready saves time and effort. It also helps you fix the rack quickly and safely.
Common Household Tools
Start with simple tools you probably have at home. A screwdriver is usually needed to tighten screws. Check if your coat rack uses a flathead or Phillips screwdriver.
A wrench or adjustable spanner helps with bolts and nuts. A hammer might be useful for small taps or adjustments. Keep a tape measure handy to check the rack’s alignment. A flashlight can help you see screws in dark corners.
Specialized Fixing Supplies
Some coat racks need special supplies to secure the base firmly. Wood glue can strengthen wooden joints. Thread locker prevents screws from loosening over time.
Wall anchors or plugs may be necessary if the rack is attached to drywall. Rubber pads under the base stop slipping and protect floors. Use these supplies as needed for a tight and stable coat rack base.
Tighten Screws And Bolts
Tightening the screws and bolts is essential to keep your coat rack stable and secure. Over time, these fasteners can loosen from use or movement. Tightening them restores firmness and prevents wobbling. This step is simple but important for safety and durability.
Locate All Fasteners
Start by finding every screw and bolt on the base of the coat rack. Check both visible and hidden areas. Look under the rack and inside any joints. Missing a fastener can leave the rack unstable. Take your time to find each one carefully.
Use Proper Tools For Tightening
Use the right tools like a screwdriver or wrench that fits the fasteners well. Using wrong tools can strip screws or damage bolts. Turn each fastener clockwise to tighten it. Tighten just enough to make it firm. Avoid overtightening to prevent breaking the parts.

Credit: www.walmart.com
Reinforce With Adhesives
Reinforcing the base of a coat rack with adhesives adds strength and stability. Glue helps hold loose joints firmly together. It prevents wobbling and keeps the rack steady over time.
Using the right glue and applying it correctly is key. The glue must bond well with the material. Safety is important to avoid damage or injury. Follow simple steps for best results.
Choose Suitable Glue
Select glue that matches your coat rack’s material. Wood glue works best for wooden racks. For metal or plastic, use epoxy or super glue. Check the glue label for compatibility and drying time. Strong, waterproof glue lasts longer and holds better.
Apply Glue Safely
Work in a well-ventilated area to avoid fumes. Wear gloves to protect your skin. Clean the surfaces before applying glue. Use a small brush or stick for even spread. Press parts together firmly and wipe off extra glue. Let it dry fully without moving the rack.
Add Supportive Brackets
Adding supportive brackets is a smart way to tighten the base of a coat rack. These brackets give extra strength and stop the rack from wobbling. They help keep the coat rack steady and safe for daily use.
Using the right brackets can make a big difference. Proper installation also ensures long-lasting support. Follow simple steps to improve your coat rack’s stability.
Select Correct Brackets
Choose brackets that match the size of your coat rack base. Metal brackets often provide strong support. Look for brackets with screw holes for easy fixing. Angle brackets are popular for corner support. Avoid brackets that are too small or weak.
Installation Tips
Mark the spots where you will attach the brackets. Use a level to keep the rack straight. Drill small pilot holes before screwing brackets in place. Tighten screws firmly but avoid over-tightening. Check the rack stability after installation. Add more brackets if needed for extra support.
Replace Damaged Parts
Replacing damaged parts is key to tightening the base of a coat rack. Old or broken pieces cause wobbling and weak support. Swapping these parts restores stability and extends the rack’s life.
Identify Worn Components
Start by examining the coat rack closely. Look for cracked wood, loose screws, or bent metal parts. Check the base for any splits or breaks. Notice if any parts feel loose or shaky. Mark all damaged spots before you buy replacements.
Find Replacement Options
Search for parts that match the coat rack’s model and size. Visit hardware stores or check online shops for screws, bolts, or wood pieces. Choose sturdy materials for long-lasting repair. Keep the original style in mind for a good fit. Having the right parts makes the tightening process easier.
Maintain Stability Over Time
Maintaining the stability of your coat rack base is important for safety and durability. A stable base prevents wobbling and accidents. It also keeps the rack sturdy even with heavy coats. Small efforts can keep your coat rack strong over time.
Regular Inspections
Check the base of your coat rack regularly. Look for loose screws, cracks, or damage. Tighten any screws that feel loose. Use a screwdriver to secure bolts firmly. Catching problems early stops bigger issues later. Inspect the rack after moving it or heavy use.
Preventive Measures
Place your coat rack on a flat, even surface. Avoid areas where it might get bumped often. Use felt pads under the base to prevent slipping. Avoid overloading the rack with too many coats. Balance weight evenly to reduce stress on the base. These small steps help maintain stability and extend the life of your coat rack.

Credit: www.walmart.com
Frequently Asked Questions
How Do I Tighten A Wobbly Coat Rack Base?
Check all screws and bolts at the base. Use a screwdriver or wrench to firmly tighten each fastener. Ensure the base is level and stable after tightening.
What Tools Are Needed To Tighten A Coat Rack Base?
Common tools include a screwdriver, wrench, and pliers. These help tighten screws and bolts securely. Having a level can ensure the base is even.
How Often Should I Tighten My Coat Rack Base?
Tighten the base every few months or when wobbling appears. Regular checks prevent instability and prolong the coat rack’s lifespan.
Can Loose Screws Cause Coat Rack Instability?
Yes, loose screws or bolts often cause wobbling. Tightening them ensures the rack stays steady and safe to use.
Conclusion
Tightening the base of your coat rack keeps it steady and safe. Small fixes can stop wobbling and extend its life. Use basic tools and follow easy steps for best results. Regular checks help catch loose parts early. A stable coat rack looks neat and works better daily.
Keep it secure to avoid accidents and damage. Simple care makes your coat rack last longer and stay useful. Try these tips and enjoy a sturdy rack at home.