Do you have a table extension that’s just gathering dust? What if you could transform it into a stylish console that adds both function and flair to your space?
Imagine turning that extra piece into something practical and eye-catching without spending a fortune. You’ll discover simple, step-by-step ideas to breathe new life into your table extension. Keep reading, and you’ll learn how to create a unique console that fits perfectly in your home – no special tools or skills needed.
Ready to unlock your table’s hidden potential? Let’s get started!
Choosing The Right Table Extension
Choosing the right table extension is key to turning your table into a stylish console. The extension should fit your space and match your style. Picking the right one makes your furniture look balanced and useful.
Think about the material and design. These affect both the look and the feel of your console. Size and shape also matter. The extension must fit well and suit your room’s layout. Careful choices create a perfect console from your table extension.
Material And Design Considerations
Choose a material that matches your table’s surface. Wood, glass, or metal work well. Wood gives warmth and a classic feel. Glass adds a modern, light touch. Metal fits an industrial or sleek style.
The design should blend with your room. Simple lines suit minimalist spaces. Carved or detailed edges fit traditional rooms. The finish should also match your table’s color and texture. Consistency makes the console look natural.
Size And Shape Factors
Measure the available space before choosing an extension. The console should fit without crowding the area. A narrow extension works well in small hallways. Wider ones suit open living rooms.
Shape matters for flow and use. Rectangular extensions create a clean, straight look. Rounded edges soften the design and reduce sharp corners. The shape should allow easy movement around the console.
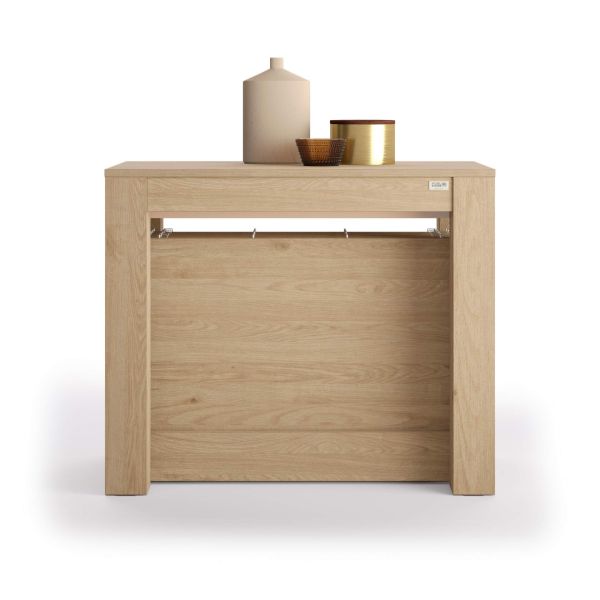
Credit: www.mobilifiver.com
Tools And Materials Needed
Transforming a table extension into a console is a simple and rewarding project. Having the right tools and materials makes the job easier and more precise. Gather everything before starting to save time and avoid interruptions.
Basic Tools Checklist
- Screwdriver set for assembling and disassembling parts
- Measuring tape for accurate dimensions
- Power drill with drill bits for making holes
- Sandpaper or electric sander to smooth edges
- Wood glue for extra strength in joints
- Clamps to hold pieces while glue dries
- Paintbrushes or rollers for finishing
- Protective gear like gloves and safety glasses
Optional Accessories For Customization
- Wood stain or paint to match your decor
- Decorative knobs or handles for style
- LED strip lights for a modern touch
- Drawer slides if adding storage features
- Felt pads to protect floors
- Decorative trim or molding for a polished look
Preparing The Table Extension
Preparing the table extension is the first step to turning it into a console. This process ensures the surface looks neat and ready for its new use. Taking time here makes the final result much better.
Cleaning And Surface Prep
Start by wiping the table extension with a soft cloth. Use mild soap and water to remove dust and dirt. Dry the surface completely to avoid water marks. Check for any stains or sticky spots. Lightly sand rough areas with fine-grit sandpaper. This helps paint or finish stick better. Wipe again to remove sanding dust before moving on.
Removing Or Adjusting Extension Leaves
Next, decide if you want to remove the extension leaves. Removing them creates a smaller, sleeker console. To remove, unlock the table mechanism carefully. Pull out the leaves one by one. Store them safely for later use. If you keep the leaves, adjust them for balance. Make sure the table sits level and stable. Tighten any loose screws or bolts. This prevents wobbling and damage over time.

Credit: www.xda-developers.com
Transforming Extension Into Console
Transforming a table extension into a console is a smart way to save space. It gives you extra surface area only when you need it. The process involves folding and securing the extension. Then, you add support to keep it stable. This change turns your table into a versatile piece of furniture.
Folding And Securing Mechanisms
Start by folding the table extension down carefully. Use hinges that allow smooth movement. Secure the extension with locks or latches. These keep it from moving accidentally. Make sure the folding parts fit tightly. This avoids any wobbling or noise.
Adding Support For Stability
Support is key to a strong console. Add brackets or legs under the folded extension. These help hold the weight evenly. Use sturdy materials like metal or hardwood. Check for any weak points before use. A stable console feels safe and lasts longer.
Designing For Style And Function
Designing a table extension to become a console blends style with function. It turns a simple piece into a useful, attractive fixture. The goal is to make the console fit your space and needs. It should look good and serve a purpose.
Think about the room’s style first. The console should match or enhance the décor. It must also be the right size. Not too big or small for the area. Balance is key for a neat, inviting look.
Function matters too. Decide how you will use the console. Will it hold keys, books, or decorations? Plan the design to fit these needs. Smart design makes daily life easier and keeps the space tidy.
Painting And Finishing Touches
Choose paint colors that fit your room’s palette. Neutral shades work well in most spaces. Bright colors can add a pop of personality.
Use quality paint for a smooth, lasting finish. Sand the surface lightly before painting. This helps the paint stick better and look smooth.
Add clear varnish or sealant to protect the surface. This makes the console easier to clean. It also keeps the paint fresh over time.
Incorporating Storage Solutions
Storage adds value to your console design. Use small baskets or boxes under the table for clutter.
Attach hooks or small shelves on the sides. These hold keys, bags, or mail. This keeps items organized and easy to find.
Drawers can fit under the tabletop. They hide small items and keep the top clear. Choose drawer sizes that suit your storage needs.
Placement And Space Optimization
Turning a table extension into a console is a smart way to save space. This change can give your room a new look and extra function. Placement and space optimization help make the most of this idea. Choosing the right spot and using small areas well can create a neat, useful space.
Choosing The Best Location
Pick a place where the console fits well. Near the wall or behind a sofa works great. Avoid blocking doors or walkways. The console should be easy to reach but not in the way. Light spots show off the console better. Think about what you want to keep on it. This helps decide the best place for the console.
Maximizing Small Spaces
Small rooms need smart ideas. Use corners or narrow walls for the console. Keep the console slim to save room. Add shelves above for more storage. Use the space under the console for baskets or boxes. This keeps the area tidy and open. A well-placed console can make a small room feel bigger.
Maintenance Tips
Maintaining your table extension turned console keeps it looking fresh and lasting longer. Proper care stops wear and tear. Small efforts can save you from big repairs later.
Cleaning And Care
Dust your console regularly with a soft cloth. Avoid harsh chemicals that damage the finish. Use mild soap and water for stains. Dry the surface quickly to avoid water marks. Polish wood consoles occasionally to keep the shine.
Preventing Damage Over Time
Use coasters to prevent rings from drinks. Avoid placing hot items directly on the surface. Keep the console away from direct sunlight to stop fading. Tighten screws and bolts every few months. Place felt pads under objects to avoid scratches.
Credit: www.timeextension.com
Frequently Asked Questions
How Do I Convert A Table Extension Into A Console?
To convert a table extension into a console, fold the extension flat and secure it. Add decorative elements like a runner or small lamp. This creates a sleek, functional console ideal for narrow spaces or entryways.
What Tools Are Needed For Table Extension Conversion?
You typically need a screwdriver, clamps, sandpaper, and paint or varnish. These tools help you detach, smooth, and finish the extension for a stylish console look. Optional items include decorative accessories for added appeal.
Can I Customize The Console After Conversion?
Yes, customization is easy. You can paint, stain, or add hardware to the console. Personalizing the finish and decorations ensures the console matches your room’s decor and style perfectly.
Is This Conversion Reversible To Original Table Form?
Yes, most table extension conversions are reversible. You can fold the extension back to its original position. This flexibility allows you to use the table as a dining surface or console as needed.
Conclusion
Turning a table extension into a console is simple and practical. You save space and add style to your room. Just follow the steps carefully and use basic tools. This project helps you create a useful piece of furniture. It fits well in small areas or hallways.
You can personalize it with paint or decorations. Enjoy your new console and the extra space it brings. Try this easy DIY and see the difference today.

