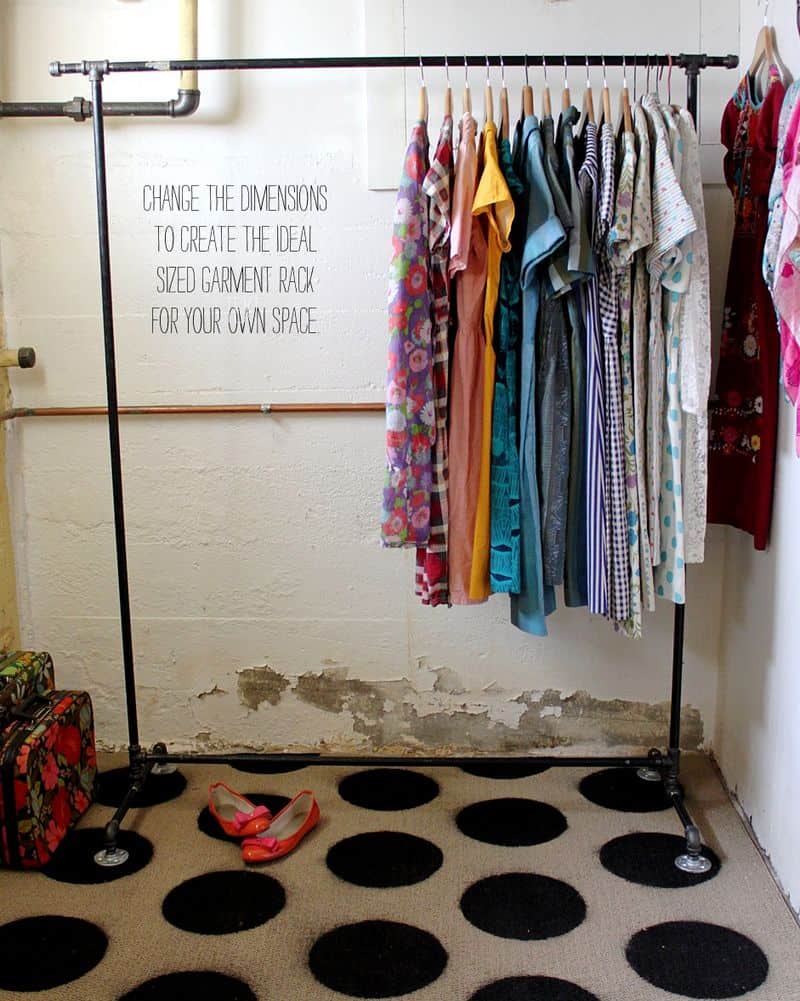
Looking for a stylish and sturdy way to organize your coats? Making a coat rack out of black pipe could be the perfect solution for you.
It’s simple, affordable, and adds a cool industrial touch to your space. Imagine having a unique rack that not only holds your jackets but also becomes a statement piece in your home. In this guide, you’ll discover easy steps to create your own coat rack using black pipe—no special skills needed.
Ready to transform your entryway and impress your guests? Keep reading, and let’s get started!
Credit: abeautifulmess.com
Materials Needed
Creating a coat rack with black pipe is a fun and practical project. Before starting, gather all materials. Having everything ready makes the process smooth and easy. Below are the essential materials you need.
Black Pipe Components
- Black iron pipes (various lengths)
- Flanges (for wall mounting)
- Elbow joints (to create corners)
- Tee fittings (for extra hooks)
- End caps (to finish pipe ends)
Tools Required
- Pipe wrench or adjustable wrench
- Drill with drill bits
- Screwdriver
- Measuring tape
- Level
- Pencil for marking
Additional Supplies
- Screws and wall anchors
- Sandpaper (to smooth rough edges)
- Protective gloves
- Optional: spray paint or sealant
Credit: abeautifulmess.com
Planning Your Design
Planning your design is the first step to make a coat rack from black pipe. Good planning saves time and avoids mistakes. It helps you build a rack that fits your space and style. Think about size, style, and exact measurements before buying materials.
Choosing The Right Size
Decide how big your coat rack should be. Consider how many coats it must hold. Too small means not enough space. Too big can crowd the room. Choose a size that fits your needs perfectly.
Deciding On The Style
Black pipe coat racks come in many styles. You can make a simple wall-mounted rack or a free-standing one. Think about the look you want. Industrial style is popular with black pipes. Choose a design that matches your home decor.
Measuring Your Space
Measure the wall or area where you want the rack. Use a tape measure for accuracy. Write down the width, height, and depth available. Check for obstacles like doors or windows. Correct measurements make sure the rack fits well.
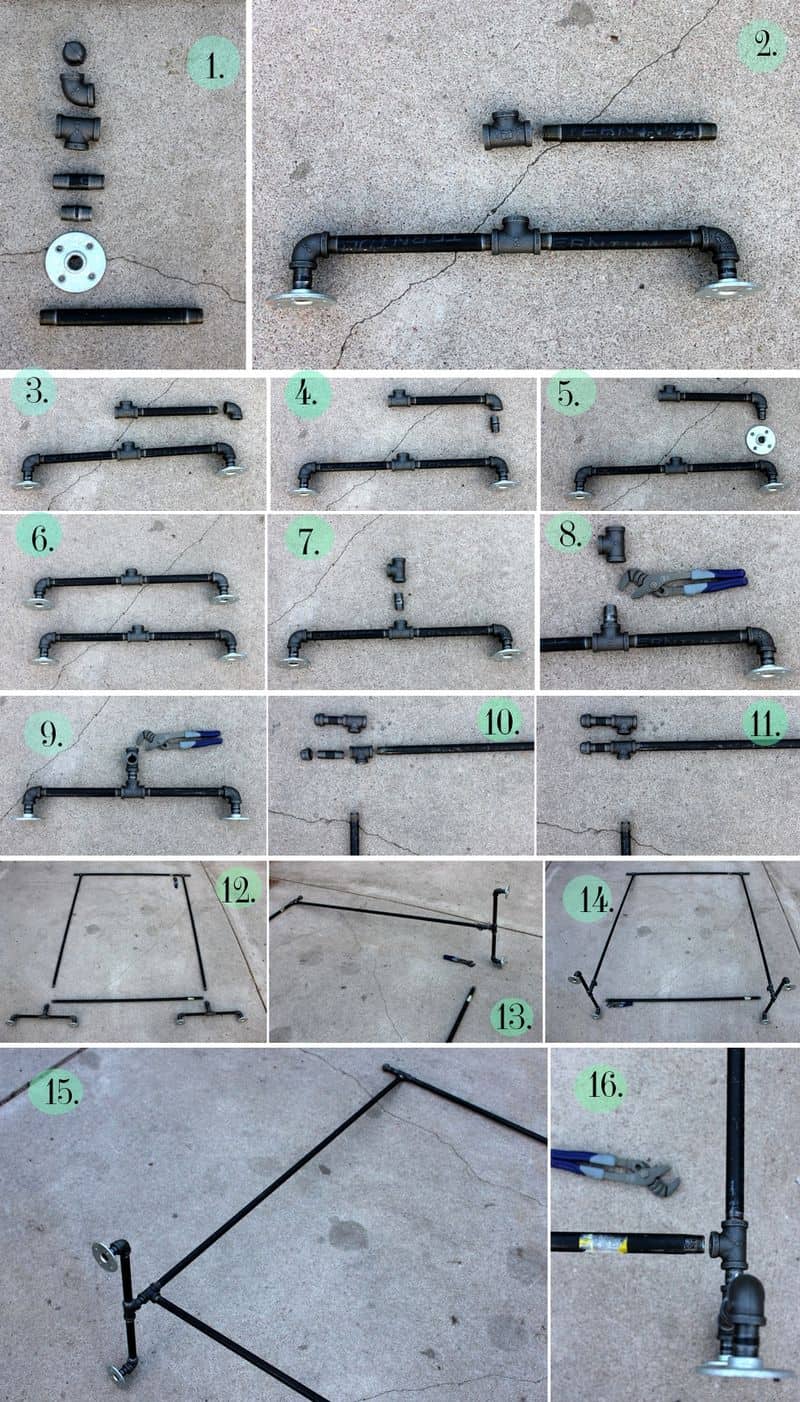
Cutting And Preparing Pipes
Cutting and preparing black pipes is the first key step in building a sturdy coat rack. This process shapes the pipes to fit your design perfectly. Taking time here ensures a safe and clean finish. Proper preparation makes assembly easier and the final rack more durable.
Marking Cut Points
Measure the pipes carefully with a tape measure. Mark the exact cut points using a permanent marker or chalk. Double-check each mark to avoid mistakes. Clear marks help keep cuts straight and accurate. Accurate measurements save materials and prevent waste.
Safe Cutting Techniques
Wear safety goggles and gloves before cutting. Use a pipe cutter or hacksaw designed for metal pipes. Secure the pipe firmly in a vice or clamp. Cut slowly and steadily along the marked line. Avoid rushing to prevent rough edges or injury.
Smoothing Edges
After cutting, the pipe edges will be sharp and rough. Use a metal file or sandpaper to smooth these edges. Work evenly around the cut area to remove burrs. Smooth edges prevent scratches and improve the coat rack’s look. Take your time to ensure a clean finish.
Assembling The Coat Rack
Assembling the coat rack is a simple process. It involves putting together the black pipe parts and making sure the rack is strong. This section guides you through each step for a sturdy, useful coat rack.
Joining Pipe Sections
Start by connecting the pipe pieces. Use threaded joints to screw pipes tightly together. Hand-tighten first, then use a wrench for a secure fit. Make sure the pipes line up straight. This helps the rack look neat and hold weight well.
Ensuring Stability
Stability is key for a safe coat rack. Check all joints for tightness. Add pipe flanges at the base for extra support. Secure the flanges to the floor or wall with screws. This stops the rack from wobbling or tipping over.
Adding Hooks And Accessories
Choose hooks that match the pipe style. Attach them by screwing into the pipe or using pipe clamps. Space hooks evenly to hang coats and bags easily. Add shelves or small baskets if you want extra storage. These accessories make the rack more useful.
Finishing Touches
Finishing touches bring your black pipe coat rack to life. They make sure it looks great and lasts long. Small details help your rack fit perfectly in your space and style.
Cleaning And Polishing
Remove dust and dirt with a soft cloth. Use a mild cleaner to wipe the pipes gently. Avoid harsh chemicals that can damage the metal.
Polish the pipes using a metal polish or a bit of olive oil. This step gives your rack a smooth shine. It also protects the pipe from rust and wear.
Mounting Options
Choose a sturdy wall to hold your rack firmly. Use anchors or screws that fit your wall type. Secure the rack tightly to avoid wobbling.
Consider mounting the rack at a comfortable height. Make sure hooks or shelves are easy to reach. This adds convenience for daily use.
Personalizing Your Rack
Add wooden shelves or decorative hooks for extra style. Paint or wrap parts of the pipe with colorful tape. This makes your coat rack unique and matches your room.
Attach small baskets or containers to hold keys or gloves. Personal touches make the rack more useful. They also show your creativity and taste.

Credit: www.amazon.com
Maintenance Tips
Maintaining your black pipe coat rack keeps it strong and looking good. Regular care prevents damage and helps it last longer. Follow these simple tips to keep your rack in top shape.
Preventing Rust
Black pipe can rust if it gets wet often. Keep your coat rack dry by placing it away from moisture. Use a clear sealant or paint designed for metal to add a protective layer. Check the rack for rust spots regularly. Clean and treat any rust immediately to stop it from spreading.
Regular Cleaning
Dust and dirt can build up on the pipe surface. Wipe the rack with a soft cloth once a week. Use mild soap and water for deeper cleaning. Avoid harsh chemicals that can damage the metal finish. Dry the rack thoroughly after cleaning to prevent rust.
Repairing Damages
Small scratches or dents can weaken your coat rack over time. Sand down rough spots gently with fine sandpaper. Touch up with paint or sealant to protect the metal. Tighten loose screws or fittings to keep the rack stable. Replace any broken parts quickly to avoid accidents.
Frequently Asked Questions
What Materials Are Needed For A Black Pipe Coat Rack?
You need black steel pipes, flanges, elbows, screws, and wall anchors. Also, gather a drill, wrench, and measuring tape for assembly. Choose pipe sizes based on desired rack height and hook spacing.
How Do You Assemble A Black Pipe Coat Rack?
Start by measuring and cutting pipes to size. Attach flanges and elbows to form the rack frame. Secure the rack to the wall using screws and anchors. Tighten all connections firmly for stability.
Can I Customize The Design Of A Black Pipe Coat Rack?
Yes, you can adjust pipe lengths, add shelves, or hooks. Choose different finishes or paint for a unique look. Custom designs fit your space and style preferences perfectly.
Is Black Pipe Durable For A Coat Rack?
Black steel pipe is strong and long-lasting. It supports heavy coats and bags without bending. Its industrial look adds aesthetic appeal and durability to your rack.
Conclusion
Making a coat rack from black pipe is simple and fun. You only need a few materials and basic tools. This project adds a stylish, strong rack to any room. It saves money compared to buying one in a store.
Plus, you get the pride of creating something yourself. Try this DIY project to organize your space better. A black pipe coat rack fits many home styles. Give it a try and enjoy your new, handy rack!

