Looking for a simple and stylish way to organize your entryway? A pallet coat rack might be just what you need.
It’s easy to make, budget-friendly, and adds a rustic charm to your home. Imagine having a unique piece that not only keeps your coats and hats in order but also impresses your guests. In this guide, you’ll discover step-by-step how to turn a simple wooden pallet into a functional coat rack.
Ready to create something practical and beautiful with your own hands? Let’s get started!

Credit: www.achrafiehcafe.com
Materials Needed
Gathering the right materials makes building a pallet coat rack easier. Knowing what you need saves time and effort. Prepare all items before starting your project. This helps keep everything organized and smooth.
Choosing The Right Pallet Wood
Select wood that is sturdy and in good condition. Look for pallets without cracks or splinters. Avoid wood treated with harmful chemicals. Pine or oak pallets work well for coat racks. Sand the wood for a smooth finish and safe touch.
Essential Tools
Have these tools ready to build your rack:
- A hammer or nail gun for fastening
- A saw to cut wood pieces
- A drill with bits for making holes
- Measuring tape to ensure size accuracy
- A screwdriver for tightening screws
These tools help create a strong and neat coat rack.
Additional Supplies
Besides wood and tools, gather these supplies:
- Nails or screws to hold parts together
- Sandpaper for smoothing surfaces
- Wood stain or paint for finishing touches
- Hooks to hang coats and bags
- Wood glue for extra strength
These items add durability and style to your project.
Preparing The Pallet
Preparing the pallet is the first step to create a sturdy coat rack. This process helps to make the wood safe and ready for use. Proper preparation ensures the final product looks good and lasts long.
Disassembling The Pallet
Start by taking apart the pallet carefully. Use a hammer and crowbar to remove the nails. Work slowly to avoid breaking the wood. Separate each plank and set the nails aside. This gives you clean wood pieces for your rack.
Sanding And Cleaning
Sand each plank to remove rough spots and splinters. Use medium-grit sandpaper for the best results. Sanding makes the wood smooth to touch. Wipe the wood with a damp cloth to clear dust. Clean wood helps paint or stain stick better.
Cutting To Size
Measure the wood pieces based on your design. Mark the cutting lines clearly with a pencil. Use a saw to cut the planks to the right size. Cut slowly to keep edges straight and neat. Proper cutting makes assembly easier and the rack stable.
Designing The Rack
Designing the rack is an important step in making your pallet coat rack. It helps you plan how the rack will look and work. A good design makes the rack strong and easy to use. It also lets you add a personal touch to the rack. Take time to think about the size, shape, and style before you start building.
Careful planning saves time and avoids mistakes. It helps you use the pallet wood well. You can create a rack that fits your space perfectly. The design also guides you on where to put hooks and shelves.
Selecting A Layout
Choose a layout that fits your space and needs. You can make the rack tall and narrow or wide and low. Think about where you will hang coats and bags. A vertical layout saves floor space. A horizontal layout gives more hook room. Pick a layout that matches your room and style.
Marking Hook Positions
Mark where each hook will go before attaching them. Use a pencil to draw spots on the wood. Space hooks evenly for a neat look. Leave enough space between hooks so coats do not overlap. Measure carefully to keep hooks level. This step makes the rack look tidy and work well.
Customizing For Style
Add style to make the rack unique. Paint or stain the wood to match your room. Use different hook shapes for a fun look. Add small shelves or a top ledge for keys and hats. Personal touches make the rack special and fit your taste. Simple changes can make a big difference.

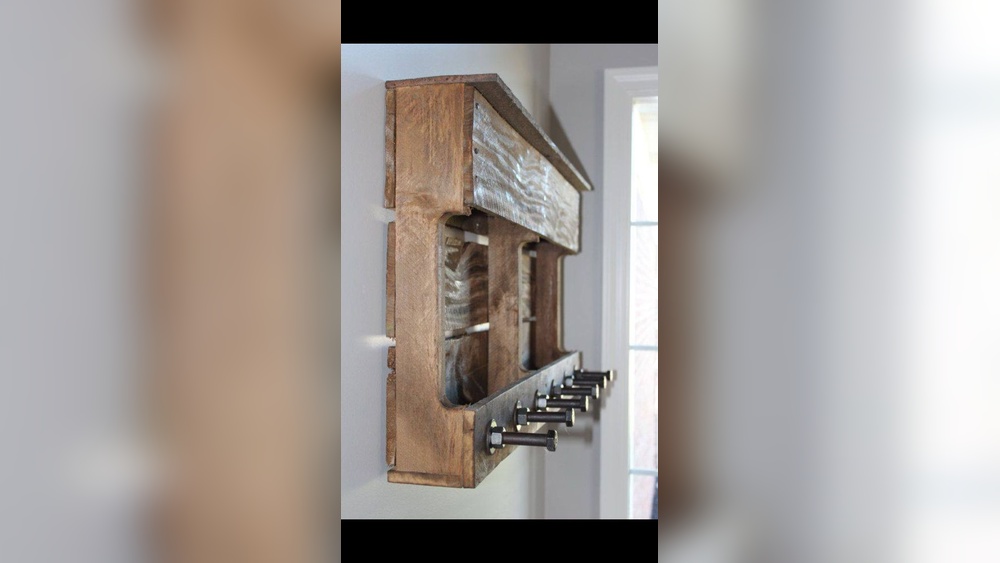
Credit: www.instructables.com
Assembling The Coat Rack
Assembling the coat rack is the step where your project starts to take shape. It involves putting all parts together carefully. This process makes sure your rack is strong and looks good. Follow clear steps for a neat and useful coat rack.
Attaching Hooks
Choose sturdy hooks for hanging coats and bags. Mark the spots on the pallet where hooks will go. Space them evenly for balance and ease of use. Use screws that fit your hooks well. Screw each hook tightly to avoid wobbling. Test the hooks by gently pulling on them.
Securing The Pieces
Check all pallet boards are aligned properly. Use wood glue between pieces for extra hold. Clamp the boards until the glue dries. Add screws or nails for strong joints. Make sure screws go in straight and deep. Wobbling parts can weaken the rack, so secure well.
Adding Finishing Touches
Sand rough edges to prevent splinters. Wipe the wood clean from dust. Apply a coat of paint or varnish for protection. Let the finish dry completely before use. Add small pads on the back if hanging on a wall. These details improve both look and safety.
Mounting And Placement
Mounting and placement are key steps in making a pallet coat rack useful and attractive. Where you put your rack affects its function and style. Proper mounting ensures the rack stays strong and safe over time.
Choosing The Right Wall
Pick a wall that is easy to reach and near the door. This helps hang coats quickly after coming inside. Solid walls like brick or wood are best. Avoid walls with thin drywall unless you use anchors. Clear the wall space so the rack fits well without blocking anything.
Installation Tips
Measure the wall and rack before drilling. Mark spots for screws carefully. Use a level to keep the rack straight. Choose screws and anchors that match the wall type. Drill pilot holes to avoid splitting the pallet wood. Tighten screws firmly but do not over-tighten.
Safety Considerations
Check that the rack can hold heavy coats and bags. Use strong screws and anchors for support. Avoid placing the rack above fragile items. Keep it at a height safe for all users. Test the rack by pulling gently before hanging items.
Maintaining Your Rack
Maintaining your pallet coat rack keeps it strong and looking fresh. Regular care helps it last longer and stay useful. Simple steps can protect the wood and keep the rack neat. Follow these tips to keep your rack in good shape.
Cleaning Tips
Dust the rack often with a soft cloth. Use a damp cloth for sticky spots. Avoid harsh chemicals that can damage the wood. Dry the rack well after cleaning. Keep it free from dirt to avoid wear.
Repairing Damages
Check for loose nails or screws regularly. Tighten or replace them to keep the rack steady. Fill small cracks with wood filler and let it dry. Sand rough areas gently to prevent splinters. Fix damage quickly to avoid bigger problems.
Refreshing The Finish
Lightly sand the surface to smooth rough spots. Apply a new coat of wood finish or varnish. Choose a finish that matches the original look. Let the finish dry fully before use. Refreshing the finish protects the wood from moisture and wear.
Creative Variations
Creating a pallet coat rack offers many ways to add your personal style. Simple changes can make your rack unique and fit your space perfectly. Try different colors, decorations, or designs. Each choice gives your rack a fresh look and new function. Experimenting with ideas makes the project fun and rewarding.
Painting And Staining Ideas
Choose paint colors that match your room. Bright colors can make the rack stand out. Soft pastels give a calm, cozy feel. Staining the wood keeps its natural look. Dark stains add richness and warmth. Light stains brighten up small spaces. Use a mix of paint and stain for contrast. Seal with a clear coat to protect the surface.
Adding Decorative Elements
Add hooks in different shapes and sizes. Use vintage knobs or metal hooks for style. Attach small shelves for keys or hats. Glue on small signs or letters for names. Wrap string lights around the rack for soft glow. Attach small plant pots for a green touch. These details make your rack both useful and pretty.
Multi-functional Designs
Combine the coat rack with a bench for seating. Add a shoe shelf below to save space. Use baskets on the rack for extra storage. Create a mail holder to keep letters neat. Attach a mirror for quick checks before leaving. These designs help organize your entryway well. Your pallet coat rack becomes a smart, helpful piece.
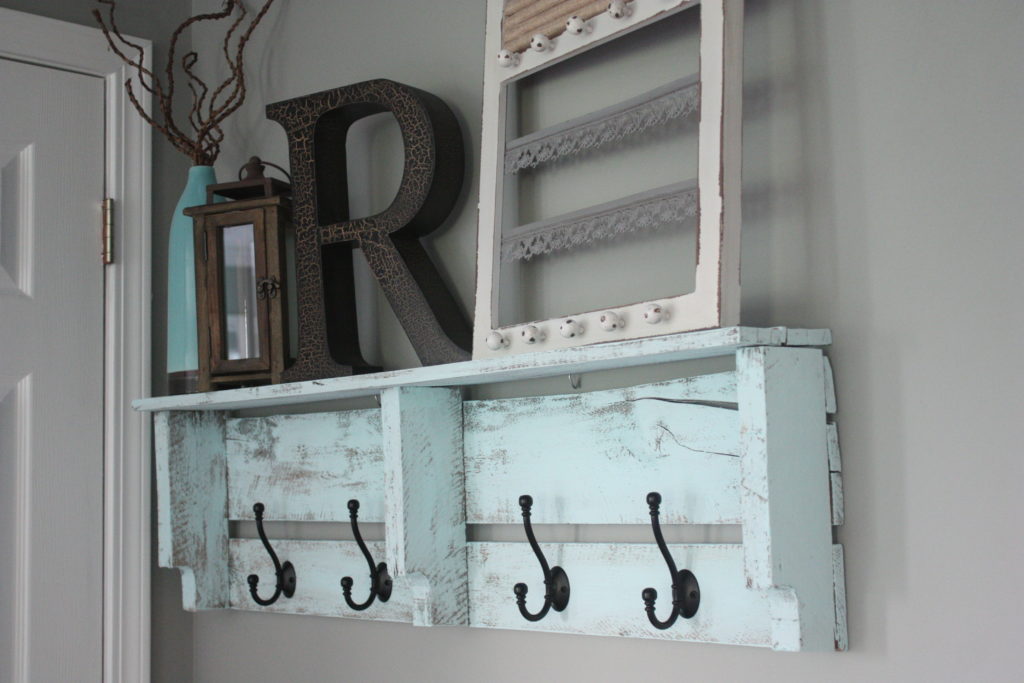
Credit: www.re-fabbed.com
Frequently Asked Questions
What Materials Are Needed To Make A Pallet Coat Rack?
You need a wooden pallet, sandpaper, hooks, screws, and a drill. Optionally, paint or varnish can enhance the finish. These materials are affordable and easy to find.
How Do You Prepare A Pallet For A Coat Rack?
Start by sanding the pallet to smooth rough edges. Remove any nails or splinters. Clean the wood thoroughly before applying paint or stain if desired.
How Many Hooks Should I Use On A Pallet Coat Rack?
Typically, 4 to 6 hooks work well. Space them evenly for balance and usability. More hooks can hold more items but may overcrowd the rack.
Can I Customize The Pallet Coat Rack Design?
Yes, you can customize by painting, staining, or adding decorative elements. Choose hook styles that match your home decor for a personal touch.
Conclusion
Creating a pallet coat rack is simple and fun. You only need a few tools and some wood. This project saves money and adds charm to any room. It also helps keep your space neat and organized. Try different designs to match your style.
Enjoy making something useful with your own hands. Start today and see how easy it can be!

