Are you tired of cluttered entryways and missing places to sit while putting on your shoes? Building your own coat rack bench can solve both problems with one smart piece of furniture.
Imagine having a sturdy bench where you can sit comfortably and hooks above to keep your coats, bags, and hats organized. In this guide, you’ll discover simple steps to create a stylish and functional coat rack bench that fits your space perfectly.
Keep reading, and you’ll soon have a custom piece that welcomes you and your guests every time you walk through the door.
Choosing The Right Materials
Choosing the right materials is key to building a strong, lasting coat rack bench. The materials affect the bench’s look, strength, and durability. Picking good wood, sturdy hardware, and proper finishing supplies ensures your project holds up well. This section explains the best materials for your coat rack bench.
Wood Types
Wood is the main material for your bench. Pine is soft, easy to work with, and budget-friendly. Oak offers strength and a classic look but costs more. Cedar is light and resists moisture, perfect for humid areas. Choose wood that fits your style and usage needs.
Hardware Selection
Hardware includes screws, hooks, and brackets. Use stainless steel or brass screws to avoid rust. Heavy-duty hooks hold coats and bags securely. Strong brackets keep the bench steady. Pick hardware that matches your wood and supports weight well.
Finishing Supplies
Finishing protects the wood and adds beauty. Sandpaper smooths rough edges. Use wood stain to enhance color and show grain. Apply a clear sealant for water and scratch resistance. Choose finishes that suit indoor or outdoor use.
Credit: www.drfabregues.com
Tools You’ll Need
Building a coat rack bench is a fun and useful project. Having the right tools makes the work easier and the results better. This list covers the basic tools, power tools, and safety gear you will need. Prepare your workspace and gather these items before starting.
Basic Tools
Start with simple hand tools. A tape measure helps you get exact sizes. Use a pencil to mark your cuts clearly. A carpenter’s square keeps corners straight and even. Sandpaper smooths rough wood edges. A handsaw works well for small cuts. These tools are easy to find and use.
Power Tools
Power tools speed up your work. A drill makes holes fast and easy. Use a screwdriver bit to attach screws tightly. A jigsaw cuts curves and shapes neatly. A power sander smooths large surfaces quickly. Choose tools that feel comfortable and safe to use.
Safety Gear
Protect yourself while working. Safety glasses shield your eyes from dust and splinters. Wear gloves to keep your hands safe. Use ear protection if you work with loud tools. A dust mask stops you from breathing sawdust. Safety gear is important to avoid injuries.
Designing Your Coat Rack Bench
Designing a coat rack bench is the first step to creating a useful piece for your home. It helps keep your entryway neat and provides a spot to sit. Careful planning ensures the bench fits well and meets your needs.
Start by thinking about the space available and how you will use the bench. This planning saves time and prevents mistakes during building. Keep your design simple and functional for the best results.
Measuring Your Space
Measure the area where the coat rack bench will go. Note the width, height, and depth of the space. Check for any obstacles like doors or windows nearby. Accurate measurements help the bench fit perfectly without crowding the room.
Sketching The Layout
Draw a simple sketch of your coat rack bench design. Include the bench seat, storage, and coat hooks. Sketching helps visualize the final product and guides you during building. Keep the drawing clear and easy to follow.
Selecting Dimensions
Choose bench dimensions based on your measurements and needs. Typical height is around 18 inches for comfortable sitting. The width depends on the space and how many people will use it. Depth should allow enough room for coats and seating.
Cutting And Preparing Wood
Cutting and preparing wood is a key step in building your coat rack bench. It shapes the pieces and sets the foundation for a strong structure. Accurate cutting makes assembly easier and the final product look neat.
Taking time to measure, cut, and sand wood properly improves the bench’s durability. It also ensures the parts fit together perfectly. Let’s explore how to get this right.
Measuring And Marking
Start by measuring each piece carefully. Use a tape measure or ruler for accuracy. Mark the wood clearly with a pencil. Double-check your marks before cutting. This step prevents mistakes and wasted wood.
Cutting Techniques
Choose the right saw for clean cuts. A handsaw works for small pieces. Use a circular saw for straight, long cuts. Cut slowly and follow your marks closely. Keep your hands steady to avoid slips.
Sanding Surfaces
Sand each cut edge to remove splinters. Use medium-grit sandpaper first. Then switch to fine-grit for a smooth finish. Sanding prepares the wood for painting or staining. It also makes the bench safer to use.
Assembling The Frame
Assembling the frame is the first step in building your coat rack bench. This part creates the strong base that holds everything together. A well-built frame ensures your bench is sturdy and lasts long. Take your time to align each piece carefully. Use the right tools and materials for best results.
Joining Techniques
Start by joining the main parts of the frame. Use wood glue to add extra strength. Secure the joints with screws or nails. Pre-drill holes to avoid splitting the wood. Make sure all corners are square for a neat fit. Clamps help hold pieces steady while drying.
Securing The Base
Next, attach the base to the frame. The base supports the weight of the bench and coats. Use longer screws to fix the base firmly. Check that the base sits flat on the floor. This prevents wobbling and keeps the bench stable. Reinforce the corners with metal brackets if needed.
Adding Support
Add extra support beams inside the frame. These beams prevent the bench from sagging over time. Attach support pieces evenly across the frame. Use screws and wood glue for a strong hold. Double-check that all parts fit tightly. Solid support means your coat rack bench stays reliable.

Credit: www.instructables.com
Installing The Coat Hooks
Installing coat hooks on your coat rack bench adds both function and style. Proper placement and secure mounting are key for a sturdy, useful rack. Follow these steps to get the hooks just right.
Hook Placement
Place hooks evenly along the back panel. Space them about 6 to 8 inches apart for easy access. Consider the height for all users. Hooks should sit at a comfortable arm level. Avoid placing hooks too close to the edges.
Mounting Methods
Use screws designed for wood to attach hooks. Pre-drill holes to prevent wood splitting. If mounting on drywall, use anchors for extra support. Choose hooks with sturdy bases for better hold. Make sure screws go deep into the wood for strength.
Ensuring Stability
Test each hook by pulling gently after installation. Hooks should not wiggle or feel loose. Tighten screws if any movement occurs. Use washers if screws strip the wood. A stable hook will hold coats without bending or falling.
Adding The Bench Seat
Adding the bench seat is a key step in building your coat rack bench. This part makes the bench comfortable and practical. You can choose a simple wooden seat or a cushioned one for extra comfort. The bench seat also ties the whole project together, making it sturdy and useful.
Choosing Cushion Options
Select cushions that fit the bench size well. Thin foam cushions work great for a soft seat without bulk. Use fabric that matches your room’s style. Waterproof or stain-resistant fabrics help keep the bench clean. You can also choose a firm cushion for better support. Pick colors and patterns that brighten the space.
Attaching The Seat
Place the seat on the bench frame carefully. Make sure it lines up with the edges. Use screws or nails to attach the seat firmly. Drill pilot holes to avoid splitting the wood. Check the seat for stability by sitting on it. Tighten any loose screws for safety. Avoid using glue alone, as it may not hold well.
Finishing Touches
Sand the edges of the seat smooth for safety. Apply paint or stain to match the rest of the bench. Seal the seat with a clear coat for protection. Add decorative trim if you want a polished look. Let the finish dry completely before use. This step helps the bench last longer and look nice.
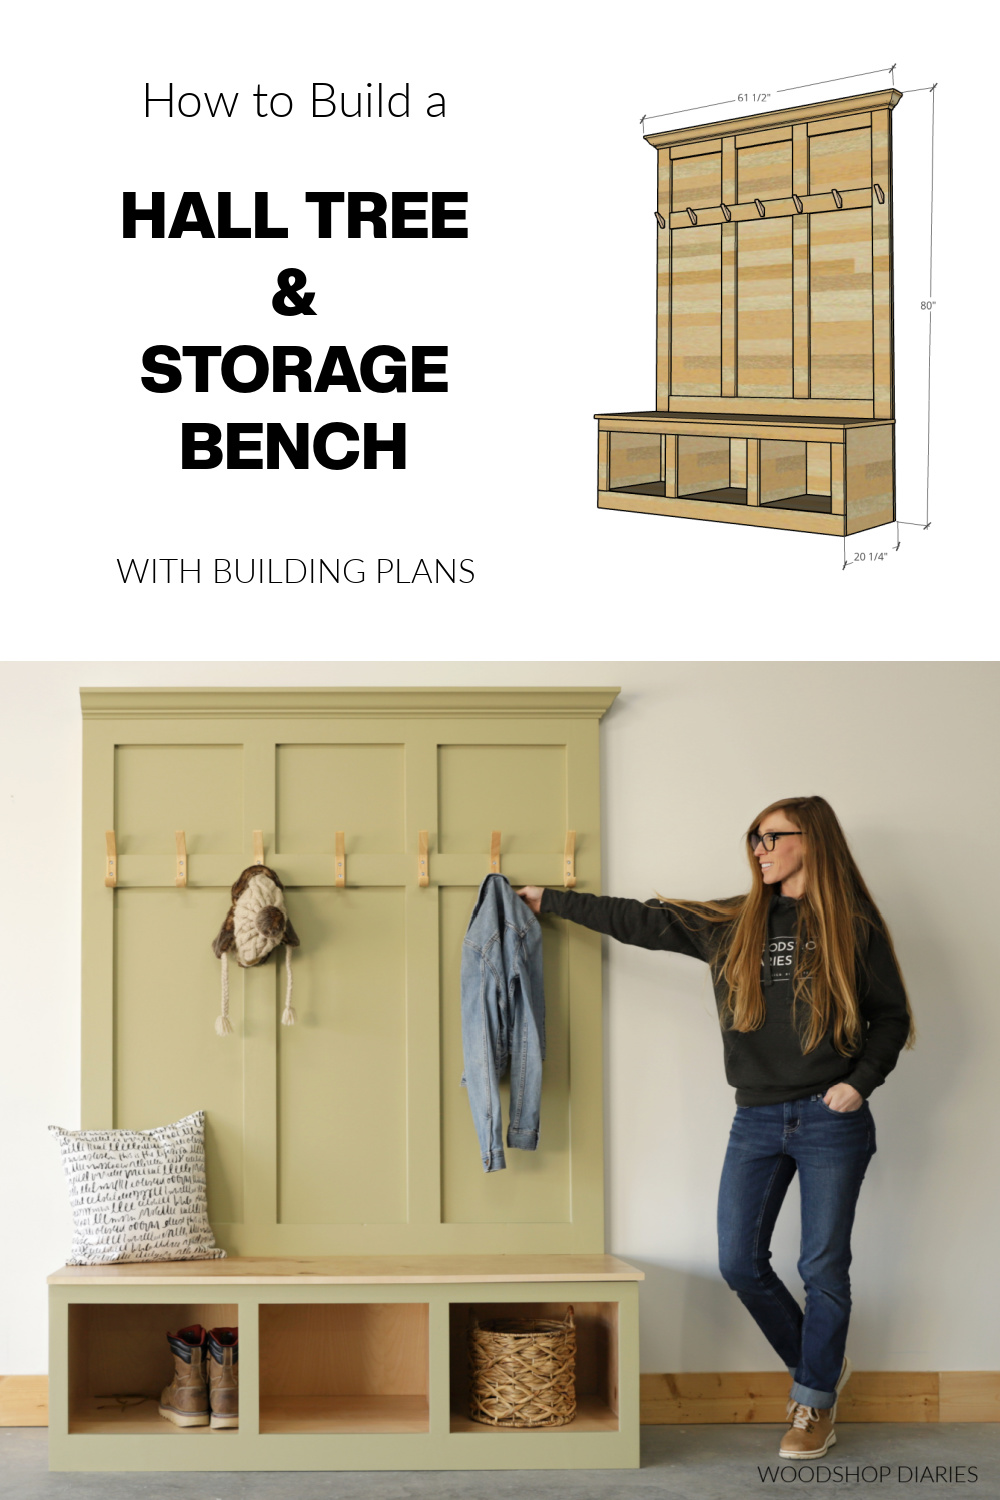
Credit: www.woodshopdiaries.com
Painting And Finishing
Painting and finishing your coat rack bench is important for protection and style. It helps the wood last longer and look better. Taking time with each step makes sure the final product is strong and beautiful.
Priming The Wood
Start by cleaning the wood surface well. Use a primer to cover the wood. Primer helps paint stick better and shows the true color. Apply one even coat with a brush or roller. Let it dry completely before moving on.
Applying Paint Or Stain
Choose paint or stain based on the look you want. Paint gives a solid color and hides wood grain. Stain shows the natural wood texture. Use smooth, even strokes to apply. Wait for the first coat to dry. Add a second coat for full coverage.
Sealing For Durability
Seal the paint or stain to protect against wear and water. Use a clear polyurethane or varnish. Apply thin, even layers with a clean brush. Let each layer dry well. This step keeps your bench strong and easy to clean.
Maintaining Your Coat Rack Bench
Keeping your coat rack bench in good shape helps it last longer and look nice. Regular care stops damage and keeps the wood or metal strong. Small efforts every now and then save you time and money later.
Cleaning Tips
Dust your coat rack bench often with a soft cloth. Use a damp cloth for sticky spots but avoid soaking the wood. Mild soap and water work well for cleaning. Dry the bench quickly to prevent water marks. Avoid harsh chemicals that can damage the finish.
Repairing Wear And Tear
Check your bench regularly for loose screws or joints. Tighten screws to keep the bench stable and safe. Fill small cracks or dents with wood filler. Sand lightly after the filler dries to make it smooth. Replace any broken parts to keep the bench functional.
Seasonal Care
In dry months, apply wood oil or polish to prevent cracking. During wet seasons, keep the bench in a dry place to avoid swelling. Use a protective cover if your bench stays outside. Regular seasonal care protects your bench from weather damage.
Frequently Asked Questions
What Materials Do I Need To Build A Coat Rack Bench?
You need wood boards, screws, hooks, wood glue, paint, and sandpaper. Choose sturdy wood like pine or oak for durability and stability.
How Much Time Does It Take To Build A Coat Rack Bench?
Building a coat rack bench typically takes 3 to 5 hours. This includes measuring, cutting, assembling, and finishing the project.
Can I Customize The Size Of My Coat Rack Bench?
Yes, you can easily customize the size. Measure your available space and adjust wood dimensions accordingly before cutting.
What Tools Are Essential For Building A Coat Rack Bench?
Essential tools include a saw, drill, screwdriver, measuring tape, and sander. These tools help ensure precise cuts and sturdy assembly.
Conclusion
Building a coat rack bench adds style and function to any space. It keeps your entryway neat and organized. This project uses simple tools and easy steps anyone can follow. You can customize it to fit your room and needs.
Enjoy your new bench for sitting and storing coats. A small effort creates a big difference at home. Try building one and see how useful it becomes. Your home will feel more welcoming and tidy every day.
