Have you ever wished your bookshelf could do more than just hold books? Imagine having a clever pivoting bookshelf that not only saves space but also adds a unique touch to your room.
Creating one yourself might sound tricky, but it’s easier than you think. In this guide, you’ll discover simple steps to build a stylish, functional pivoting bookshelf that fits perfectly in your home. Ready to transform your space and impress your friends?
Let’s get started!
Credit: www.thisiscarpentry.com
Materials And Tools Needed
Building a pivoting bookshelf needs the right materials and tools. Choosing good wood, hardware, and tools helps the project go smoothly. This section explains what you need to get started. Follow these tips to prepare well before you begin.
Choosing The Right Wood
Wood type affects strength and look. Pine is soft and easy to cut. Oak is hard and lasts longer. Plywood is stable and less likely to warp. Pick wood that fits your style and budget. Make sure the wood is smooth and free of cracks.
Essential Hardware
You need a pivot hinge for the bookshelf to turn. Buy a heavy-duty hinge to support the weight. Screws must be strong and the right size. Get wood glue to join pieces firmly. Consider small brackets for extra support if needed.
Tools For Assembly
A drill makes holes fast and accurate. A screwdriver is needed for screws. Use a saw to cut wood to size. Sandpaper smooths rough edges and surfaces. A measuring tape ensures parts fit well. A level helps keep the bookshelf straight and balanced.

Credit: www.youtube.com
Designing Your Pivoting Bookshelf
Designing a pivoting bookshelf starts with clear planning. It helps make a strong, functional piece that fits your space well.
Think about the size, style, and how the shelf will move. Good design keeps the shelf steady and easy to use.
Measuring Your Space
Measure the wall or corner where the bookshelf will stand. Note the height, width, and depth available.
Check for any obstacles like doors, windows, or vents near the area. Leave enough room for the shelf to pivot smoothly.
Planning Shelf Dimensions
Decide how tall and wide your bookshelf should be. Make sure the shelves hold your books and items comfortably.
Keep shelf thickness in mind. Strong shelves need thicker boards to hold weight without bending.
Selecting A Pivot Mechanism
Choose a pivot system that supports your shelf’s size and weight. It must allow smooth turning without wobbling.
Common types include center pivots and side pivots. Each offers different movement styles and support levels.
Preparing The Wood
Preparing the wood is the first key step in building a pivoting bookshelf. It sets the base for a strong and smooth structure. Taking time here saves problems later. The wood must be measured, cut, sanded, and drilled carefully. This ensures all parts fit well and the bookshelf works perfectly.
Cutting Boards To Size
Measure each board according to your design. Use a pencil to mark the exact lines. Cut the boards with a saw, following the marks. Make sure cuts are straight and clean. Properly sized boards make assembly easier and stable.
Sanding For Smooth Finish
Sand each board to remove rough edges and splinters. Start with coarse sandpaper to smooth large rough parts. Then use fine sandpaper for a soft finish. Sanding helps the wood look better and feel safe to touch. It also makes painting or staining easier.
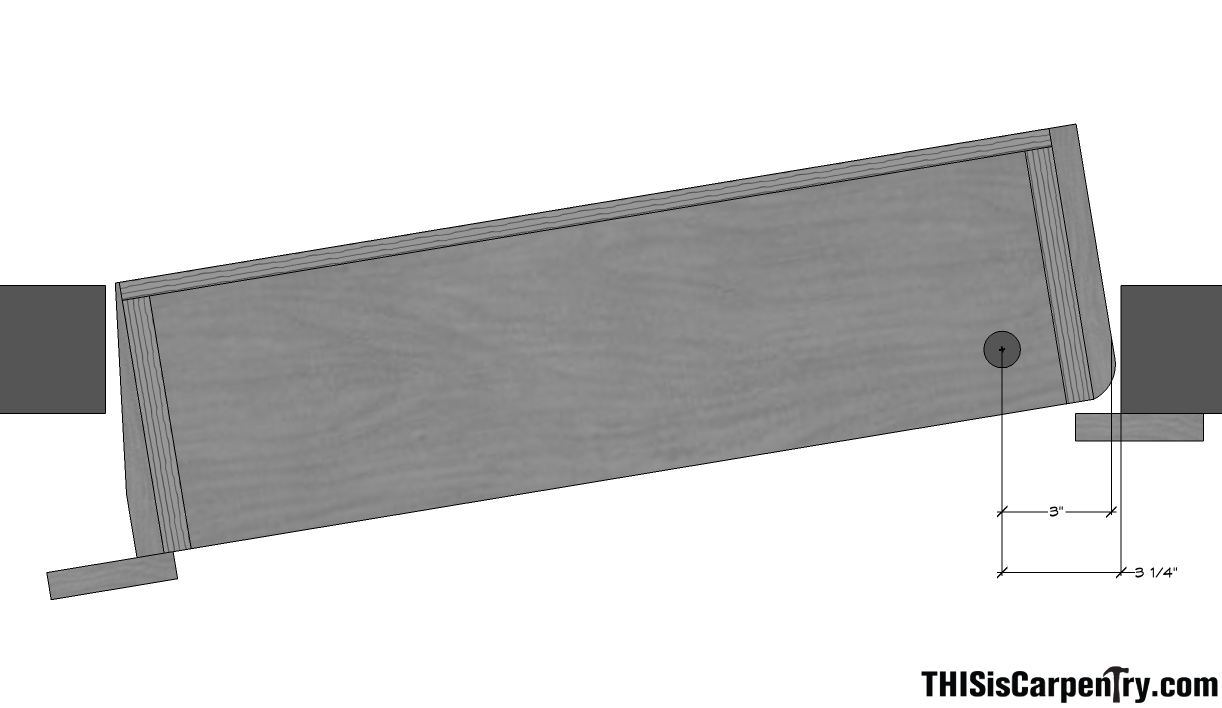
Drilling Pivot Points
Mark the pivot points clearly on the boards. Drill holes that fit the pivot hardware size. Keep the drill steady and straight to avoid mistakes. Correct drilling ensures the bookshelf will pivot smoothly and stay secure. Check hole sizes before assembly to avoid problems.
Assembling The Bookshelf
Assembling the bookshelf is an important step. It brings all parts together. Careful work ensures the final product works well and looks great.
Follow each step carefully. This helps avoid mistakes and saves time. The process is simple with clear instructions.
Attaching Shelves To Frame
Start by fixing the shelves to the frame. Use screws or brackets for strong support. Make sure shelves are level and aligned. Check each shelf fits tightly to avoid wobbling.
Work slowly. Attach one shelf at a time. Double-check measurements and placement. Tighten screws firmly but do not over-tighten to avoid damage.
Installing The Pivot Hardware
The pivot hardware lets the bookshelf turn smoothly. Attach the pivot points at the top and bottom of the frame. Use a drill for precise holes. Secure the hardware with bolts and washers.
Make sure the pivot is centered. This helps the bookshelf rotate evenly. Test the pivot movement before final tightening. Adjust as needed for smooth turning.
Ensuring Stability And Balance
Check the bookshelf stands steady on the floor. Adjust the base or add small shims if needed. The pivoting motion should feel balanced without tipping.
Test the rotation slowly. The shelf should not lean or shake. Tighten all screws and bolts once stable. This keeps the bookshelf safe and reliable.
Finishing Touches
Finishing touches bring your pivoting bookshelf to life. These final steps protect the wood and improve its look. They also make sure your bookshelf works safely and lasts long. Let’s explore how to complete your project with care and skill.
Applying Paint Or Stain
Choose paint or stain that matches your room’s style. Paint covers the wood completely and offers many colors. Stain shows the natural wood grain and adds warmth. Use a brush or cloth to apply the finish evenly. Let it dry fully before the next step. Apply a second coat if you want richer color.
Adding Protective Coating
A protective coating guards the wood from scratches and spills. Polyurethane is a popular choice for its strong protection. Apply it with a clean brush in thin layers. Allow each layer to dry well before adding another. This coating keeps your bookshelf looking new for years. It also makes cleaning easier and faster.
Installing Safety Features
Safety is key for a pivoting bookshelf. Install wall anchors or brackets to secure the bookshelf firmly. This prevents tipping during use or accidental bumps. Use soft-close hinges to stop sudden slamming. Add rubber pads under the base to protect floors. These small steps keep your space safe and your bookshelf steady.
Tips For Maintenance
Maintaining your pivoting bookshelf keeps it working smoothly and looking good. Regular care helps avoid problems and extends its life.
Regular Cleaning
Dust and dirt can cause the pivot to stick or wear out fast. Use a soft cloth to wipe the shelves and pivot points often. Avoid harsh cleaners that may damage the wood or metal parts.
Lubricating Pivot Joints
Apply a small amount of lubricant to the pivot joints every few months. This helps the shelf turn easily without noise. Use a light oil or silicone spray for best results. Wipe off any extra oil to prevent dust buildup.
Checking For Wear And Tear
Look at the pivot and hinges regularly for signs of damage. Loose screws or cracks in the wood need fixing fast. Tighten any loose parts to keep the shelf safe and stable. Early repairs stop bigger problems later.

Credit: www.fritsjurgens.com
Frequently Asked Questions
What Materials Are Needed For A Pivoting Bookshelf?
You need plywood or hardwood, pivot hinges, screws, wood glue, and finish. These materials ensure sturdy construction and smooth pivot action.
How Do You Install Pivot Hinges Properly?
Align hinges at the top and bottom edges. Secure them firmly with screws for balanced pivot movement and stability.
Can A Pivoting Bookshelf Support Heavy Books?
Yes, if constructed with strong wood and quality hinges. Proper installation distributes weight evenly to prevent sagging.
What Tools Are Required To Build A Pivoting Bookshelf?
Basic tools include a drill, saw, screwdriver, measuring tape, and level. These help ensure precise cuts and secure assembly.
Conclusion
Creating a pivoting bookshelf adds style and function to any room. It saves space and keeps your books organized. Follow each step carefully to build a sturdy shelf. Use the right tools and materials for best results. Take your time and enjoy the process.
Soon, you will have a unique bookshelf to show off. Try this project to add a personal touch to your home. Simple, useful, and fun to make—what’s not to like?