Are you looking for a simple way to organize your books and display your favorite items? Making a cubby bookshelf might be the perfect project for you.
It’s not only practical but also adds a personal touch to your space. Imagine having a sturdy, stylish shelf that fits exactly where you want it. In this guide, you’ll discover easy steps to build your own cubby bookshelf, even if you’ve never worked with wood before.
Keep reading, and you’ll be surprised at how quickly you can create something both useful and beautiful.
Materials And Tools Needed
Building a cubby bookshelf is a fun and rewarding project. Having the right materials and tools makes the process smooth. Gather everything before you start. This helps you stay organized and work faster.
Wood Types And Sizes
Choose wood that is strong and easy to cut. Pine and plywood are good choices. They cost less and look nice. Use 3/4 inch thick wood for the shelves and sides. For the back panel, thinner wood like 1/4 inch plywood works well. Cut the pieces to the size of your cubby design.
Essential Tools List
Prepare these tools for building your bookshelf. A saw to cut the wood pieces is a must. A drill helps make holes for screws. Use a screwdriver or drill bit to fasten screws. Sandpaper smooths rough edges. A tape measure ensures correct sizes. A square tool helps keep corners straight. Clamps hold pieces steady while you work.
Safety Equipment
Protect yourself during woodworking. Wear safety glasses to shield your eyes. Use ear protection if tools are loud. Gloves protect your hands from splinters. A dust mask keeps you safe from sawdust. Work in a well-ventilated area. Keep your workspace clean to avoid accidents.

Credit: www.instructables.com
Planning Your Cubby Bookshelf
Planning your cubby bookshelf is the first step to a successful project. It helps you avoid mistakes and saves time and materials. Good planning means knowing what you want and how to build it. This section guides you through important decisions before you start cutting wood.
Choosing The Right Dimensions
Measure the space where the bookshelf will go. Think about height, width, and depth. Make sure it fits without crowding the room. Consider what you want to store. Bigger items need bigger cubbies. Small items fit in smaller spaces. Use simple numbers for easier cutting and assembly.
Designing The Layout
Decide how many cubbies you want. Arrange them in rows and columns. You can make all cubbies the same size or mix sizes. Think about balance and symmetry. Sketch your design on paper or use a drawing app. This helps you see the final look and adjust if needed.
Selecting A Finish
Choose a finish that matches your room style. Paint can add color and protect the wood. Stain shows the wood’s natural beauty. Consider a clear coat for extra durability. Make sure the finish is safe for indoor use. Test the finish on a small wood piece first.
Cutting And Preparing Wood
Cutting and preparing wood is a crucial step in building a cubby bookshelf. This phase sets the foundation for the entire project. Properly cut and smooth wood ensures stability and a clean finish. Taking time here helps avoid problems later.
Measuring And Marking
Start by measuring the wood pieces carefully. Use a tape measure for accuracy. Mark the wood with a pencil where you need to cut. Double-check each measurement before cutting. Clear and precise marks help make straight cuts.
Cutting Techniques
Use a saw suitable for your wood type. A handsaw or circular saw works well. Cut slowly and follow the marks exactly. Keep your hand steady and the blade straight. Wear safety gear to protect your eyes and hands.
Sanding For Smooth Edges
After cutting, sand the edges to remove splinters. Use medium-grit sandpaper first, then fine-grit for a smooth finish. Sand in the direction of the wood grain. Smooth edges prevent injuries and improve the look. Take your time for the best results.

Credit: gosforthhandyman.com
Assembling The Frame
Assembling the frame is the first big step in making your cubby bookshelf. This part gives the bookshelf its shape and strength. You will work with wood pieces and make sure they fit tightly. Careful assembly helps the bookshelf hold weight and last long.
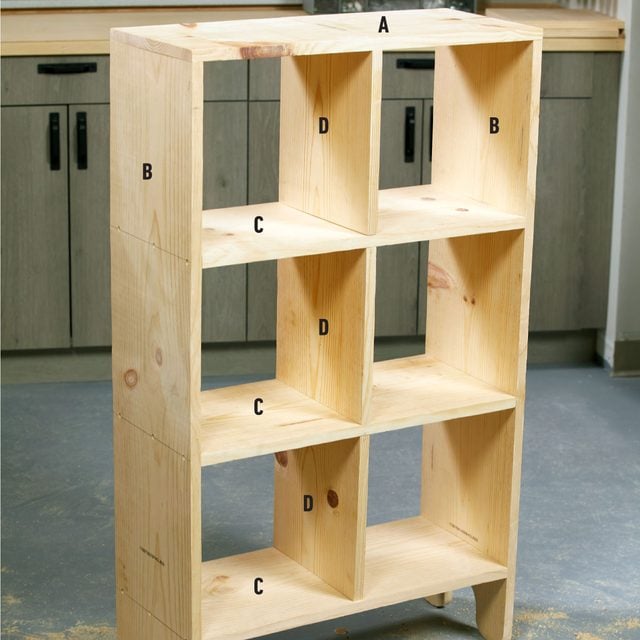
Building The Outer Frame
Start by cutting the wood pieces for the outer frame. These include the two sides, top, and bottom boards. Use a square tool to keep corners at 90 degrees. Join the pieces using wood glue for a strong bond. Clamp the frame and let the glue dry before moving on.
Adding Internal Dividers
Next, add the internal dividers to create cubby spaces. Measure and cut wood pieces to fit inside the outer frame. Place dividers evenly for balanced cubbies. Use a level tool to keep dividers straight. Glue the dividers to the top, bottom, and side boards carefully.
Securing With Nails And Screws
After gluing, secure the frame with nails and screws. Use a hammer to gently tap nails at corners and joints. Drive screws through pre-drilled holes to avoid wood splitting. This step strengthens the frame and stops parts from moving. Check all joints to make sure the frame is solid.
Finishing Touches
Finishing touches give your cubby bookshelf a polished look. They protect the wood and make it last longer. These final steps also help the bookshelf fit your room style perfectly. Let’s explore how to apply paint or stain, add a protective coating, and install feet or wall mounts.
Applying Paint Or Stain
Choose paint or stain that matches your room decor. Use a brush or cloth to apply it evenly. Paint gives a solid, colorful finish. Stain shows the wood grain for a natural look. Apply thin coats and let each dry fully. Sand lightly between coats for smoothness. This step enhances beauty and protects the wood.
Adding Protective Coating
Protective coatings keep your bookshelf safe from scratches and spills. Use clear polyurethane or varnish for durability. Apply with a clean brush in thin layers. Let each layer dry before adding another. This coating seals the paint or stain. It also makes cleaning easier and prevents damage.
Installing Feet Or Wall Mounts
Feet raise the bookshelf slightly, protecting it from floor moisture. Choose sturdy feet that support the weight evenly. Screw or attach them firmly to the bottom. Wall mounts secure the bookshelf to the wall. They prevent tipping and increase safety. Use proper anchors for your wall type. This step keeps your cubby bookshelf stable and safe.
Tips For Stylish Storage
Stylish storage turns a simple cubby bookshelf into a beautiful and useful piece. It keeps things neat while adding charm to your room. Small touches make a big difference in how your cubby looks and works. Organize smartly, decorate thoughtfully, and care for it well to keep it fresh and inviting.
Organizing Your Cubby
Sort items by size and type. Place frequently used things at eye level. Use baskets or bins inside cubbies for loose items. Label containers for easy finding. Mix vertical and horizontal stacking to save space. Keep heavier items on the bottom shelves for safety.
Decorating Ideas
Add small plants to brighten the space. Use colorful boxes or baskets for a pop of color. Display a few favorite books with their covers facing out. Include personal items like photos or souvenirs. Balance empty and filled cubbies to avoid clutter. Use soft lighting nearby to highlight the shelf.
Maintenance And Care
Dust your cubby regularly with a soft cloth. Wipe spills immediately to prevent damage. Check for loose screws or joints once a month. Use wood polish or spray protectant to keep the finish fresh. Avoid placing it in direct sunlight to prevent fading. Handle with care when moving or adjusting items.
Credit: www.familyhandyman.com
Frequently Asked Questions
What Materials Are Needed To Make A Cubby Bookshelf?
You need wood panels, screws, wood glue, sandpaper, paint or stain, and brackets. Quality materials ensure durability and a polished look.
How Long Does It Take To Build A Cubby Bookshelf?
Building a cubby bookshelf typically takes 4 to 6 hours. Time varies based on skill level and design complexity.
Can I Customize The Size Of My Cubby Bookshelf?
Yes, you can easily adjust the height, width, and cubby sizes. Customization fits your space and storage needs perfectly.
What Tools Are Required To Build A Cubby Bookshelf?
Common tools include a saw, drill, screwdriver, measuring tape, level, and clamps. These tools help ensure accuracy and safety.
Conclusion
Building a cubby bookshelf adds charm and order to any room. It offers space to store books and display items neatly. The project suits beginners and experts alike. With simple tools and steps, you create something useful and lasting. Enjoy the pride of making your own furniture.
Start your project today and see the difference it makes.
