Have you ever stood in front of a bookshelf and wondered if it would fit perfectly in your space? Or maybe you want to build your own bookshelf but don’t know where to start with measurements.
Knowing how to measure a bookshelf correctly can save you time, money, and frustration. You’ll discover simple steps to get precise measurements that match your needs. By the end, you’ll feel confident choosing or creating the perfect bookshelf for your home.
Keep reading to unlock the easy method that makes measuring a bookshelf hassle-free.

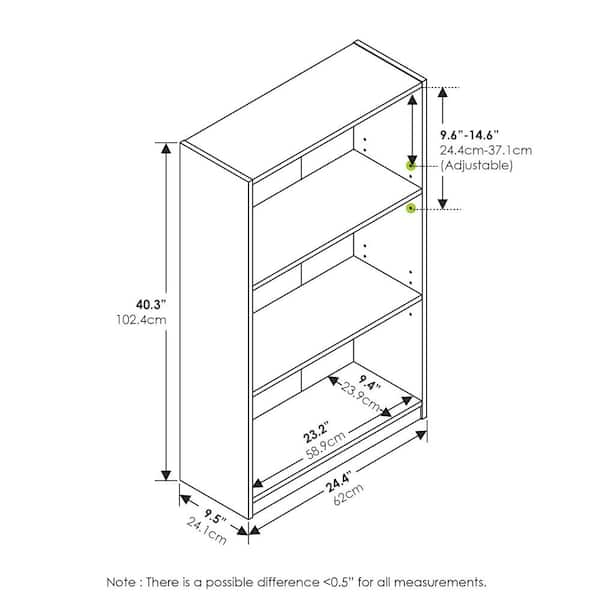
Credit: www.dimensions.com
Tools Needed
Measuring a bookshelf needs the right tools. These tools help get exact sizes and keep your project on track. Using the right tools saves time and avoids mistakes. Here are the basic tools you need for measuring a bookshelf.
Measuring Tape
A measuring tape is the main tool for this task. It measures the height, width, and depth of the bookshelf. Use a tape with clear numbers and marks. A tape that locks in place makes measuring easier. Pull it out straight for the best results.
Level
A level checks if the shelf is straight and even. It helps avoid shelves that tilt or lean. Place the level on top of the shelf. Adjust the shelf until the bubble is centered. A level ensures your bookshelf looks neat and stable.
Pencil And Paper
Write down your measurements as you go. Use a pencil to mark the shelf or wall gently. Paper helps keep all sizes in one place. Clear notes make building or buying the right shelf easier. Keep your measurements organized for quick reference.
Credit: www.homedepot.com
Measure Bookshelf Width
Measuring the width of your bookshelf is a key step before buying or building one. The width affects how many books or items you can store. Getting this measurement right helps avoid problems later. You will need a tape measure and a clear space around the shelf.
Start with a simple plan. Measure the width carefully and note the numbers. This ensures the shelf fits well in your room and holds your belongings securely.
Measure Inside Width
Inside width means the space between the two sides of the bookshelf. Use a tape measure to find this distance. Place the tape at one inside edge and stretch it across to the other side. Do this at the top, middle, and bottom to check for any differences. Write down the smallest number. This is the true inside width where your books will fit.
Account For Shelf Thickness
Shelf thickness affects the total width of the bookshelf. Measure the thickness of the shelves themselves. Use the tape to find how wide each shelf board is. Add this thickness to your calculations if you plan to build or customize your shelf. This helps you understand the total space the bookshelf will take up on your wall or floor.
Measure Bookshelf Height
Measuring the height of your bookshelf is an important step. It helps you find the right spot and ensures the shelf fits well. Height affects how much space you have for books and decorations.
Take your time to measure carefully. Use a tape measure or a ruler for the best results. Write down the numbers to avoid mistakes.
Measure Overall Height
Start by measuring from the floor to the top of the bookshelf. Hold the tape measure straight and steady. Check the number twice to be sure. This gives you the total height of the shelf.
Note any parts that stick out, like legs or a decorative top. Include these in your measurement. This total height helps you plan space around the shelf.
Consider Adjustable Shelves
Some bookshelves have shelves you can move up or down. Measure the height of each shelf space if possible. This helps you know what size items fit on each level.
Check how much the shelves can adjust. This flexibility makes your bookshelf more useful. Keep these numbers handy for future changes.
Measure Bookshelf Depth
Measuring the depth of a bookshelf is crucial for fitting it perfectly in your space. Depth tells you how far the shelf extends from front to back. This affects what items you can store and how the bookshelf fits in the room. Accurate depth measurement helps avoid buying a shelf that is too shallow or too deep.
Front To Back Measurement
Start by placing the tape measure at the front edge of the shelf. Measure straight back to the very end of the shelf’s surface. This gives you the total depth. Make sure the tape is flat and straight for accuracy. Write down this number for future reference.
Clearance For Items
Think about the size of items you want to store on the shelf. Some books and decorations need extra space behind or in front. Leave a little extra depth for easy access and air circulation. This helps keep items safe and easy to reach. Adjust your measurement to allow this clearance.
Measure Wall Space
Measuring the wall space is the first step to choosing the right bookshelf. Knowing the exact space helps avoid buying a shelf that does not fit. It also guides you on the size and style suitable for your room. Take your time to measure carefully for the best results.
Available Width And Height
Start by measuring the width of the wall area where the bookshelf will go. Use a tape measure and note the distance between the two walls or boundaries. Next, measure the height from the floor to the ceiling or any obstruction above. Write down these numbers to keep track.
Consider Baseboards And Molding
Baseboards and molding can reduce the usable space for your bookshelf. Measure their thickness along the floor and walls. Subtract these measurements from the total width and height. This step ensures the shelf fits snugly without gaps or damage to the trim.
Check For Levelness
Checking for levelness is important before measuring a bookshelf. It helps avoid mistakes and ensures the shelves fit perfectly. A shelf that is not level can cause books to slide or lean. It also looks uneven and can be unsafe. Taking time to check levelness makes the whole process easier and the results better.
Use A Level On Wall
Place a level tool against the wall where the bookshelf will stand. The bubble in the level shows if the wall is straight. If the bubble is in the center, the wall is level. Move the level up and down to check the entire area. This step helps know if the wall is even before placing the shelf.
Adjust For Uneven Floors
Floors are not always flat, and this can affect the bookshelf. Use shims or small wedges under the bookshelf feet to fix any tilt. Check the shelf again with the level after adjusting. Small changes can make a big difference in stability and appearance.
Mark Placement
Marking placement is a key step in measuring your bookshelf space. It helps you see exactly where the shelf will fit. Clear marks guide you during installation. They prevent mistakes and wasted effort.
Start with a pencil and measuring tape. Make light marks so you can adjust if needed. Take your time to ensure accuracy. Precise marking sets the foundation for a sturdy bookshelf.
Outline Bookshelf Area
First, outline the area where the bookshelf will go. Measure the width and height on the wall. Use a pencil to draw light lines showing the shelf’s edges. This visual frame helps you picture the final fit. Check that the outline is level and straight. Adjust marks to correct any unevenness. This step ensures your shelf will look neat and balanced.
Mark Stud Locations
Next, find and mark the wall studs inside the outline. Studs provide strong support for the shelf. Use a stud finder or tap the wall to locate them. Mark each stud with a small pencil dot. Space between studs is usually 16 or 24 inches. Align your shelf brackets with these marks. This prevents your shelf from pulling away or falling. Correct stud placement is crucial for safety and durability.
Final Tips
Before finishing your bookshelf project, keep these final tips in mind. They help avoid common mistakes and ensure your shelf fits perfectly. Careful attention now saves time and effort later.
Double-check Measurements
Measure twice, cut once. Always measure your space and bookshelf dimensions again. Check width, height, and depth carefully. Small errors can cause big problems. Use a reliable tape measure and note down each number. Double-checking helps prevent costly mistakes and frustration.
Allow Extra Space For Fit
Leave a little extra room around your bookshelf. This space helps when placing the shelf in tight spots. It also allows for slight wall or floor unevenness. About half an inch of extra space on each side works well. This small gap makes installation smoother and avoids damage to walls or shelf edges.
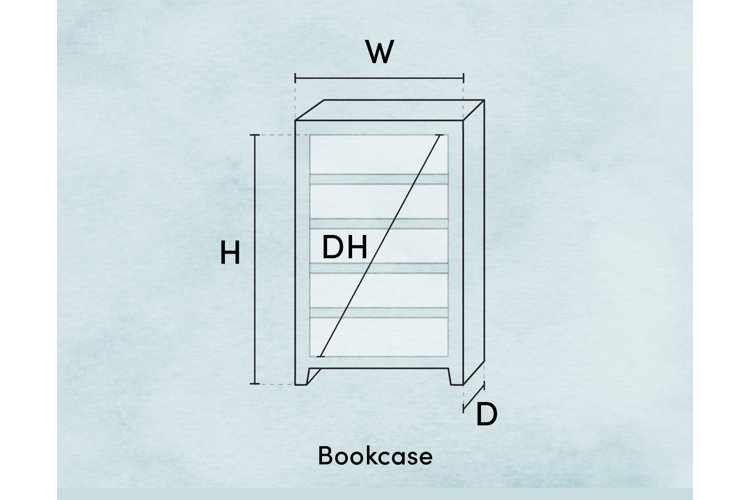
Credit: www.wayfair.com
Frequently Asked Questions
How Do I Measure The Height Of A Bookshelf?
Measure from the bookshelf’s base to its top edge using a tape measure. Ensure the tape is straight for accuracy. Record the height in inches or centimeters for reference.
What Is The Best Way To Measure Bookshelf Width?
Measure the distance between the outer edges of the bookshelf’s front face. Use a tape measure and keep it level. This width helps determine space fit and shelf size.
How To Measure Bookshelf Depth Correctly?
Measure from the front edge to the back edge of the shelf. Use a tape measure and keep it parallel to the shelf surface. Depth impacts storage capacity and room placement.
Why Is Measuring Bookshelf Dimensions Important?
Accurate measurements ensure the bookshelf fits your space perfectly. It helps in selecting the right size and organizing books efficiently. Proper dimensions avoid buying the wrong size.
Conclusion
Measuring a bookshelf is simple and takes just a few steps. Start with the height, width, and depth. Use a tape measure for accuracy. Write down each number clearly. Double-check your measurements to avoid mistakes. Knowing these numbers helps you find the right bookshelves or build one yourself.
Keep your measurements handy for future use. This way, you get a perfect fit every time. Measuring right saves time and effort. It makes your space look neat and organized. Simple, quick, and useful.