
Your outdoor wicker furniture can brighten up any patio or garden space. But over time, the paint may fade, chip, or just lose its charm.
What if you could bring it back to life with a fresh coat of paint? Painting your wicker furniture is easier than you think, and it can save you money while giving your outdoor space a new look. In this guide, you’ll discover simple steps and expert tips to make your wicker furniture look brand new.
Ready to transform your outdoor area? Let’s get started!
Choosing The Right Paint
Choosing the right paint is key to a successful outdoor wicker furniture makeover. The paint must protect your furniture from sun, rain, and dirt. It should also stick well to the wicker’s woven surface. Picking the right paint type ensures long-lasting beauty and durability.
Types Of Paint For Outdoor Use
Outdoor paint must resist weather and fading. Acrylic paint is a popular choice. It dries fast and handles moisture well. Oil-based paint offers strong protection but takes longer to dry. Both types are good, but acrylic is easier to clean and less smelly.
Selecting Paint For Wicker Surfaces
Wicker has many tiny gaps and curves. Use paint that flows smoothly and covers evenly. Spray paint made for outdoor use works well on wicker. It reaches into small spaces better than a brush. Choose paint labeled for plastic or resin wicker for best results.
Preparing The Furniture
Preparing outdoor wicker furniture for painting is the key to a smooth, lasting finish. It takes time and care to get the surface ready. Proper preparation helps paint stick better and look nicer. Follow these steps closely to make your wicker ready for a fresh coat of paint.
Cleaning And Removing Old Finish
Start by cleaning the wicker thoroughly. Use warm water with mild soap to remove dirt and dust. A soft brush helps reach into the crevices. Rinse with clean water and let it dry completely. Next, remove any old paint or finish. Use a paint stripper made for outdoor furniture or sand gently. This step ensures the new paint will stick well.
Repairing Damages And Loose Weaves
Check the wicker for damage. Look for broken strands or loose weaves. Fix small breaks with glue made for wicker or wood. Press the strands firmly and let the glue dry. Replace any missing pieces if possible. Tighten loose weaves by carefully pushing them back into place. Repairing these issues keeps the furniture strong and ready for painting.
Sanding Techniques For Wicker
Sanding prepares the surface for paint by smoothing rough spots. Use fine-grit sandpaper to avoid damaging the wicker. Lightly sand all surfaces, including tight areas. A sanding sponge can help reach curves and corners. Wipe away dust with a clean cloth after sanding. Smooth wicker allows paint to go on evenly and last longer.
Priming The Surface
Priming the surface is a key step before painting outdoor wicker furniture. It helps paint stick better and last longer. Primer creates a smooth base, sealing the wicker’s texture. This step protects the furniture from weather damage. Proper priming ensures your paint job looks fresh and lasts through seasons.
Benefits Of Using Primer
Primer improves paint adhesion on wicker surfaces. It prevents peeling and cracking over time. The primer blocks moisture, which can damage wicker. It helps paint colors appear brighter and more even. Using primer saves you from repainting too soon. It also fills small gaps and rough spots. This leads to a cleaner, professional finish.
Best Primers For Outdoor Wicker
Choose primers designed for outdoor use and flexible surfaces. Oil-based primers work well for synthetic wicker. They resist water and hold paint firmly. Latex primers suit natural wicker and dry quickly. Look for rust-resistant primers if furniture has metal parts. Some primers also offer mold and mildew protection. Always check labels to match primer type with your wicker material.
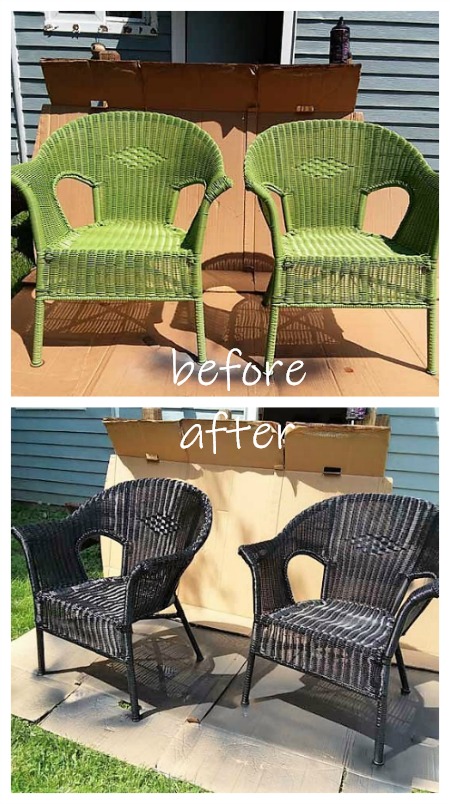
Credit: stowandtellu.com
Painting Techniques
Painting outdoor wicker furniture needs careful technique to get a smooth, lasting finish. The texture of wicker can be tricky. It has many small spaces and woven patterns. Proper tools and methods help paint stick well and look nice. The right approach makes your furniture stand out and protects it from weather damage.
Choosing The Right Brushes And Tools
Use a small, soft-bristle brush for detailed areas. It reaches inside the wicker weave easily. A foam brush works well on flat surfaces. Avoid large brushes that miss tight spots. A spray paint can also cover hard-to-reach areas quickly. Choose tools that fit the size and shape of your furniture.
Applying Paint Evenly On Wicker
Apply paint gently to avoid clumps. Brush in the direction of the wicker strands. Start with light coats to cover the surface slowly. Use a dabbing motion for deep crevices. Keep the paint thin to prevent drips. Even coverage helps the furniture look neat and uniform.
Multiple Coats And Drying Time
Two to three coats work best for durability. Let each coat dry fully before adding the next. Drying time depends on paint type and weather. Usually, wait at least one hour between coats. Multiple layers protect the wicker from sun and rain. Patience during drying ensures a strong, lasting finish.
Sealing And Protecting
Sealing and protecting your outdoor wicker furniture is key to keeping it beautiful. Paint alone does not stop damage from sun, rain, and dirt. A good sealant forms a strong barrier. It keeps moisture out and paint from chipping. This step extends the life of your furniture and keeps it fresh.
Types Of Sealants For Outdoor Furniture
Choose a sealant made for outdoor use. Clear acrylic sealants are popular. They dry fast and resist yellowing. Polyurethane sealants offer strong protection. They handle scratches and water well. Another option is marine varnish. It is tough and made for wet conditions. Pick a sealant that fits your paint and climate.
Application Tips For Long-lasting Finish
Apply sealant on dry, clean furniture. Use a brush or spray for even coverage. Work in thin layers to avoid drips. Let each coat dry fully before adding more. Two to three coats usually work best. Avoid painting in direct sunlight or high humidity. This helps sealant set properly. Store furniture in shade for longer protection.
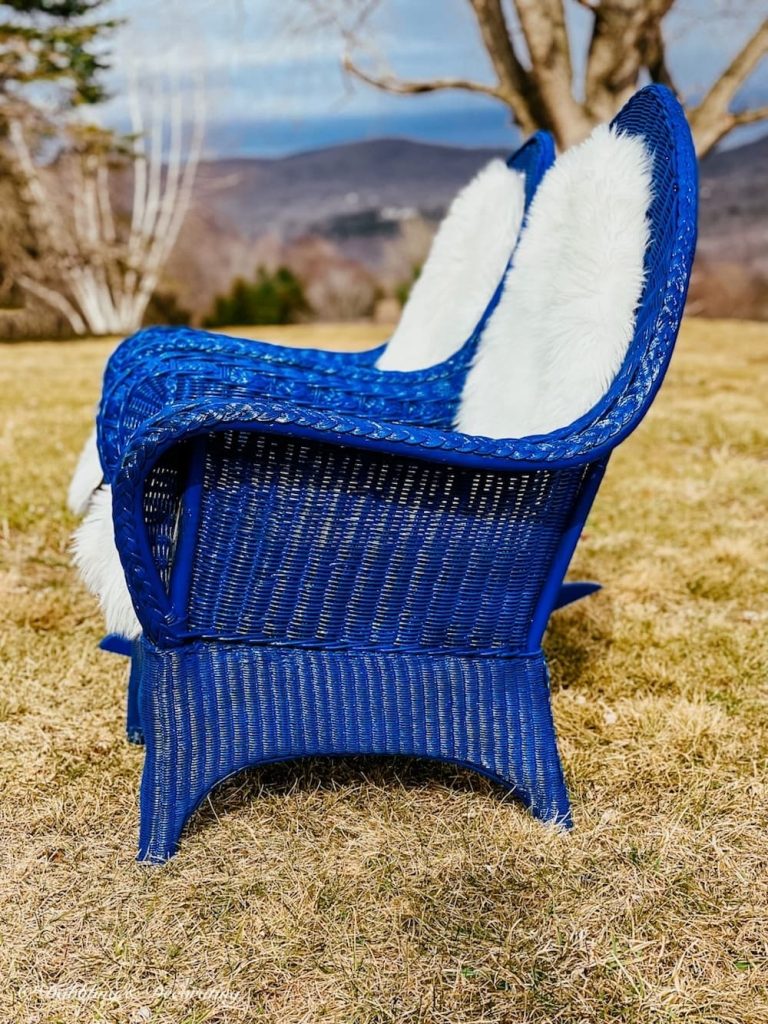
Credit: www.dabblinganddecorating.com
Maintenance Tips
Maintaining painted outdoor wicker furniture keeps it looking fresh and protects it from weather damage. Regular care extends the life of your furniture and preserves its color. Simple steps make a big difference in upkeep.
Cleaning Painted Wicker Furniture
Dust and dirt build up on wicker surfaces over time. Use a soft brush or cloth to remove loose dirt. Mix mild soap with water for gentle cleaning. Avoid harsh chemicals that can strip paint or damage the wicker.
Dip a soft cloth in soapy water and wipe the furniture gently. Use a toothbrush to clean tight spots and crevices. Rinse with clean water and dry with a towel. Do not let water sit on painted surfaces for long.
Touch-up Strategies For Wear And Tear
Paint can chip or fade after months of use. Keep extra paint on hand for small repairs. Lightly sand the damaged area to smooth rough edges before painting. Apply thin paint layers to avoid drips and allow drying between coats.
Use a small brush for precise touch-ups. Match the paint color closely to the original. Check your furniture regularly to spot wear early. Quick repairs prevent bigger damage and keep furniture attractive.
Common Mistakes To Avoid
Painting outdoor wicker furniture can give it a fresh, new look. Avoiding common mistakes helps the paint last longer. These errors can cause peeling, cracking, or uneven color. Learning what to avoid makes the project easier and more successful.
Skipping Preparation Steps
Preparation is key for a smooth finish. Cleaning the wicker removes dirt and dust that block paint. Sanding rough spots helps paint stick better. Skipping these steps often leads to paint peeling or chipping quickly. Take time to clean and sand before painting.
Using Incompatible Paints Or Tools
Not all paints work well on wicker. Use paint made for outdoor use and flexible surfaces. Regular wall paint can crack or peel on wicker. Choose brushes or spray tools that reach tight spaces. Wrong tools cause uneven coverage and messy results. Pick paint and tools designed for your furniture type.
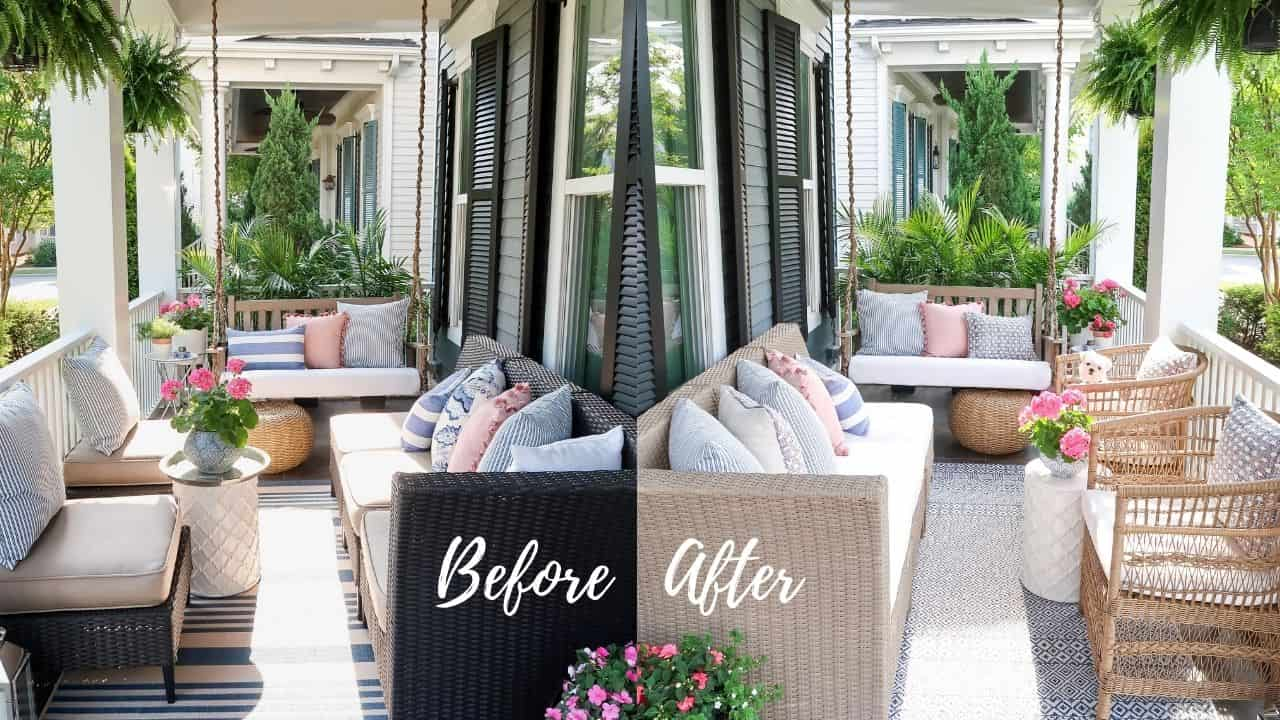
Credit: porchdaydreamer.com
Frequently Asked Questions
How Do You Prepare Wicker Furniture For Painting?
Clean the wicker with mild soap and water. Remove dirt and dust thoroughly. Let it dry completely before painting. Sand lightly to smooth rough spots. This ensures paint adheres well and lasts longer.
What Type Of Paint Is Best For Outdoor Wicker?
Use high-quality spray paint designed for outdoor use. Acrylic or enamel spray paints work well. They resist weather damage and provide a smooth finish. Avoid oil-based paints as they can crack over time.
How Many Coats Of Paint Should I Apply?
Apply two to three thin coats for even coverage. Let each coat dry fully before applying the next. Thin layers prevent dripping and enhance durability. Multiple coats ensure better protection against elements.
Should I Seal Painted Outdoor Wicker Furniture?
Yes, apply a clear outdoor sealant after painting. It protects the paint from fading and chipping. Use a UV-resistant sealant for best results. Sealants extend the furniture’s lifespan in harsh weather.
Conclusion
Painting outdoor wicker furniture can refresh your space quickly. Clean the surface well before starting to paint. Choose the right paint for outdoor use. Apply thin, even coats for best results. Let each coat dry completely. Protect your work with a clear sealer.
This process helps your furniture last longer. Enjoy the new look and feel outside. Simple steps make a big difference in care. Ready for a fresh, stylish outdoor area?


