
Are you planning to give your bunk bed a fresh new look but unsure how much paint you’ll need? Painting a bunk bed can be a fun and rewarding project, but guessing the right amount of paint can be tricky.
Using too little means extra trips to the store, while too much can lead to wasted paint and money. You’ll discover exactly how to calculate the right amount of paint for your bunk bed. By the end, you’ll feel confident, prepared, and ready to transform your bed without any guesswork.
Keep reading to get the smart tips that will save you time, effort, and cash.
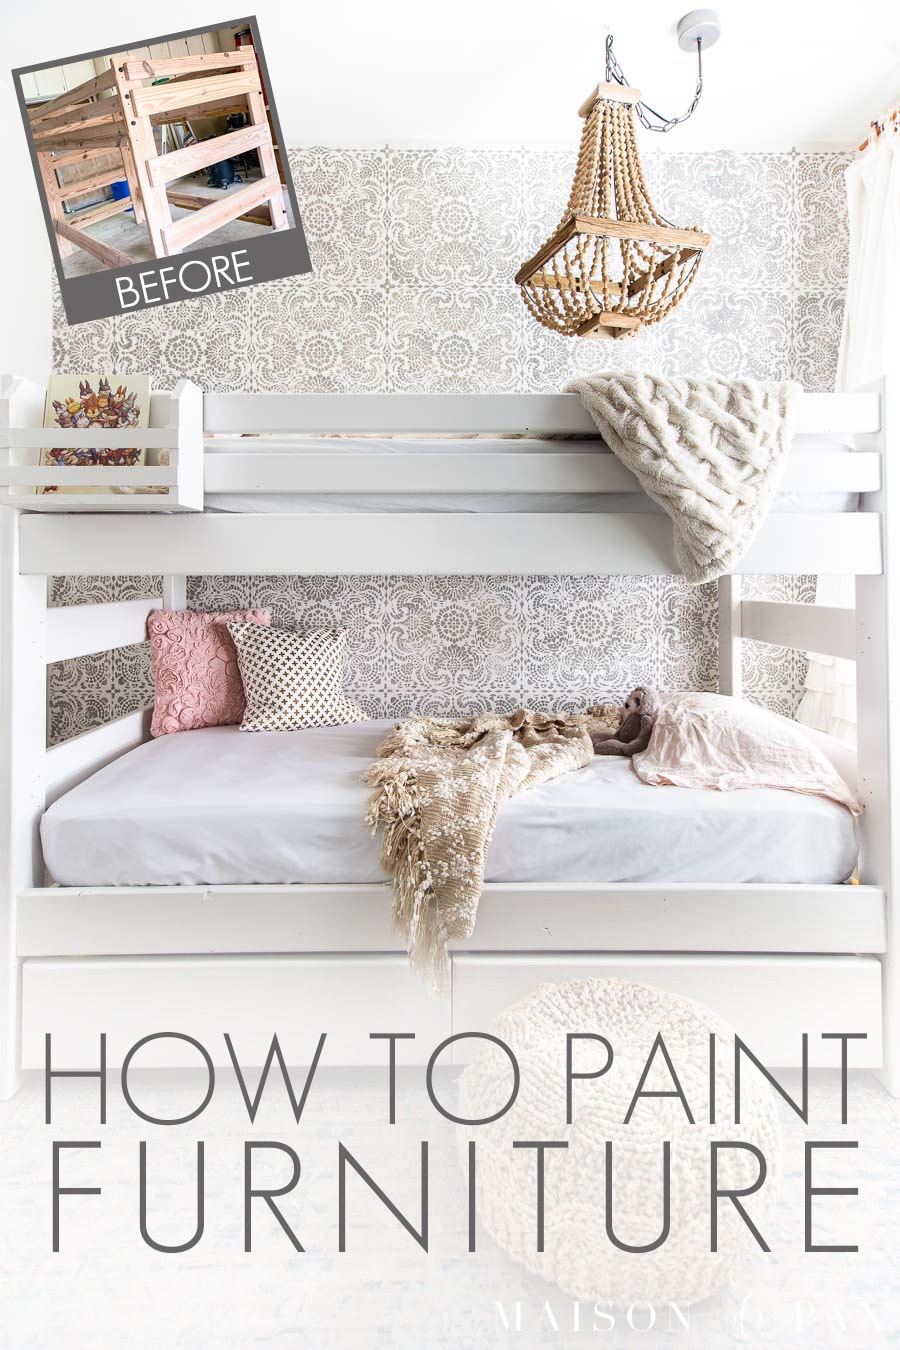
Credit: www.maisondepax.com
Calculating Surface Area
Calculating the surface area helps you know how much paint to buy. Paint covers surfaces, so you need to measure all parts of the bunk bed. Measuring carefully saves money and avoids running out of paint.
Measure each part of the bed separately. Add all measurements to get the total surface area. This total tells you how much paint is required.
Measuring The Bunk Bed
Start by measuring the length, width, and height of the main parts. Include the headboard, footboard, sides, and guardrails. Use a tape measure to get exact numbers. Multiply the length by height for flat surfaces. Write down each number for later.
Accounting For Slats And Details
Slats and small details change the surface area. Count all slats and measure their size. Multiply slat size by the number of slats. Add this to the total surface area. Don’t forget knobs, posts, and ladders. They need paint too and add to the total area.
Choosing The Right Paint
Choosing the right paint for a bunk bed is key to a successful project. The paint affects the bed’s look, feel, and lifespan. A good choice protects the wood and keeps the bed safe for kids. This guide helps you find the best paint type and finish for your bunk bed.
Types Of Paint For Wood
Latex paint is a popular choice for wood. It dries fast and cleans up with water. It is safe and has low odor, perfect for indoor use. Oil-based paint is stronger and lasts longer. It resists scratches and stains well. But it takes longer to dry and needs special cleaners.
Chalk paint offers a matte look and is easy to apply. It needs a protective topcoat for durability. Milk paint gives a natural, rustic style. It is non-toxic but can chip without a sealant.
Finish Options And Durability
Flat finishes hide imperfections but are less durable. Satin finish gives a soft shine and cleans easily. Semi-gloss is shiny and very durable, ideal for furniture used often. Glossy finish reflects most light and resists wear. It is best for high-traffic areas.
Choose finishes that protect the wood from scratches and spills. Durable paint keeps the bunk bed looking good for years. A strong finish also helps with cleaning and maintenance.
Estimating Paint Quantity
Estimating the right amount of paint for a bunk bed is important. Too little paint means extra trips to the store. Too much paint wastes money and space. Knowing how much paint to buy helps finish the job smoothly. Let’s break down the key factors to consider.
Coverage Per Gallon
Paint cans show coverage in square feet per gallon. Most paints cover about 350 to 400 square feet per gallon. A bunk bed is smaller, so you need less paint. Measure the bed’s surface area. Multiply length by height for each part. Add up all parts to get total square feet. This number helps estimate paint needed for one coat.
Number Of Coats Needed
Usually, two coats give the best finish. The first coat may not fully cover the surface. The second coat evens out color and texture. Multiply the surface area by the number of coats. This total shows the paint amount needed. Keep in mind paint type and color affect coverage. Dark colors or raw wood often need more coats.

Credit: www.maisondepax.com
Preparation Tips
Preparing a bunk bed before painting is very important. It helps the paint stick well and last longer. Good preparation also makes the finish smooth and neat. Taking time on these steps saves effort later.
Cleaning And Sanding
Start by cleaning the bunk bed. Remove dust, dirt, and grease with a damp cloth. Use mild soap if needed. Let it dry completely.
Next, sand the surface lightly. Use fine-grit sandpaper for best results. Sanding removes old paint and rough spots. This helps the new paint hold better. After sanding, wipe away dust with a dry cloth.
Priming For Better Adhesion
Apply a primer coat after sanding. Primer creates a smooth base for the paint. It also stops wood stains from showing through. Choose a primer that suits your paint type—latex or oil-based.
Let the primer dry fully before painting. This step improves paint coverage and durability. Proper priming means fewer paint layers are needed.
Application Techniques
Choosing the right application technique affects the final look of your bunk bed. It also influences how much paint you will need. Proper methods help paint cover smoothly and last longer. This section explains two common ways to apply paint and how to avoid common problems.
Brush Vs. Spray Methods
Brushing gives you control and works well for small areas. It helps paint get into corners and edges. Brushes come in different sizes for detailed work or larger surfaces. Brushing takes more time but uses less paint overall.
Spraying covers large areas quickly. It creates a smooth, even finish with little effort. Sprayers use more paint and require careful setup. Use a spray method outdoors or in a well-ventilated space. Mask off areas you do not want to paint.
Avoiding Drips And Streaks
Apply thin, even coats of paint. Thick layers cause drips and streaks. Let each coat dry before adding another. Use long, steady strokes with a brush to spread paint evenly.
When spraying, keep the nozzle moving at a steady speed. Hold it about 10 to 12 inches from the surface. Avoid stopping in one spot to prevent runs. Check your work often for any drips and smooth them out immediately.

Credit: thewickerhouse.com
Saving Paint And Cost
Saving paint and cost is important when painting a bunk bed. Using the right amount of paint helps avoid waste. It also keeps your expenses low. Careful planning makes your painting project smoother and cheaper.
Buying The Right Amount
Start by measuring the bunk bed’s surface area. Calculate the square footage to estimate how much paint you need. Check the paint can for coverage details. Usually, one gallon covers about 350 square feet.
Buy a little less than the total estimate. This prevents extra paint that may dry out. You can always buy more if needed. Avoid buying too much to save money and space.
Storing Leftover Paint
Store leftover paint properly to use later. Seal the paint can tightly to stop air from entering. Keep it in a cool, dry place away from sunlight. This stops the paint from drying or thickening.
Use leftover paint for touch-ups or small projects. Label the can with the paint color and date. Proper storage extends paint life and reduces costs.
Frequently Asked Questions
How Much Paint Do I Need For A Bunk Bed?
Typically, one quart of paint covers a bunk bed. This amount is enough for two coats on a standard wooden bunk bed. Always check the paint can for coverage details to ensure you buy the right quantity.
What Type Of Paint Is Best For Bunk Beds?
Use a durable, non-toxic paint like enamel or latex for bunk beds. These paints offer a smooth finish and resist wear. They are safe for children and easy to clean, making them ideal for furniture.
How Many Coats Of Paint Are Recommended?
Two coats are usually recommended for even coverage and durability. The first coat seals the wood, and the second enhances color and protection. Allow drying time between coats for the best results.
Should I Sand The Bunk Bed Before Painting?
Yes, sanding the bunk bed before painting is essential. It smooths rough surfaces and removes old paint or finish. This step helps the new paint adhere better and last longer.
Conclusion
Painting a bunk bed needs the right amount of paint. Measure the bed carefully before buying paint. One or two small cans usually work well. Use a brush or roller for smooth coverage. Let each coat dry before adding another.
Proper preparation helps paint stick better. This keeps the bunk bed looking nice longer. Planning paint needs saves time and money. Enjoy your refreshed bunk bed once done!