Are you ready to transform your bathroom with a brand-new vanity cabinet? Assembling one might seem tricky at first, but with the right steps, you can do it yourself and save money.
Imagine the satisfaction of seeing your bathroom take shape, piece by piece, knowing you built it with your own hands. In this guide, you’ll find simple, clear instructions that make the process easy—even if you’ve never built furniture before. Keep reading, and you’ll have your bathroom vanity cabinet ready in no time.
Tools And Materials Needed
Gathering the right tools and materials is the first step to assemble a bathroom vanity cabinet. Prepare everything before starting. This saves time and avoids frustration.
Essential Tools
You need a few basic tools to assemble the cabinet. A screwdriver, both flathead and Phillips, is necessary. A power drill makes the job faster. Use a measuring tape to check dimensions. A level helps keep the cabinet straight. A hammer may be needed for small nails or adjustments. Have some wood glue for extra strength. Safety glasses protect your eyes from dust or debris.
Vanity Cabinet Components
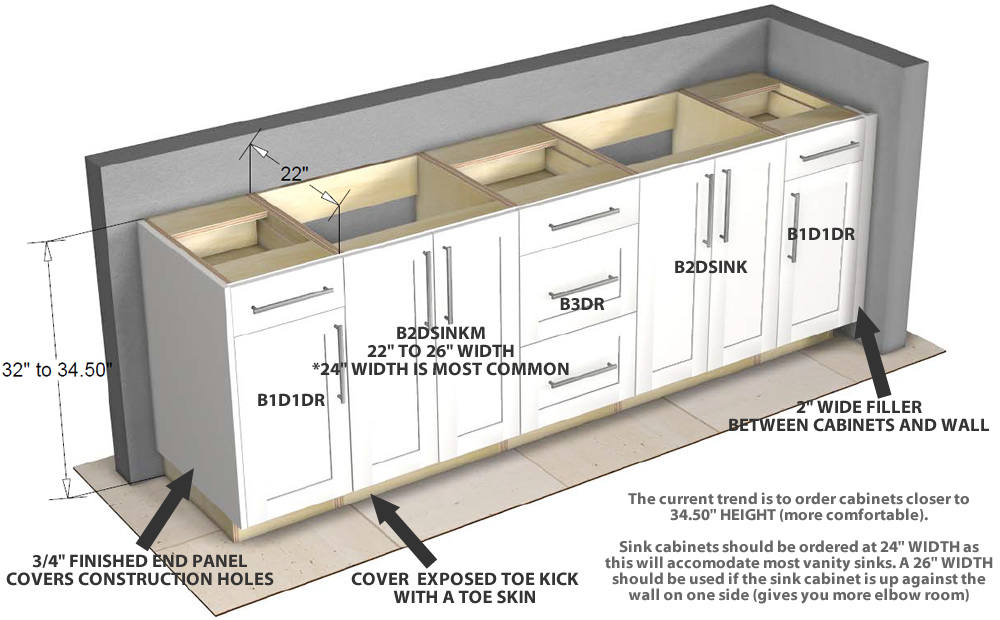
The cabinet comes with several parts. Side panels form the cabinet’s walls. The bottom panel supports the base. Shelves go inside for storage. The back panel adds stability. Doors and drawers complete the front. Hinges and handles attach to the doors. Screws, nails, and brackets hold everything together. Check all parts before starting assembly to avoid missing pieces.
Preparing The Workspace
Clear the area and gather all tools before starting. A clean, flat surface helps keep parts organized and safe. Proper lighting makes assembly easier and reduces mistakes.
Setting up your workspace is the first step in assembling a bathroom vanity cabinet. A clean and organized area makes the job easier and faster. It helps prevent mistakes and lost parts. Prepare your space before opening the box or using any tools.
This preparation also keeps your tools and parts safe. It reduces the chance of damage to the vanity cabinet and your bathroom floor. Take a few minutes to get ready. It will save time and stress later.
Clear And Clean Area
Choose a flat surface large enough for the vanity cabinet parts. Remove any items that could block your work. Clear the floor or table completely. Sweep or wipe the area to avoid dust and dirt.
A clean space protects the cabinet’s finish. It also helps you find small screws and pieces easily. Avoid working in cramped or cluttered spots. Room to move is important for safety and comfort.
Organize Parts And Tools
Take all parts out of the box and arrange them by size and type. Lay screws, hinges, and handles in small containers or trays. Gather tools like a screwdriver, hammer, and level. Keep everything within arm’s reach.
Check the instruction manual for needed tools. Having them ready avoids delays in the middle of assembly. Organizing parts helps you follow each step carefully. It also makes it easier to spot missing or damaged pieces.
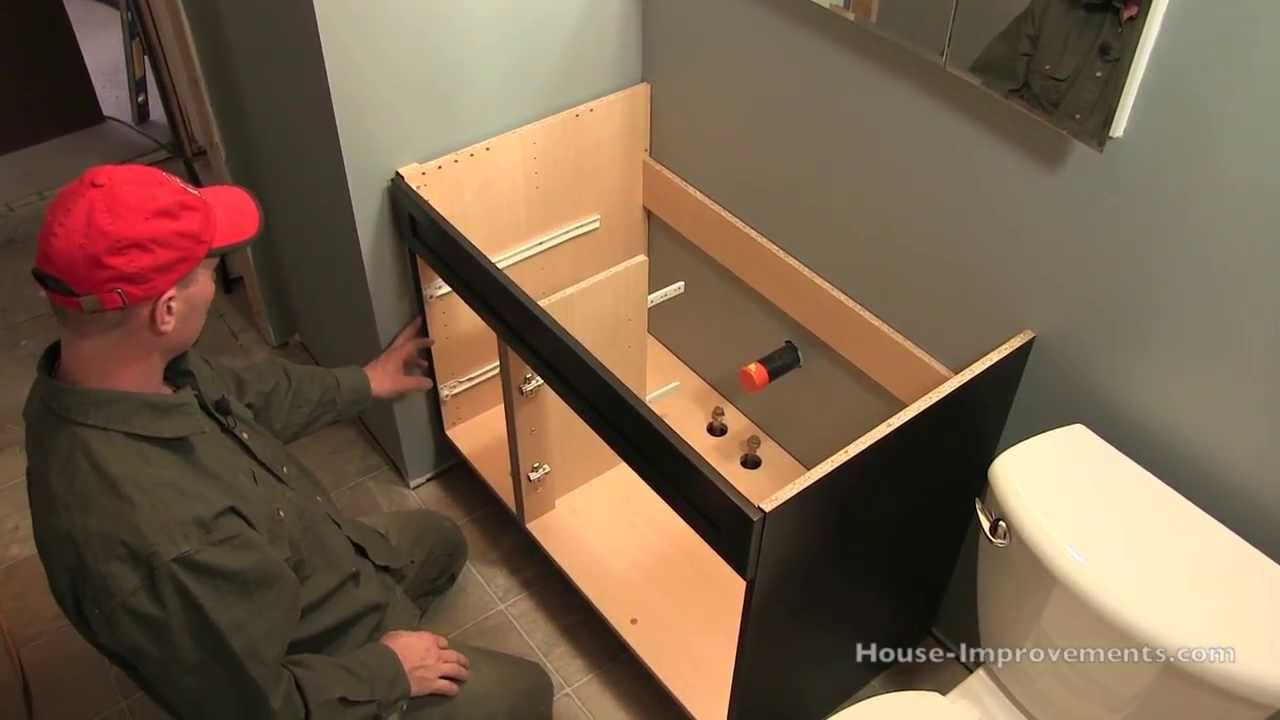
Assembling The Cabinet Frame
Assembling the cabinet frame is the first important step in building your bathroom vanity. This frame provides the basic shape and strength. It holds all other parts together securely. Careful assembly here ensures the cabinet will be stable and long-lasting.
Start by organizing all parts and tools. Clear space helps avoid mistakes. Follow the instructions closely and take your time. Each piece has a purpose and place.
Attach Side Panels
Begin with the two side panels. These form the cabinet’s vertical sides. Place them upright and parallel to each other. Align the edges carefully for a perfect fit.
Use screws or cam locks to join the side panels. Tighten fasteners firmly but do not over-tighten. Over-tightening can damage the wood or connectors.
Check that the panels stand straight and square. Use a level or measure the corners. Adjust if needed before moving on.
Secure Bottom And Back Panels
Next, attach the bottom panel to the side panels. This panel supports the cabinet’s weight. Slide it into place or fit it with dowels or screws.
Ensure the bottom panel fits tightly without gaps. Secure it firmly to prevent wobbling. A solid base is key for durability.
Finally, attach the back panel. This part adds stability and keeps the cabinet square. Align it with the edges and fix it using screws or nails.
Double-check all corners for squareness and tight connections. The frame should feel solid and steady. A well-assembled frame makes the rest of the build easier.

Credit: castacabinetry.com
Installing Shelves And Drawers
Installing shelves and drawers in your bathroom vanity cabinet creates useful storage. Proper placement and secure fitting keep everything organized and sturdy. This section covers key steps to place shelves and install drawers correctly. Follow these tips for a neat, functional vanity.
Shelf Placement
First, decide where to place each shelf inside the cabinet. Measure the height and width carefully. Mark the spots for shelf supports or pegs on both sides. Use a level to keep shelves even. Insert supports firmly to hold the shelves well. Slide each shelf onto the supports. Check if the shelves sit steady and adjust if needed.
Drawer Assembly And Installation
Start by assembling the drawer parts: sides, bottom, front, and back. Align pieces and fasten with screws or nails. Attach drawer slides to the drawer sides. Fix the matching slides inside the cabinet at the right height. Slide the drawer into the cabinet rails. Test the drawer by opening and closing it smoothly. Tighten or adjust screws to ensure proper movement.
Attaching Doors And Hardware
Attaching the doors and hardware is an important step in assembling your bathroom vanity cabinet. This part gives your cabinet a finished look and makes it functional. Properly installed doors and hardware ensure smooth operation and long-lasting use.
Take your time to align everything correctly. This helps the doors open and close easily without sticking or gaps. Follow the steps carefully to avoid mistakes and save effort later.
Hinge Installation
Start by attaching the hinges to the doors. Use the screws that come with the hinges. Align the hinges with the pre-drilled holes on the door edge. Tighten the screws firmly but avoid over-tightening, which can damage the wood.
Next, position the door on the cabinet frame. Hold it steady and mark where the hinges meet the frame. Drill small pilot holes if needed, then screw the hinges onto the cabinet. Check if the door swings smoothly and closes flush with the cabinet.
Handle And Knob Attachment
Choose the position for your handles or knobs. Most people place them near the edge of the door, about three inches from the top or bottom. Use a ruler and pencil to mark the exact spot.
Drill a small hole through the door at the mark. Insert the screw from inside the cabinet. Attach the handle or knob on the outside and tighten the screw. Make sure the hardware feels secure and straight before finishing.
Credit: www.youtube.com
Mounting The Vanity To The Wall
Mounting the vanity to the wall is a key step in bathroom cabinet assembly. It keeps the cabinet stable and safe. Proper mounting prevents damage and ensures long-lasting use.
Start by preparing the wall and tools. You need a secure base to hold the cabinet’s weight. Follow each step carefully for the best results.
Locate Studs
Studs are wooden supports inside the wall. They hold heavy items like vanities. Use a stud finder to find them quickly. Move the finder slowly along the wall. Mark the stud locations with a pencil.
Studs usually sit 16 or 24 inches apart. Mark at least two studs for better support. Avoid drilling into pipes or wires behind the wall. Check for obstacles before drilling.
Secure Cabinet Safely
Lift the vanity and place it against the wall. Align it with the stud marks. Use a level to keep it straight and even. Hold the cabinet firmly in place.
Drill pilot holes through the cabinet back into the studs. Use long screws made for wood studs. Tighten screws until the cabinet feels secure. Avoid overtightening to prevent damage.
Double-check the cabinet’s position and stability. The vanity should not move or wobble. Fix any loose spots by adding extra screws if needed.
Finishing Touches
Finishing touches complete your bathroom vanity cabinet assembly. These steps protect your work and improve the look. Small details make a big difference in durability and style. Take time to seal and clean carefully. The final adjustments ensure everything fits perfectly.
Seal Edges And Surfaces
Seal all edges to prevent water damage. Use a waterproof sealant around the sink and countertop. Apply sealant evenly with a brush or caulk gun. Let it dry fully to create a strong barrier. Check corners and joints for any gaps. Proper sealing stops moisture from seeping inside the cabinet.
Final Adjustments And Cleaning
Check doors and drawers for smooth operation. Tighten any loose screws or hinges. Align cabinet doors so they close properly. Clean the surfaces with a soft cloth and mild cleaner. Remove dust and fingerprints for a polished look. These final steps make your vanity ready for use.
Credit: www.barkercabinets.com
Frequently Asked Questions
How Do I Prepare Before Assembling A Vanity Cabinet?
Measure your space and check all parts before starting. Read the instructions carefully. Gather necessary tools like screwdrivers and drills to ensure smooth assembly.
What Tools Are Needed To Assemble A Bathroom Vanity?
Common tools include a drill, screwdriver, level, and measuring tape. These help in fixing screws, aligning parts, and ensuring a sturdy installation.
How Do I Attach The Vanity Cabinet To The Wall?
Locate studs and use a level to align the cabinet. Secure it with screws through the back panel into the studs for stability.
Can I Install A Vanity Cabinet Without Professional Help?
Yes, with basic DIY skills and proper tools, you can assemble and install a vanity cabinet by following instructions carefully.
Conclusion
Assembling a bathroom vanity cabinet can be simple and rewarding. Follow each step carefully and take your time. Use the right tools to make the process easier. Double-check your work to avoid mistakes. A well-assembled cabinet improves your bathroom’s look and function.
Enjoy the satisfaction of doing it yourself. Keep instructions handy for future reference. With patience, anyone can complete this project successfully. Ready to add style and storage to your bathroom? Give it a try today.