Are you dreaming of a stunning bookshelf wall that not only holds your favorite books but also transforms your room into a cozy, stylish haven? Building one yourself might sound tricky, but it’s easier than you think.
Imagine having a wall that reflects your personality, keeps your space organized, and impresses every guest who walks in. In this guide, you’ll discover simple steps and insider tips to create a bookshelf wall that fits your style and space perfectly.
Ready to turn your blank wall into a masterpiece? Let’s get started!
Planning Your Bookshelf Wall
Planning your bookshelf wall is the first step to a successful project. Careful thought saves time and money later. It also ensures the bookshelf fits your space and style perfectly.
Start by understanding your room and how the bookshelf will fit. Think about its purpose and look. This helps in making smart choices about size, design, and materials.
Measuring The Space
Measure the wall length and height accurately. Note any doors, windows, or vents that affect placement. Use a tape measure and write down all numbers.
Double-check your measurements before buying materials. Consider the ceiling height for tall shelves. Leave enough space for walking and furniture.
Choosing The Style
Decide the bookshelf style that matches your room décor. Options include built-in, floating, or freestanding shelves. Each style changes the room’s look and feel.
Think about how many books and items you want to display. Open shelves show off collections. Closed shelves hide clutter and protect books.
Selecting Materials
Pick materials based on durability and appearance. Wood offers warmth and strength. Metal gives a modern and industrial look.
Consider paint or stain finishes for a custom look. Choose materials that fit your budget and skill level. Quality materials ensure a long-lasting bookshelf wall.
Gathering Tools And Supplies
Building a bookshelf wall starts with gathering the right tools and supplies. Having everything ready saves time and avoids frustration. This step ensures the project runs smoothly from start to finish.
Essential Tools List
- Measuring tape – for accurate dimensions
- Level – to keep shelves straight
- Power drill – for making holes and driving screws
- Screwdriver – manual control for screws
- Stud finder – to locate wall studs
- Circular saw or handsaw – to cut wood pieces
- Hammer – for nails and adjustments
- Clamps – to hold wood steady while assembling
- Pencil – for marking measurements
- Safety goggles – to protect your eyes
- Dust mask – to avoid inhaling sawdust
Recommended Materials
- Plywood or solid wood boards – for shelves and sides
- Wood screws – to secure the parts
- Wall anchors – for extra support in drywall
- Wood glue – to strengthen joints
- Sandpaper – to smooth rough edges
- Paint or wood stain – for finishing the shelves
- Primer – to prepare wood for painting
- Brackets or shelf supports – for extra strength
Preparing The Wall
Preparing the wall is the first step to building a sturdy bookshelf wall. Proper preparation ensures the shelves hold weight safely. It also makes the installation process smoother and faster. Follow these steps to get your wall ready for the bookshelf.
Clearing The Area
Remove all furniture and decorations near the wall. Clear the floor space to work freely and avoid accidents. Cover the floor with a drop cloth to catch dust and debris. A clean area helps you focus and keeps your tools organized.
Locating Studs
Use a stud finder to locate studs behind the drywall. Studs provide strong support for heavy shelves. Mark the stud positions lightly with a pencil. Check for electrical wires or pipes before drilling. Knowing stud locations prevents damage and ensures safety.
Marking Layout
Decide where you want your shelves on the wall. Use a pencil and a level to draw straight lines. Mark the height and width for each shelf clearly. Planning the layout helps keep shelves even and balanced. It saves time and prevents mistakes during installation.
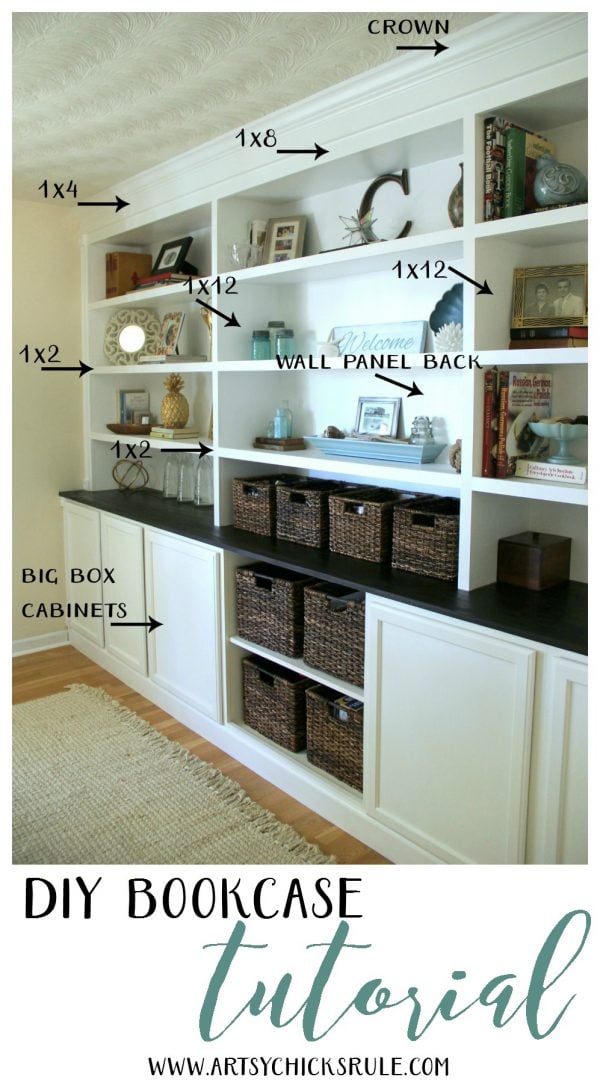
Credit: www.artsychicksrule.com
Building The Frame
Building the frame is the first big step in creating your bookshelf wall. This frame will hold all shelves and books. It needs to be strong and straight. Careful measuring and cutting ensure a perfect fit.
Each part of the frame plays a role. Vertical supports hold the weight. Horizontal pieces keep shelves steady. A solid frame means a safe and lasting bookshelf.
Cutting Wood Pieces
Start by measuring the wall space for your bookshelf. Mark wood pieces based on these measurements. Use a saw to cut each piece carefully. Cut vertical supports first, then horizontal shelves. Smooth edges with sandpaper for safety. Accurate cuts make assembling easier.
Assembling The Frame
Lay out all cut pieces on the floor. Arrange vertical supports and horizontal shelves in place. Use wood screws and a drill to join pieces. Check for right angles with a square tool. Tighten screws to keep the frame rigid. Double-check measurements before finalizing.
Securing To The Wall
Find wall studs with a stud finder for strong support. Mark stud locations on the frame. Use long screws to fix the frame into studs. Ensure the frame is level with a spirit level. Secure both top and bottom for stability. This step prevents the bookshelf from tipping.
Installing Shelves
Installing shelves is a key step in building a bookshelf wall. Proper installation keeps shelves steady and safe for your books. It requires careful measuring, secure supports, and correct placing of each shelf.
Measuring Shelf Spacing
Start by deciding the distance between shelves. Think about the size of your books or items. Mark equal spaces on the wall using a pencil. Use a level tool to keep marks straight. Accurate spacing helps the shelves look neat and balanced.
Attaching Shelf Supports
Choose strong supports that fit your shelf size. Attach supports to the wall using screws and anchors. Make sure to find studs for better strength. Check that supports are level and firmly fixed. Good supports prevent shelves from sagging or falling.
Placing Shelves
Place each shelf on the supports carefully. Push the shelf fully back against the wall. Check that shelves sit level and are stable. Secure shelves with screws if needed. Proper placing keeps your bookshelf safe and tidy.

Credit: www.youtube.com
Finishing Touches
Finishing touches give your bookshelf wall a polished look. These final steps protect the wood and enhance its beauty. Each detail adds charm and character to your project.
Sanding And Smoothing
Start by sanding the entire surface with fine-grit sandpaper. Smooth edges and corners to avoid rough spots. Wipe the dust away with a clean cloth. A smooth surface helps paint or stain stick better.
Painting Or Staining
Choose a paint or stain that matches your room’s style. Use a brush or roller to apply thin, even coats. Let each coat dry fully before adding another. This step protects the wood and improves its look.
Adding Decorative Elements
Decorative touches make your bookshelf wall unique. Add trim, molding, or LED strip lights for interest. Consider small plants or artwork on shelves for personality. These details bring warmth and style to your space.
Maintaining Your Bookshelf Wall
Maintaining your bookshelf wall keeps it looking fresh and strong. It protects your books and items from dust and damage. Regular care helps the shelves last longer and stay safe.
Regular Cleaning Tips
Dust your bookshelf wall every week. Use a soft cloth or a duster to remove dirt. Clean both shelves and books gently. Avoid using wet cloths that can damage wood. Air the room often to reduce dust buildup.
Handling Repairs
Check shelves for loose screws or nails. Tighten them to keep shelves stable. Fix any cracks with wood glue or filler. Replace broken parts to avoid accidents. Small repairs prevent bigger problems later.
Organizing Books And Items
Arrange books by size or category for easy access. Use bookends to keep books upright. Avoid overcrowding shelves to prevent bending. Mix books with decorative items for a nice look. Regularly remove items you no longer need.
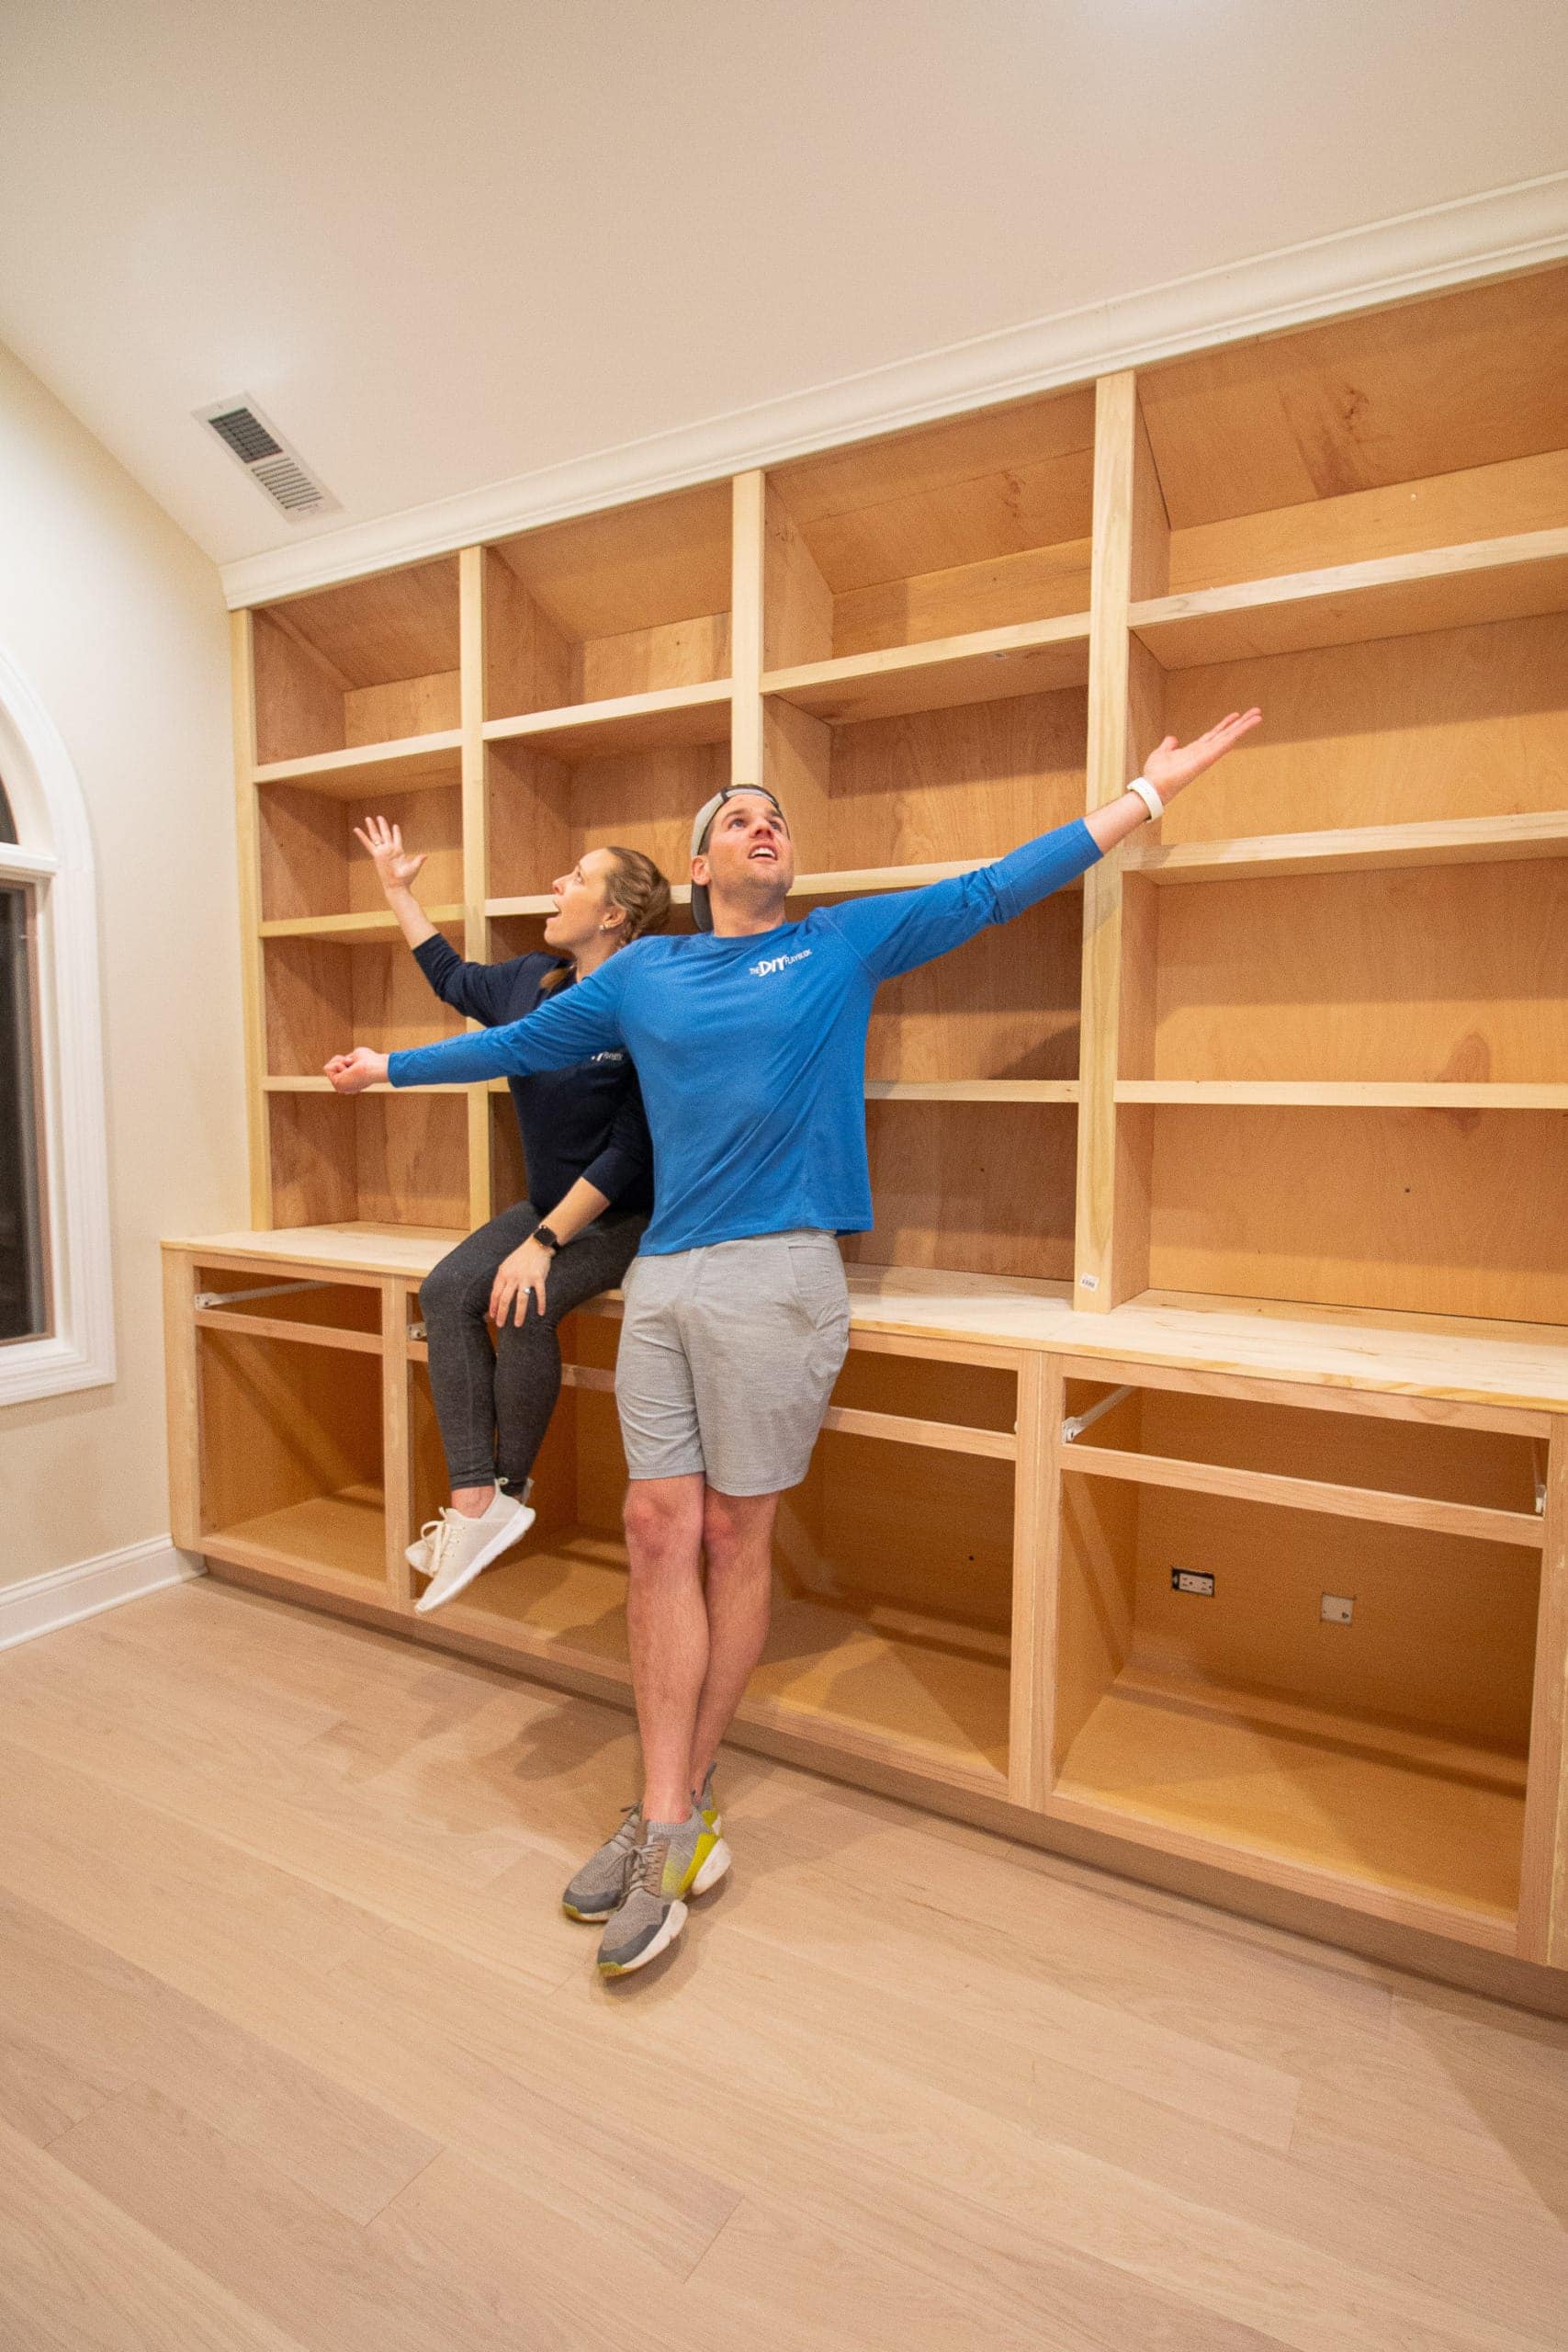
Credit: thediyplaybook.com
Frequently Asked Questions
How Do I Plan A Bookshelf Wall Layout?
Start by measuring your wall space accurately. Sketch the design considering shelf height and spacing. Plan for weight distribution and accessibility. Choose materials suited for your room style and load requirements. Proper planning ensures a functional and aesthetically pleasing bookshelf wall.
What Tools Are Needed To Build A Bookshelf Wall?
You will need a drill, level, stud finder, measuring tape, saw, screws, and brackets. Safety gear like goggles and gloves is essential. These tools help ensure precise measurements, secure mounting, and a professional finish for your bookshelf wall.
How Can I Ensure My Bookshelf Wall Is Sturdy?
Anchor shelves into wall studs using strong brackets or anchors. Use quality materials like solid wood or plywood. Avoid overloading shelves beyond their weight capacity. Proper installation and material choice keep your bookshelf wall safe and durable.
What Finish Options Suit A Bookshelf Wall?
Popular finishes include paint, stain, or clear varnish. Paint offers color variety and protection. Stain enhances wood grain and adds warmth. Clear varnish protects while keeping a natural look. Choose a finish that complements your room decor.
Conclusion
Building a bookshelf wall adds style and storage to any room. It does not need to be hard or expensive. Follow clear steps, measure well, and choose good materials. Take your time to make sure it fits your space perfectly.
Enjoy placing your books and decorations on your new shelf. This project brings a sense of pride and a cozy feel to your home. Start small, and see your wall transform bit by bit. A bookshelf wall is both useful and beautiful.