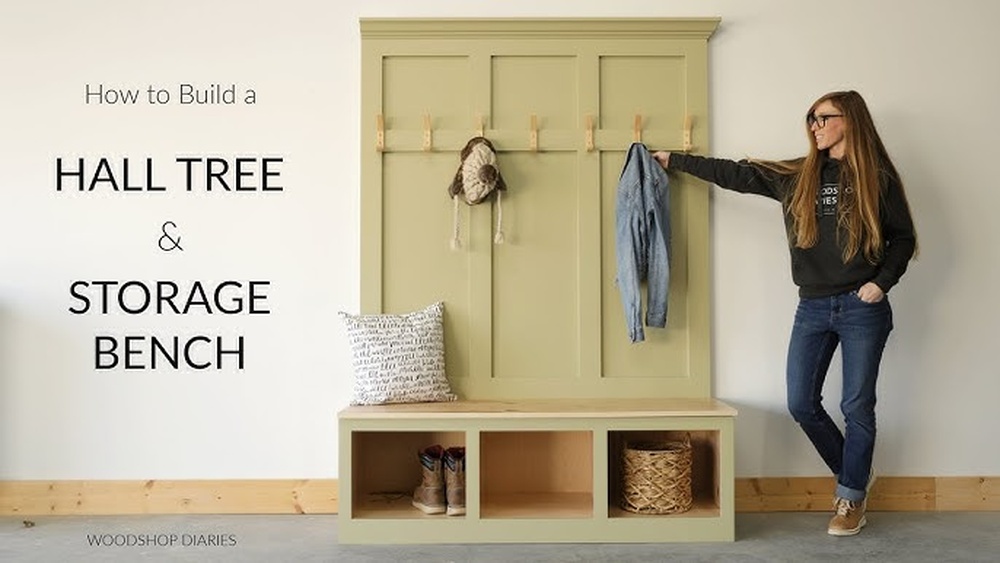
Are you tired of clutter piling up by your door? Imagine having a stylish coat rack with a bench that keeps your entryway neat and welcoming.
Building one yourself is easier than you think—and it gives you a chance to create something truly unique for your home. In this guide, you’ll discover simple steps and handy tips to craft a coat rack with a bench that fits your space and style perfectly.
Ready to transform your entryway into a functional and beautiful spot? Let’s get started!
Credit: www.woodshopdiaries.com
Materials And Tools
Building a coat rack with a bench is a fun and useful project. Choosing the right materials and tools is key. Good materials make your coat rack strong and lasting. The right tools help you work faster and better. Below, learn about wood, hardware, and tools needed for this project.
Wood Selection
Pick wood that is strong and looks nice. Pine is affordable and easy to work with. Oak is harder and lasts longer. Cedar resists moisture and smells good. Choose wood that fits your style and budget. Make sure the wood is smooth and free of cracks.
Hardware Essentials
Coat racks need sturdy hooks to hold coats and bags. Use metal hooks that can carry heavy weight. Screws and nails hold the wood pieces together. Use rust-resistant screws for durability. Sandpaper helps smooth rough edges. Wood glue adds extra strength to joints.
Tools Needed
A drill makes holes for screws and hooks. A saw cuts wood to the right size. A screwdriver drives screws in place. A measuring tape ensures accurate cuts and assembly. A level helps keep your rack straight. Clamps hold wood steady while gluing or screwing.
Design And Measurements
Design and measurements are the first steps to build a coat rack with bench. A good design ensures the rack fits your space and needs. Careful measuring helps avoid mistakes and wasted materials.
Spend time planning the style and size before cutting wood or buying tools. This saves time and money.
Choosing The Style
Pick a style that matches your home decor. Simple, modern, or rustic styles work well. Think about the number of hooks and bench space you want. A clean design looks neat and is easier to build.
Taking Accurate Measurements
Measure the wall space where the coat rack will go. Note the height, width, and depth needed. Measure the bench seat for comfortable sitting. Double-check all numbers to avoid errors.
Creating A Simple Plan
Draw a basic sketch of your coat rack with bench. Mark all measurements clearly on the plan. List the materials and tools needed. A simple plan guides your work step-by-step.
Cutting The Wood
Cutting the wood is the first big step in building your coat rack with bench. This stage sets the shape and size of all parts. Good cuts mean the pieces will fit together well. Take your time and focus on accuracy.
Marking The Pieces
Start by measuring the wood carefully. Use a pencil to mark the cut lines clearly. Double-check each measurement before marking. Mark all pieces needed for the coat rack and bench. Clear marks help you cut straight and avoid mistakes.
Safe Cutting Techniques
Wear safety glasses and gloves to protect yourself. Use a sharp saw for clean cuts. Keep your hands away from the blade at all times. Cut slowly and steadily along the marked lines. Support the wood properly to prevent it from moving. Safety ensures a smooth cutting process.
Sanding The Edges
After cutting, the edges may be rough or splintered. Use sandpaper or a sanding block to smooth them out. Sand all edges evenly for a clean finish. Smooth edges make the coat rack safer and look better. Take your time to achieve a nice, smooth surface.
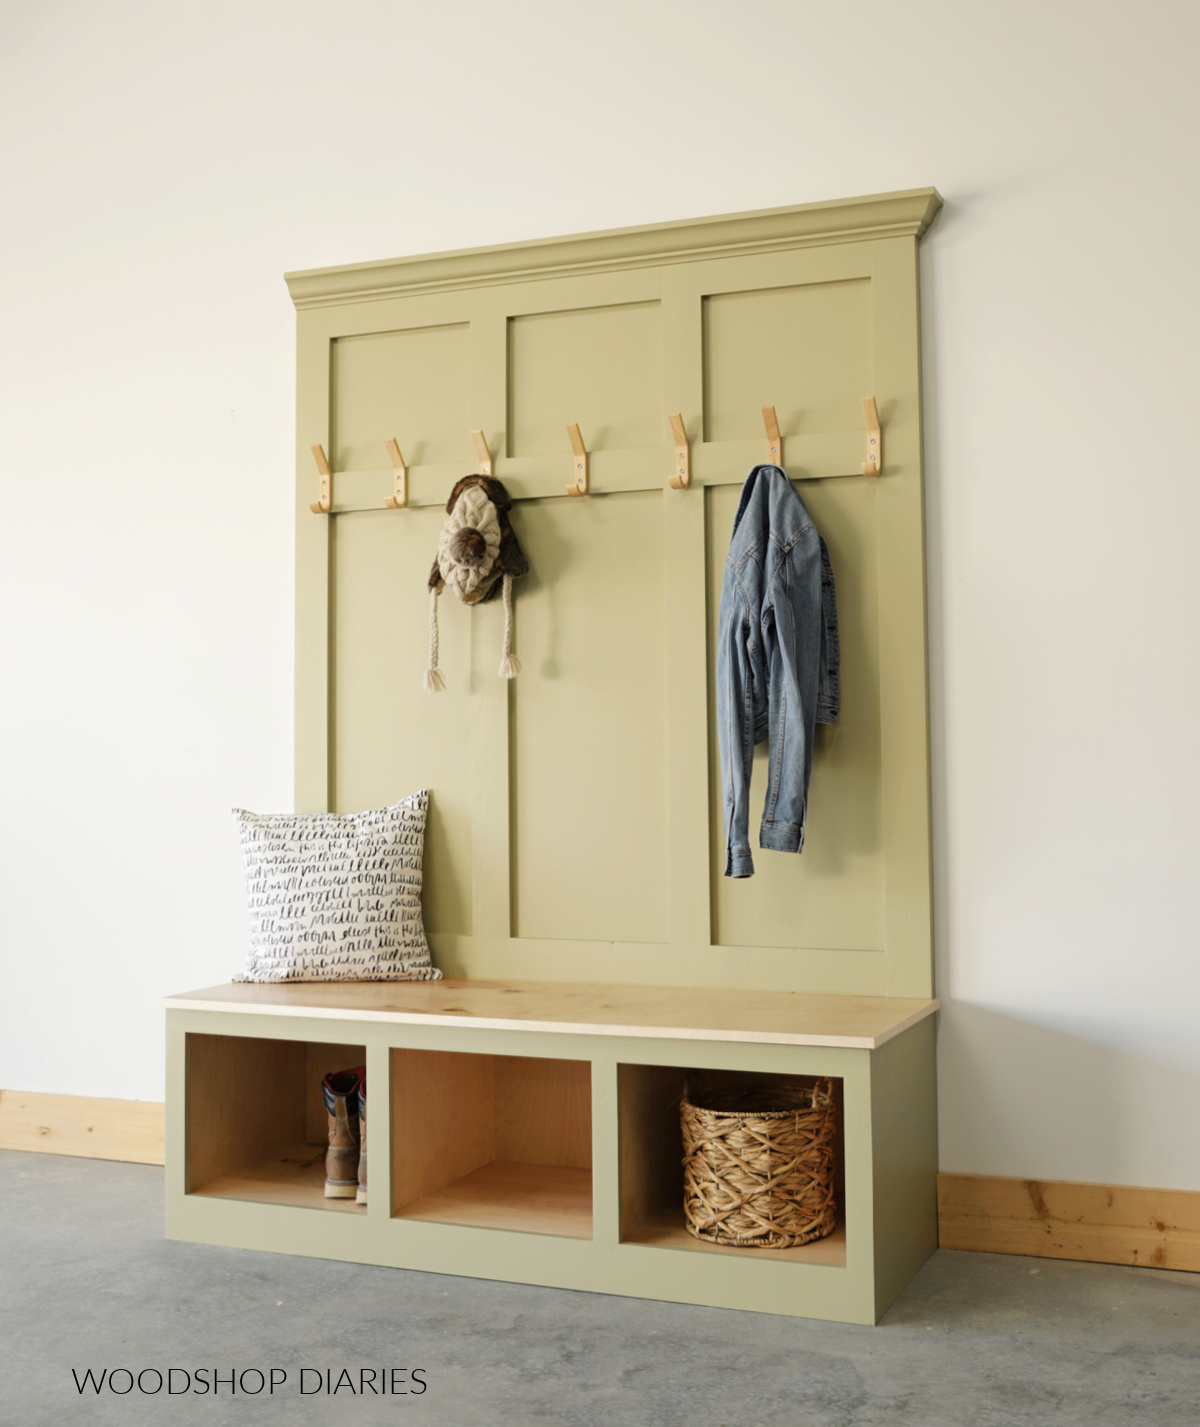
Assembling The Bench
Assembling the bench is a key step in building your coat rack with a bench. This part gives you a sturdy place to sit and store items. Follow these simple steps to make a strong and reliable bench.
Building The Frame
Start by cutting the wood pieces for the bench frame. Use strong wood like pine or oak. Connect the legs with side and front supports. Make sure the frame is square and stable. Screw the pieces tightly for a solid base.
Attaching The Seat
Cut a flat piece of wood for the seat. Sand the edges smooth for comfort. Place the seat on top of the frame. Align it carefully to avoid overhang. Screw the seat down firmly to the frame.
Reinforcing Joints
Strengthen all joints with corner braces or wood glue. Check each corner and connection for movement. Add extra screws if needed to prevent wobbling. This step ensures the bench stays strong over time.
Building The Coat Rack
Building the coat rack is an important step in this project. It gives you space to hang coats and organize your entryway. The rack also adds style and function to the bench. Follow these simple steps to create a strong and useful coat rack.
Constructing The Back Panel
Start by cutting a wooden board to the size of your bench’s width and height. The back panel will support the hooks and hold the rack steady. Sand the edges to make them smooth and safe. Paint or stain the panel before attaching it to the bench. This step helps the wood last longer and look better.
Installing Hooks Or Pegs
Choose hooks or pegs that suit your style and needs. Mark spots evenly on the back panel for each hook. Drill small pilot holes to prevent the wood from splitting. Screw the hooks or pegs firmly into the panel. Make sure they are secure enough to hold heavy coats and bags.
Securing The Rack To The Bench
Place the back panel on the bench’s rear edge. Use clamps to hold it steady. Drill pilot holes through the bench into the panel. Attach the panel with screws for a strong bond. Check that the rack does not wobble or move. Tighten screws if needed to ensure safety and stability.

Credit: www.reddit.com
Finishing Touches
Finishing touches give your coat rack with bench a polished look. They protect the wood and add comfort. These final steps make your project both useful and attractive.
Painting Or Staining
Choose paint or stain to match your room’s style. Paint covers the wood fully and offers many colors. Stain shows the wood grain and adds warmth. Use a brush or cloth to apply evenly. Let it dry completely before moving on.
Adding Cushions Or Fabric
Add cushions to make the bench soft and inviting. Pick fabric that is easy to clean and fits your decor. Attach cushions with ties or Velcro for easy removal. A well-chosen cushion makes sitting more comfortable and adds color.
Final Inspection And Adjustments
Check all screws and hooks for tightness. Sand any rough edges to avoid splinters. Test the bench for stability and strength. Fix any loose parts or uneven surfaces. A careful final check ensures safety and durability.
Tips For Safety And Maintenance
Building a coat rack with a bench is a fun project. Safety and care keep it strong and useful for years. This section shares tips on safe work and how to keep your coat rack in good shape. Follow these ideas to avoid accidents and fix small problems fast.
Safe Work Practices
Wear safety goggles and gloves during all cutting and drilling. Use tools correctly and read instructions first. Keep your workspace clean and free of clutter. Work slowly and carefully to avoid mistakes. Never rush when handling sharp tools or heavy parts.
Regular Upkeep
Check screws and bolts every few months. Tighten any loose parts to keep the rack steady. Clean the surface with a soft cloth to remove dust. Use mild soap and water for stains. Avoid harsh chemicals that damage wood or finish.
Troubleshooting Common Issues
Listen for creaks or wobbles. These mean loose screws or joints. Tighten or replace hardware as needed. Watch for chipped paint or scratches. Sand lightly and repaint to protect wood. Fix minor problems early to prevent bigger damage.

Credit: www.instructables.com
Frequently Asked Questions
What Materials Are Needed To Build A Coat Rack With Bench?
You need wood planks, screws, hooks, wood glue, sandpaper, and paint or stain. Also, gather a drill and measuring tape for assembly. Choose sturdy wood for durability and a smooth finish for safety and aesthetics.
How Long Does It Take To Build A Coat Rack With Bench?
Building a coat rack with bench typically takes 3 to 5 hours. This depends on your experience and tools. Allow extra time for drying paint or stain. Planning and preparation help speed up the process.
Can I Customize The Coat Rack With Bench Design?
Yes, you can customize the design to fit your space and style. Adjust dimensions, add shelves, or choose different finishes. Personalizing enhances functionality and matches your home decor.
How Do I Securely Attach Hooks To The Rack?
Use screws appropriate for the wood type to attach hooks firmly. Pre-drill holes to avoid splitting the wood. Space hooks evenly for balanced weight distribution and ease of use.
Conclusion
Building a coat rack with a bench adds style and function to your home. It saves space and keeps your entryway neat. The project is simple and rewarding. You can customize it to fit your needs and space. Use basic tools and materials for the best results.
Enjoy sitting while putting on shoes or storing coats easily. This DIY project brings comfort and order together. Give it a try and see how useful it becomes. A small effort creates a big difference in your daily routine.
