Are you looking for a stylish and affordable way to add charm to your home? Building a console table from pallets might be the perfect project for you.
Not only is it budget-friendly, but it also lets you create a unique piece that fits your style perfectly. Imagine turning simple wooden pallets into a beautiful table that catches everyone’s eye. You’ll discover easy steps and helpful tips to guide you through the process.
Ready to transform your space and impress your friends? Let’s get started!
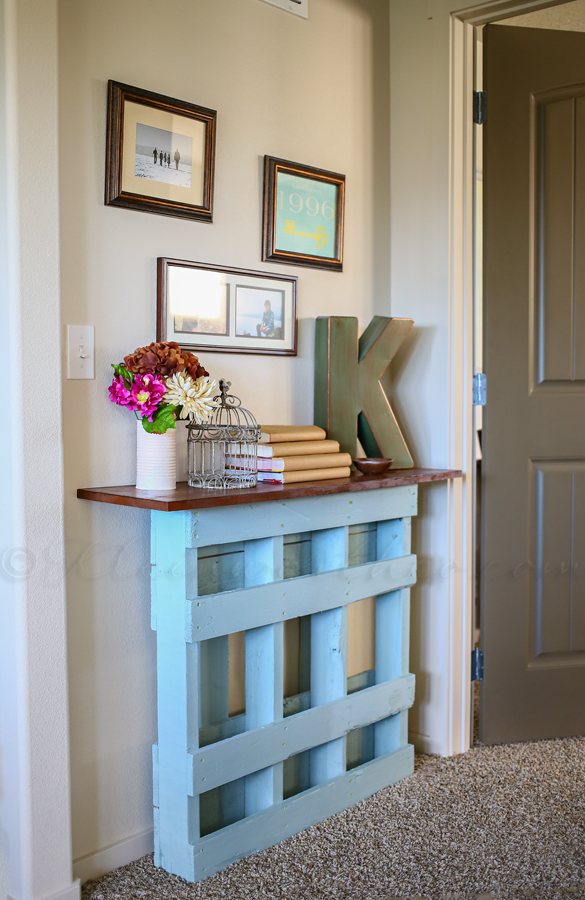
Credit: www.kleinworthco.com
Materials Needed
Building a console table from pallets is a fun and rewarding project. Getting the right materials is the first step. This section covers what you need to start.
Pallet Selection
Choose pallets that are sturdy and in good condition. Look for wood that is not cracked or rotten. Avoid pallets treated with chemicals. Pallets marked with “HT” (heat treated) are safer to use. The size of the pallet matters. Bigger pallets give more wood for your table.
Tools Required
You will need a saw to cut the wood pieces. A hammer or a nail gun helps to join parts. Sandpaper or a power sander smooths the surface. A drill is useful for making holes and driving screws. Measuring tape and pencil help with accuracy.
Additional Supplies
Get wood screws or nails to hold the table together. Wood glue adds extra strength. Paint or wood stain improves the look and protects the wood. Safety gear like gloves and goggles keeps you safe while working. A brush or cloth is needed for applying paint or stain.
Credit: www.reddit.com
Preparing The Pallets
Preparing the pallets is the first step in building a sturdy console table. This stage ensures the wood is safe and smooth for your project. Proper preparation helps your table last longer and look better. Follow these steps to get your pallets ready.
Disassembling The Pallets
Start by carefully taking apart the pallets. Use a crowbar or hammer to remove the boards gently. Avoid breaking the wood pieces to keep them usable. Work slowly to keep nails and screws intact for later removal.
Sanding The Wood
Sand each pallet board to remove rough spots and splinters. Begin with coarse sandpaper to smooth rough surfaces. Then, use fine sandpaper for a cleaner finish. This step makes the wood safe to touch and ready for painting or staining.
Cleaning And Treating
Clean the wood with a brush to remove dirt and dust. Wash the boards with mild soap and water, then let them dry completely. Apply wood treatment or sealant to protect against insects and moisture. This treatment increases the wood’s durability for your console table.
Designing Your Console Table
Designing your console table is an important step before building. A good design helps you create a table that fits your space and style. Planning saves time and avoids mistakes. It also makes the building process easier and more fun.
Start by thinking about the size and shape you want. Consider where the table will stand and what it will hold. Think about the style you like and the look you want to achieve. Pallets offer a rustic charm, but you can customize your design to match any decor.
Choosing Dimensions
Measure the wall or space where the console table will go. The width of the table should fit comfortably without crowding the area. The height usually matches other furniture, like a sofa or a chair. Depth is important too; it should be wide enough to hold items but not stick out too far.
Standard console tables are often 30 to 36 inches high, 12 to 18 inches deep, and 48 inches wide. Adjust these numbers to fit your needs. Write down your chosen dimensions clearly before starting.
Sketching The Layout
Draw a simple sketch of your table design on paper. Include the top, legs, and any shelves you want. Show the size of each part using your chosen dimensions. Sketches help you see the table’s shape and balance.
Use your sketch to plan where pallet boards will go. Mark places for screws or nails. This step helps avoid surprises during building. Keep your drawing nearby as a guide throughout the project.
Building The Frame
Building the frame is the first key step in creating your pallet console table. A strong frame supports the entire table and keeps it stable. This part involves assembling the base and constructing the legs. Each piece must fit well and be secure. Taking time here makes the final table sturdy and durable.
Assembling The Base
Start by selecting good-quality pallet wood for the base. Cut the wood planks to the right length. Arrange them side by side, forming a rectangle. Use screws to join the planks tightly. Add support beams underneath for extra strength. Check that the base is flat and even before moving on.
Constructing The Legs
Choose four sturdy pallet boards for the legs. Cut them to the desired height for your console table. Attach each leg firmly to the base corners using screws. Make sure the legs are straight and aligned. Reinforce the connections with corner brackets if needed. This step ensures your table stands firmly without wobbling.
Attaching The Tabletop
Attaching the tabletop is a key step in building your pallet console table. This process gives the table its strong, flat surface. A well-attached top ensures the table stays steady and looks great. Follow the steps carefully to secure the boards perfectly.
Aligning The Boards
Start by laying out the pallet boards side by side. Check for any gaps or uneven edges. Arrange the boards until they form a smooth, even surface. Use clamps to hold the boards tightly together. This prevents movement while you work.
Securing The Surface
Flip the aligned boards over and place support beams underneath. Screw the beams into the boards to hold them firmly. Use screws long enough to keep everything tight but not split the wood. Double-check the tabletop is flat and stable. Now the surface is ready to attach to the table base.
Finishing Touches
Finishing touches give your pallet console table a polished look. This step protects the wood and adds style. Choosing the right finish makes your table last longer. It also highlights the natural beauty of the wood or adds color. Small details can make your table unique and personal.
Applying Stain Or Paint
Stain brings out the wood grain and adds warm tones. Use a brush or cloth to apply stain evenly. Wipe off excess stain after a few minutes. Let it dry completely before the next step. Paint covers the wood with solid color. Choose paint made for wood surfaces. Apply thin, even coats for best results. Allow each coat to dry before adding another.
Adding Protective Coating
Protective coating seals the wood against water and scratches. Polyurethane or varnish works well for console tables. Use a clean brush to apply the coating smoothly. Apply two or three thin coats for strong protection. Lightly sand between coats for a smooth finish. Let the coating dry fully before use.
Optional Decorations
Decorations add personality to your console table. Consider adding metal handles or corner brackets. Use stencils to paint simple designs or patterns. Attach small shelves or hooks for extra storage. Choose decorations that match your room style. Keep it simple to avoid a cluttered look.
Tips For Maintenance
Maintaining your console table made from pallets keeps it strong and looking good. Small care habits extend the life of the wood. Follow easy tips to keep your table clean and fix small problems fast.
Cleaning Advice
Dust the table with a soft cloth regularly. Use a damp cloth for sticky spots, then dry the wood well. Avoid harsh chemicals; mild soap works best. Clean spills quickly to stop stains. A soft brush can remove dirt in cracks.
Repair Suggestions
Check the table for loose nails or screws often. Tighten them to keep the table steady. Sand rough or splintered spots gently with fine sandpaper. Use wood glue to fix small cracks. Replace broken pallet boards with similar wood pieces.

Credit: www.youtube.com
Frequently Asked Questions
What Materials Are Needed To Build A Pallet Console Table?
To build a pallet console table, you need wooden pallets, sandpaper, screws, wood glue, a saw, and paint or stain. Optional tools include a drill and clamps for easier assembly. Quality materials ensure a sturdy and attractive final product.
How Do You Prepare Pallets For Making A Console Table?
Start by cleaning the pallets thoroughly to remove dirt and nails. Sand the wood to smooth rough surfaces. Remove any damaged boards. Proper preparation ensures safety and a polished look for your table.
Can I Customize The Size Of My Pallet Console Table?
Yes, you can customize the size by cutting pallets to your desired dimensions. Measure your space first and adjust the length and height accordingly. Custom sizing helps fit the table perfectly in any room.
What Finish Options Work Best For Pallet Tables?
Popular finishes include paint, wood stain, or clear sealant. Paint offers color variety, stain highlights natural wood grain, and sealant protects from moisture. Choose a finish based on your decor style and table usage.
Conclusion
Building a console table from pallets is a fun, simple project. You save money and create something useful. Pallets give a rustic look that fits many homes. Just follow the steps carefully and take your time. Sand the wood well and use strong nails or screws.
Add your favorite paint or finish for a personal touch. This project helps you recycle and reduce waste too. Enjoy your new table and the pride of making it yourself. Give it a try—you might love the result.
