Are you looking to add a stylish and functional piece to your home without spending a fortune? Building a DIY console table 50” long is easier than you think.
Imagine having a unique table that fits perfectly in your space and reflects your personal style. In this guide, you’ll discover simple steps to create your own console table, even if you’re new to woodworking. By the end, you’ll have the confidence and know-how to build a beautiful table that impresses everyone who visits your home.
Let’s get started and turn your idea into reality!

Credit: www.pneumaticaddict.com
Choosing Materials
Planning your design is the first step to building a DIY console table. Good planning saves time and money. It helps you avoid mistakes and ensures the table fits your space. You need to think about size, style, and materials. Careful planning makes the project easier and more fun.
Measuring And Sketching
Start by measuring the space where the console table will go. Use a tape measure and write down the numbers. Measure the width, height, and depth of the area. Check for any obstacles like outlets or vents.
Next, draw a simple sketch of the table. Show the front, side, and top views. Label the measurements clearly. This sketch guides you while building. It also helps you see if the design looks right.
Deciding On Dimensions
Pick the right dimensions for your table. Common console tables are about 30 to 36 inches tall. The width can vary from 40 to 60 inches. The depth is usually between 12 and 18 inches.
Think about what you will put on the table. Allow space for lamps, decorations, or storage. Make sure the table is not too big or too small for the room. Proper dimensions create balance and function.
Planning Your Design
Cutting the wood is one of the first and most important steps in building your DIY console table. Getting accurate cuts ensures all pieces fit well together. Take your time and prepare carefully before starting. A clean, precise cut means less sanding and easier assembly.
Marking Cut Lines
Start by measuring each piece of wood with a tape measure. Use a pencil to mark the cut lines clearly. Draw straight lines using a ruler or square tool. Double-check each measurement before making any cuts. Clear marks prevent mistakes and help keep your project on track.
Safe Cutting Techniques
Wear safety goggles and gloves before cutting wood. Use a stable surface to place your wood on. Hold the wood firmly to avoid slipping. Cut slowly and steadily with your saw. Keep fingers away from the blade at all times. Stop and check your progress after each cut. Safety first makes your work easier and safer.
Cutting The Wood
Assembling the frame is a key step in building a DIY console table. It creates the strong base that holds everything together. This part needs care and attention to make sure the table is stable. Follow the steps carefully to join the pieces perfectly.
Joining The Legs And Supports
Start by placing the legs on a flat surface. Align the supports between the legs to form a rectangle. Check that all corners meet at right angles. Use clamps to hold the pieces in place. This keeps the frame steady while you work.
Make sure the legs are straight and even in height. Adjust if needed before securing the supports. The frame must be level to prevent wobbling later.
Using Screws And Glue
Apply wood glue on the ends of the supports where they meet the legs. This adds extra strength to the joints. Next, drill pilot holes to avoid splitting the wood. Insert screws into the holes and tighten firmly.
Use screws long enough to hold the parts securely. Avoid over-tightening, as it can damage the wood. Wipe away any excess glue before it dries for a clean finish.
Let the glue dry fully before moving the frame. This ensures the table frame stays strong and stable.
Assembling The Frame
Adding the tabletop is a key step in building a DIY console table. It gives the table its final look and function. The surface must be attached securely and checked for stability. This ensures the table lasts long and holds weight well.
Attaching The Surface
Start by placing the tabletop upside down on a soft surface. Position the table frame on top, aligning it perfectly. Use screws to fix the tabletop to the frame. Drill pilot holes first to avoid wood splitting. Tighten screws evenly to keep the surface flat and secure.
Ensuring Stability
Check all screws and joints after attaching the surface. Make sure the tabletop does not wobble or shift. Add corner brackets for extra support if needed. Use a level to confirm the tabletop is even. Stability is important for safety and durability.
Adding The Tabletop
Sanding and smoothing are key steps in building a DIY console table. They prepare the wood for a clean, polished finish. Proper sanding removes rough spots and splinters. It also helps the paint or stain stick better. Taking time to sand well ensures a professional look for your table.
Choosing The Right Sandpaper
Select sandpaper based on the wood type and its condition. Start with coarse grit like 80 or 100 to remove large imperfections. Move to medium grit around 150 for smoothing. Finish with fine grit 220 or higher for a soft surface. Use finer grits between coats of finish for a smooth feel. Avoid skipping grits to keep the surface even.
Preparing For Finishing
After sanding, clean the table to remove dust and debris. Use a vacuum or a damp cloth. Let the wood dry completely before applying finish. Check for any missed rough areas and sand lightly if needed. Proper preparation helps the finish stick well and last longer. Take your time for a neat and lasting result.
Sanding And Smoothing
Applying a finish to your DIY console table is an important step. It protects the wood and gives the table a polished look. A good finish can make your project last longer and look better. Choosing the right finish depends on the style and use of your table. This section covers key options for finishing your table.
Staining Vs Painting
Staining enhances the natural beauty of the wood grain. It adds color without hiding the texture. Stains come in many shades, from light to dark. Staining is great for a classic or rustic look.
Painting covers the wood completely with color. It hides the grain but allows for more color options. Paint works well for modern or bold styles. It also helps cover imperfections in the wood.
Both staining and painting need clean, smooth surfaces. Sand the table well before applying either finish. Test your stain or paint on a small area first.
Sealing And Protecting
Sealing the table protects it from water, dirt, and scratches. A clear sealer keeps the finish looking fresh. Polyurethane is a popular choice for sealing wood furniture.
Apply thin coats of sealer with a brush or cloth. Let each coat dry completely before adding another. Lightly sand between coats for a smooth finish.
Sealing extends the life of your console table. It keeps the wood safe and the finish bright. Choose a sealer that matches your stain or paint for best results.
Applying Finish
The final touches on your DIY console table bring everything together. This step makes your project look complete and polished. Small details can change the whole appearance. Focus on these last elements to enhance beauty and function.
Adding Decorative Elements
Choose simple decorations that match your room’s style. A small vase, a stack of books, or candles work well. These items add personality without clutter. Use colors that blend with the table’s finish. This keeps the look clean and inviting. Avoid heavy or large decor that hides the table’s shape.
Checking For Durability
Test the table’s stability by gently shaking it. Make sure all screws and joints feel tight. Sand any rough edges to avoid splinters. Check the finish for any spots that need touch-ups. A strong table lasts longer and stays safe. Fix any weak points before using the table daily.
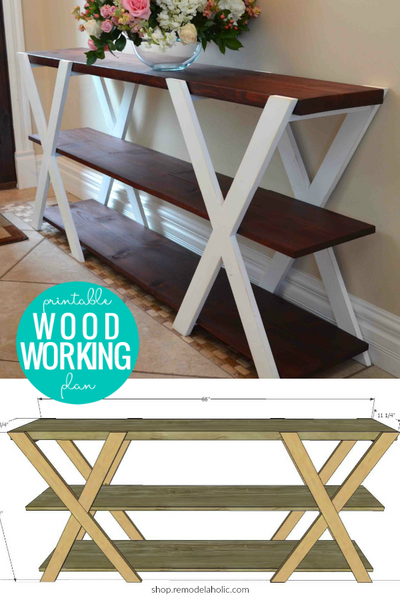
Credit: shop.remodelaholic.com
Final Touches
Maintaining your DIY console table keeps it looking fresh and strong. Proper care helps the wood last longer. Simple habits protect your work and style.
Cleaning Your Console Table
Use a soft cloth to wipe dust regularly. Avoid harsh chemicals that damage the finish. Mild soap mixed with water works best. Dry the surface with a clean, dry cloth. Clean spills quickly to prevent stains.
Handling Wear And Tear
Check for scratches and dents often. Light scratches can be fixed with wood polish. Use furniture wax to protect the surface. Tighten loose screws to keep it stable. Place felt pads under items to avoid marks.
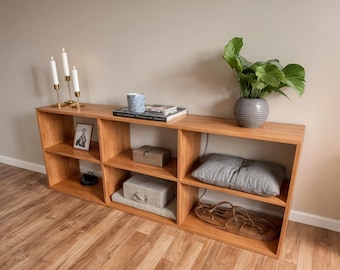
Credit: www.etsy.com
Frequently Asked Questions
What Materials Do I Need To Build A Diy Console Table?
You need wood boards, screws, wood glue, sandpaper, paint or stain, a saw, drill, and measuring tape. Quality materials ensure durability and a polished finish for your console table.
How Long Does It Take To Build A Diy Console Table?
Building a DIY console table typically takes 4 to 6 hours. Time varies based on skill level and design complexity. Planning and preparation can speed up the process.
Can I Customize The Size Of My Console Table?
Yes, you can customize the size to fit your space perfectly. Measure the area and adjust dimensions before cutting wood. Custom sizes enhance functionality and style.
What Type Of Wood Is Best For A Console Table?
Hardwoods like oak, maple, or walnut are best for durability. Pine is affordable but less durable. Choose wood based on your budget and desired look.
Conclusion
Building a DIY console table is fun and rewarding. You save money and create something unique. Follow clear steps and use the right tools. Take your time and enjoy the process. This project fits any space and style. A handmade table adds charm to your home.
Try it yourself, and see the difference. Simple materials can bring great results. Your effort will show in the finished piece. Give it a go and feel proud.
