
Are you looking for a fun and creative project that adds a special touch to your doll collection? Building a doll bunk bed is easier than you might think, and it’s a great way to bring your dolls’ playtime to the next level.
Imagine giving your dolls a cozy, stylish place to sleep that you made yourself. In this guide, you’ll discover simple steps, useful tips, and clever tricks to create a sturdy and beautiful doll bunk bed. Ready to turn your ideas into a charming piece your dolls will love?
Let’s get started!
Materials And Tools Needed
Building a doll bunk bed needs the right materials and tools. Choosing good supplies makes the project easier and the bed stronger. This section covers the wood, tools, and extra items needed.
Choosing The Right Wood
Pick wood that is easy to cut and safe for kids. Pine wood is soft and works well for small projects. It is light and smooth to sand. Avoid wood with splinters or knots. These can make the bed unsafe or weak.
Basswood and poplar are also good choices. They are smooth and paint well. Choose pieces that are straight and not warped. This helps the bed parts fit better.
Essential Tools For The Project
Basic tools make building faster and neater. A small saw or jigsaw works to cut the wood. A drill is useful for making holes and driving screws. Sandpaper or a sanding block smooths rough edges.
A measuring tape and pencil help mark wood pieces accurately. Clamps hold pieces steady while you work. A screwdriver is needed to tighten screws by hand.
Additional Supplies
Wood glue adds strength to joints. Use non-toxic glue safe for kids’ toys. Paint or wood stain finishes the bed and protects the wood. Choose water-based paint for easy clean-up.
Small screws and nails hold the parts together. Use sizes suitable for thin wood pieces. Soft felt pads under the bed legs prevent scratches on surfaces.

Credit: www.youtube.com
Designing The Doll Bunk Bed
Designing a doll bunk bed is the first step in creating a fun and safe toy. It helps to plan the size, shape, and features before building. A clear design saves time and makes the project easier.
Good design also ensures the bed fits the dolls perfectly and stays sturdy during play. Focus on simple shapes and strong structure for best results.
Measuring For Doll Size
Start by measuring your dolls carefully. Note their height and width while lying down. This helps you decide the bed’s length and width.
Leave extra space for comfort, about one inch on each side. Check the height of the doll to set the distance between bunk beds. Proper measurements keep dolls from getting stuck or falling.
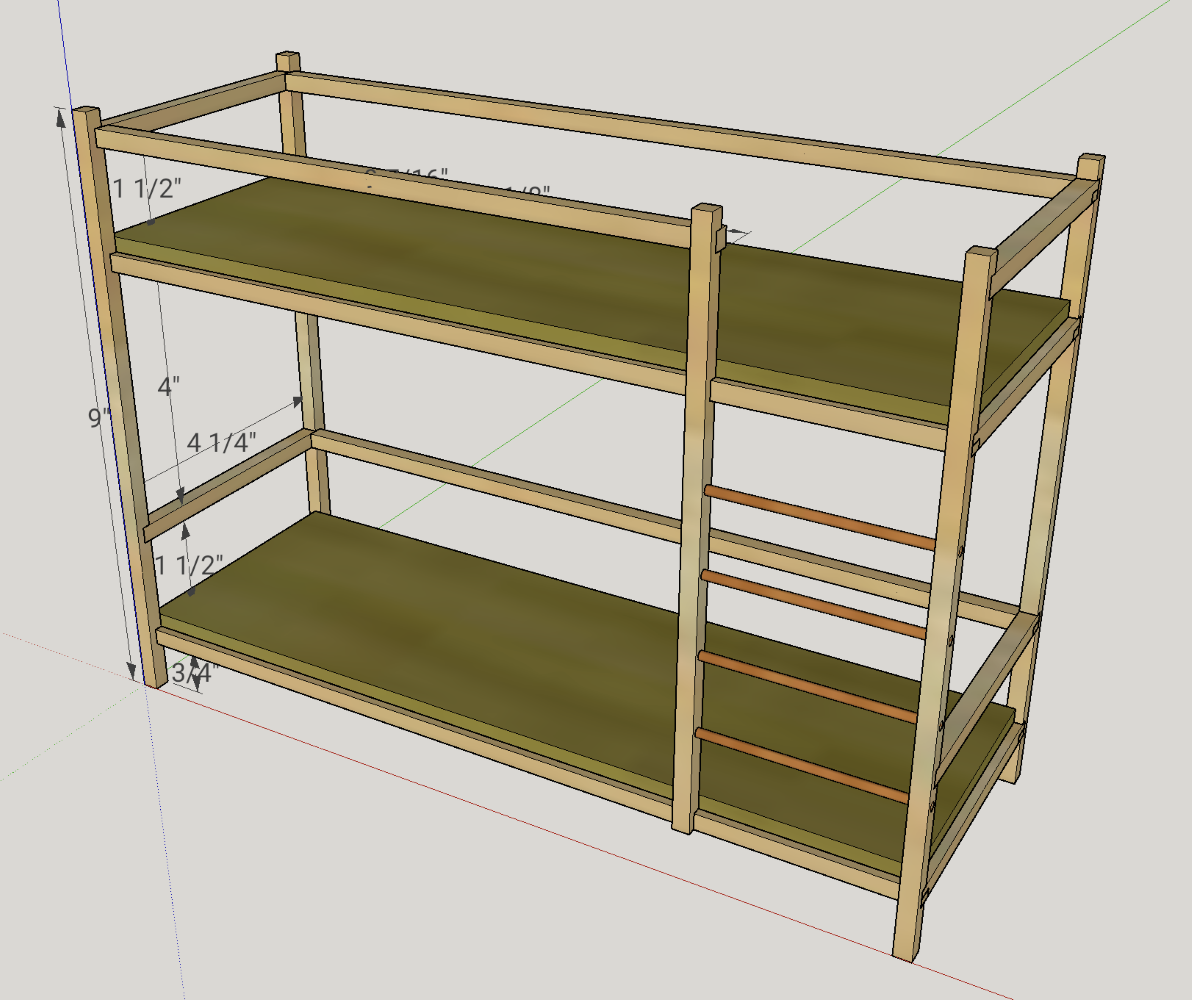
Sketching Your Design
Draw a basic sketch of the bunk bed on paper. Use simple lines to show the bed’s shape and parts. Include the headboard, footboard, and ladder in your sketch.
Mark the measurements on the drawing. This visual guide helps when cutting wood or assembling parts. Adjust the design if something looks off or too small.
Planning Safety Features
Think about safety while designing the bed. Add guardrails on the top bunk to prevent dolls from falling. Make sure the ladder is easy to climb and secure.
Avoid sharp edges by planning rounded corners. Use smooth wood or sand the edges well. Safe design protects dolls and makes playtime worry-free.
Cutting The Wood Pieces
Cutting the wood pieces is a key step in building a doll bunk bed. Getting this right means the bed will fit together well and look neat. Careful cutting saves time and helps avoid mistakes. Use the right tools and take your time with each cut. This step sets the base for the entire project.
Marking Measurements Accurately
Measure twice to cut once. Use a pencil and ruler to mark each piece clearly. Draw straight lines where you will cut. Double-check the size against your plan. Accurate marks help make clean, even cuts. This step keeps all parts the right size.
Safe Cutting Techniques
Wear safety glasses and gloves before cutting wood. Use a sharp saw for smooth cuts. Keep your hands away from the blade. Cut slowly and follow your marks carefully. A stable surface stops the wood from moving. Safety is important to avoid injuries.
Organizing Cut Pieces
Sort the cut pieces by size and shape. Group similar parts together in one place. Label each piece with its purpose. This saves time during assembly. A tidy workspace helps you find parts fast. Organized pieces keep the project running smoothly.
Assembling The Frame
Assembling the frame is the first step in building a sturdy doll bunk bed. This part gives the bed its shape and strength. Take your time to make sure each piece fits well. A strong frame keeps the bed safe and stable for play.
Building The Bed Base
Start with the bed base. Cut two rectangular wooden pieces to fit the mattress size. These pieces hold the mattress in place. Attach small wooden slats across the base for extra support. Space the slats evenly to keep the mattress firm.
Constructing The Side Rails
Next, make the side rails. Cut long strips of wood that match the bed’s length. These rails stop the doll from falling off. Smooth the edges to avoid splinters. Drill small holes for screws to connect the rails to the base.
Joining The Frame Components
Finally, join all frame parts. Align the base and side rails carefully. Use wood glue and screws to secure the joints. Check for any gaps or loose parts. Tighten screws until everything feels solid and steady.
Adding The Ladder And Guardrails
Adding the ladder and guardrails completes the doll bunk bed’s look and safety. These parts let your dolls climb up and stay safe on the top bunk. Building them strong and secure is very important.
Creating A Sturdy Ladder
Start by cutting two side rails from wood strips. They should be the same length as the height of the top bunk. Next, cut several rungs to fit between these side rails. Space the rungs evenly for easy climbing.
Use wood glue to attach each rung between the side rails. Let the glue dry well before moving the ladder. For extra strength, add small nails or screws through the side rails into each rung.
Installing Safety Rails
Safety rails keep dolls from falling off the top bunk. Cut long wood strips to match the length of the bed’s edges. Attach these strips along the sides of the top bunk frame.
Make sure the rails are tall enough to block falls but low enough to see over. Use wood glue and screws for a firm hold. Sand the edges smooth to avoid splinters.
Securing Attachments
Attach the ladder to the bunk bed frame firmly. Drill pilot holes to prevent wood from splitting. Use screws to fix the ladder in place. Check that it does not wobble or move.
Secure the guardrails with screws at multiple points along the bed frame. Tighten all screws well. Test the stability of the rails by pressing gently. These steps ensure a safe and sturdy doll bunk bed.
Sanding And Finishing
Sanding and finishing are key steps in building a doll bunk bed. They make the wood smooth and safe for play. These steps also improve the bed’s look and protect it from damage. Take your time to do them well for the best result.
Smoothing Rough Edges
Start sanding with coarse sandpaper to remove large rough spots. Use gentle, even strokes along the wood grain. After that, switch to finer sandpaper for a smooth finish. Check all edges and corners to avoid splinters. Smooth wood makes the doll bed safe and nice to touch.
Choosing Paint Or Stain
Pick paint or stain based on the style you want. Paint adds color and covers the wood fully. Stain keeps the wood’s natural look and shows its grain. Choose non-toxic, water-based products for safety. Light colors brighten the bed, dark ones give a classic feel.
Applying Protective Coating
Apply a clear protective coat after paint or stain dries. Use polyurethane or varnish to seal the wood surface. This layer protects from scratches and moisture. Apply thin, even coats with a brush. Let each coat dry before adding the next. This step keeps the bed looking great longer.
Final Touches And Decoration
After building the doll bunk bed, the final touches make it special. Decorating and adding small details bring the bed to life. These steps create a cozy and fun space for dolls.
Adding Bedding And Accessories
Choose soft fabric for tiny blankets and pillows. Use colorful patterns to make the bed look cheerful. Small accessories like rugs or tiny lamps add charm. These items make the bed feel real and inviting.
Personalizing The Bunk Bed
Paint the bed in your favorite colors or patterns. Add stickers or small decals for a unique look. Write your doll’s name or initials for a personal touch. Personal details show creativity and care.
Tips For Maintenance
Keep the bed clean by dusting often. Check for loose screws and tighten them regularly. Store the bed in a dry place to avoid damage. These simple steps keep the bed safe and lasting long.
Credit: blog.mcfisch.com
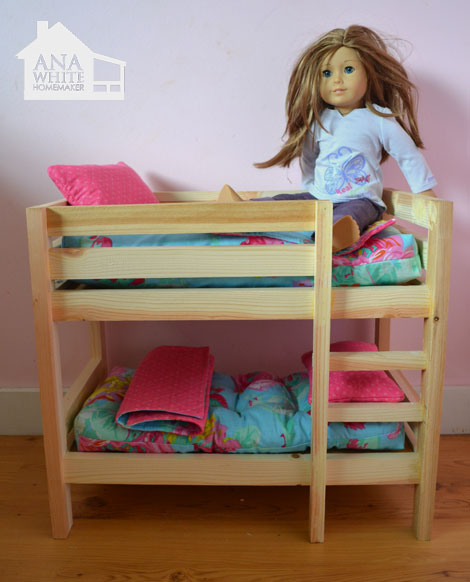
Credit: www.ana-white.com
Frequently Asked Questions
What Materials Do I Need To Build A Doll Bunk Bed?
You need wood boards, screws, wood glue, sandpaper, paint, and a drill. Choose lightweight wood for easy handling and durability.
How Long Does It Take To Build A Doll Bunk Bed?
Building a doll bunk bed usually takes 2 to 4 hours. Time depends on your experience and the design complexity.
Can I Customize The Size Of The Doll Bunk Bed?
Yes, customize the size to fit your dolls. Measure your dolls first and adjust dimensions accordingly.
What Tools Are Essential For Assembling A Doll Bunk Bed?
Essential tools include a drill, screwdriver, measuring tape, saw, and clamps. These ensure accurate cuts and secure assembly.
Conclusion
Building a doll bunk bed can be a fun and rewarding project. It adds charm to any doll collection and encourages creativity. Use safe materials and follow the steps carefully. Take your time to make sure each piece fits well.
Your dolls will have a cozy place to rest. Enjoy the process and show off your handiwork proudly. Simple tools and patience make a big difference. Try customizing the bed with paint or decorations next time. Crafting this bed brings joy to both kids and adults alike.