Are you ready to transform your bathroom with a stylish and practical double vanity cabinet? Building your own double vanity not only saves you money but also lets you create a piece that perfectly fits your space and style.
Imagine having extra storage and two sinks, making busy mornings easier for you and your family. In this guide, you’ll discover simple, step-by-step instructions to help you build a sturdy and beautiful double vanity cabinet. Whether you’re a beginner or have some DIY experience, you’ll find tips that make the process smooth and enjoyable.
Keep reading to unlock the secrets to a bathroom upgrade that you’ll be proud of every day.
Planning Your Double Vanity
Planning your double vanity is the first step to a successful bathroom upgrade. This phase sets the foundation for a vanity that fits your space and needs. Careful planning prevents mistakes and saves time and money.
Think about the space available in your bathroom. Measure the width, depth, and height where the vanity will go. Understand how the vanity will fit with other bathroom fixtures. This helps in choosing the right size and design.
Choosing The Right Size
Measure the bathroom space carefully. A double vanity usually needs at least 60 inches wide. Make sure there is enough room to open drawers and doors fully. Leave space for comfortable movement around the vanity.
Consider the height of the vanity. Standard height is 32 to 36 inches. Choose a height that feels comfortable for all users. Depth matters too; 20 to 24 inches is common. Make sure sinks and faucets fit well without crowding.
Selecting Materials
Pick materials that resist moisture and last long. Solid wood offers durability and a classic look. Plywood is also strong and handles moisture better than particleboard. Avoid materials that swell or peel easily.
Countertops need to be water-resistant. Granite, quartz, and marble are good choices. Laminate is budget-friendly but less durable. Think about the style of your bathroom when choosing colors and textures.
Designing Storage Options
Plan storage based on your daily needs. Drawers help keep small items organized and easy to find. Cabinets offer space for larger items like towels and cleaning supplies.
Include shelves or dividers for better organization. Think about adding pull-out trays or baskets. These features improve access and keep the vanity tidy. Good storage design makes your bathroom more functional.
Gathering Tools And Supplies
Gathering the right tools and supplies is the first step to build a double vanity cabinet. Proper preparation saves time and prevents mistakes. Collect everything before starting your project. This helps keep work smooth and efficient.
Essential Tools List
- Measuring tape for precise dimensions
- Power drill with drill bits
- Screwdriver set for assembly
- Level to ensure even surfaces
- Circular saw or handsaw for cutting wood
- Clamps to hold pieces firmly
- Hammer for nails and adjustments
- Sander or sandpaper for smooth finishes
- Safety gear: gloves and goggles
Materials Checklist
- Plywood or hardwood panels for cabinet frame
- Wood screws and nails
- Wood glue for strong joints
- Cabinet doors and drawer fronts
- Drawer slides and hinges
- Paint or wood stain for finishing
- Sealant to protect wood from moisture
- Countertop material (granite, marble, or laminate)
- Two sinks with plumbing fixtures
Preparing The Workspace
Preparing the workspace is the first step to building a double vanity cabinet. A clean and safe area helps work go smoothly. It reduces mistakes and keeps tools in order. This section covers clearing the area and setting up safety measures.
Clearing The Area
Remove all items from the workspace. Clear away furniture, rugs, and decorations. Make sure the floor is free of dust and debris. This space should be large enough to move around easily. Keep the tools and materials close but not cluttered. A tidy area helps focus on the project. It also prevents accidents and damage.
Setting Up Safety Measures
Safety is key when building a cabinet. Wear safety goggles and gloves to protect yourself. Make sure there is good lighting in the workspace. Check that electrical outlets are working and safe. Use a dust mask if you plan to sand wood. Keep a first aid kit nearby for small injuries. Finally, keep children and pets away from the workspace.
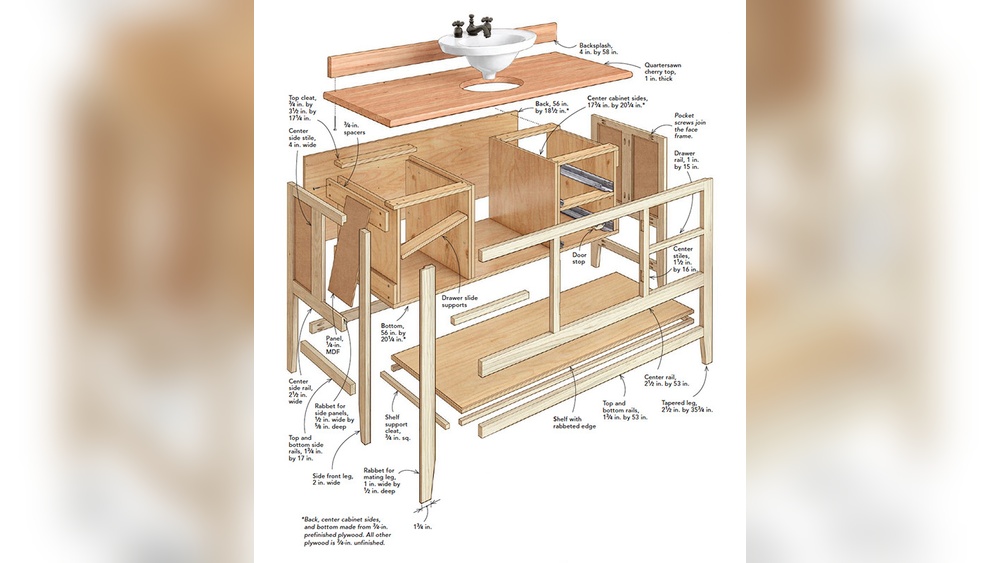
Building The Frame
Building the frame is the first step in creating a sturdy double vanity cabinet. A strong frame supports the whole structure and keeps it stable. It shapes the cabinet and helps fit all parts together. Focus on precise measurements and solid connections to ensure a durable frame.
Start with good quality wood and tools. Take your time cutting and assembling. This will make the rest of the project easier and the cabinet last longer.
Cutting Lumber To Size
Measure twice, cut once. Mark the wood carefully using a pencil and ruler. Use a saw to cut each piece to the correct length. Cut the sides, base, and any support pieces needed. Smooth the edges with sandpaper to avoid splinters. Proper cutting ensures a clean fit and a neat frame.
Assembling The Base And Sides
Lay out the base on a flat surface. Attach the side panels using wood glue and screws. Check that corners are square with a carpenter’s square. Secure the pieces firmly but avoid overtightening screws. Use clamps to hold parts in place while the glue dries. This step forms the main shape of your vanity frame.
Installing Shelves And Dividers
Installing shelves and dividers inside your double vanity cabinet improves storage and organization. Shelves create extra space for towels and toiletries. Dividers keep items neat and easy to find.
This part of the build requires careful measuring and secure fixing. Proper shelves prevent clutter and maximize cabinet use. Follow these steps for a clean, sturdy setup.
Measuring And Cutting Shelves
Start by measuring the inside width and depth of the cabinet. Use a tape measure for accurate numbers. Mark these measurements on the shelf board.
Subtract a small gap to allow easy shelf fitting. Use a pencil and square to draw straight cutting lines. Cut the shelves with a saw, following the lines carefully.
Smooth the edges with sandpaper to avoid splinters. Double-check the size by placing the shelves inside the cabinet.
Securing Shelves In Place
Choose shelf supports like pins or brackets for stability. Mark the support positions on the cabinet walls. Use a level to keep shelves even and straight.
Drill small holes for shelf pins or screw in brackets firmly. Place the shelves on the supports and test their strength. Adjust if the shelves wobble or feel loose.
Ensure shelves are secure to hold bathroom items safely. Proper fixing prevents damage and keeps your vanity neat.
:strip_icc()/open-simple-blue-vanity-32366fec-cedb074f8ff9499fa7e993416f2d9eb8.jpg)
Credit: www.bhg.com
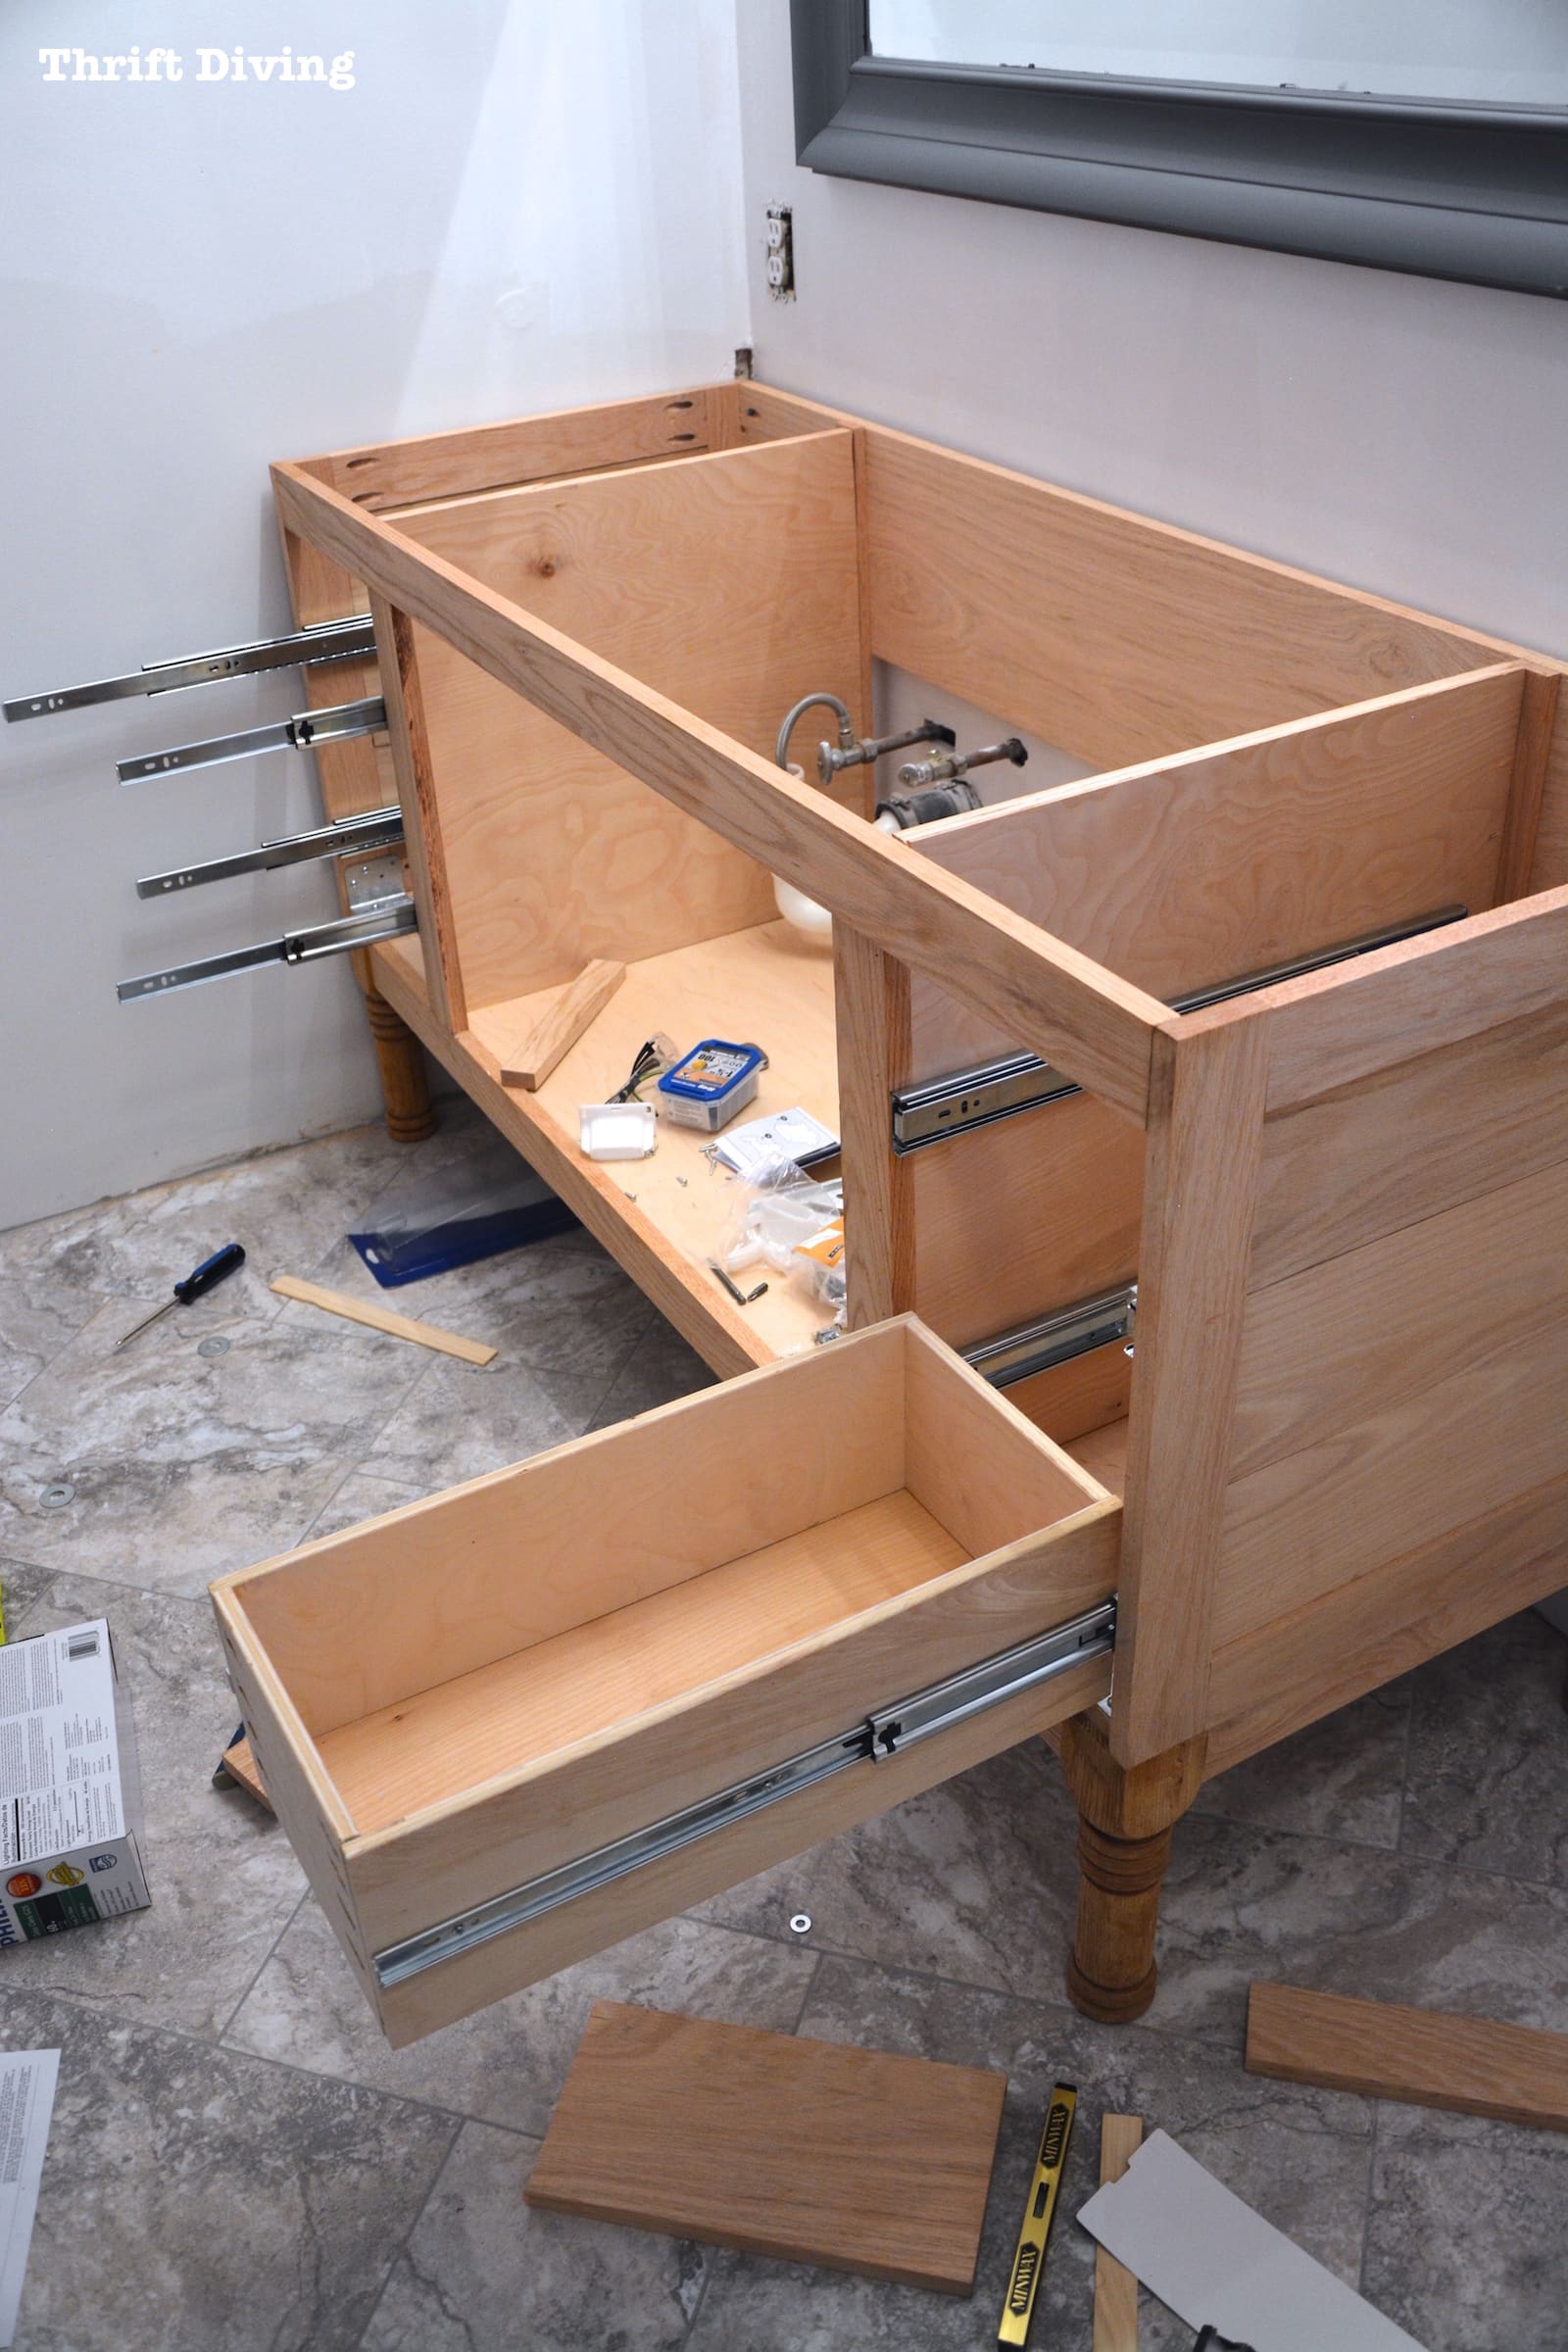
Adding Doors And Drawers
Adding doors and drawers to your double vanity cabinet gives it a finished look. This step also increases storage space and keeps items organized. Proper installation ensures smooth operation and durability.
Hanging Cabinet Doors
Start by attaching hinges to the cabinet doors. Use a drill to secure screws firmly. Align the doors with the cabinet frame carefully. Check that the doors are level and even. Adjust the hinges to fix any gaps. Test by opening and closing each door. Make sure doors do not rub or stick.
Installing Drawer Slides And Drawers
Measure the inside width of the cabinet opening for slides. Choose slides that fit your drawer size. Attach the slides inside the cabinet using screws. Secure the matching slides on the drawer sides. Slide the drawer into the cabinet tracks slowly. Test the drawer movement for smoothness. Adjust slides if the drawer feels loose or tight.
Finishing Touches
The finishing touches bring your double vanity cabinet to life. They make the piece smooth, attractive, and ready to use. This stage focuses on sanding, painting, and adding hardware.
Each step improves the cabinet’s look and function. Taking care here ensures a polished, professional result. Let’s explore the key finishing tasks.
Sanding And Painting
Sanding smooths the wood surface. Start with medium grit sandpaper to remove rough spots.
Then use fine grit to create a soft finish. Wipe dust off with a damp cloth before painting.
Choose paint or stain that fits your bathroom style. Apply thin, even coats to avoid drips.
Let each coat dry fully before adding another. This builds a durable and beautiful surface.
Attaching Hardware
Hardware includes handles, knobs, and hinges. Measure carefully to place them evenly.
Use a drill to make holes for screws. Attach hardware firmly but avoid over-tightening.
Good hardware adds style and makes doors easy to open. It completes the vanity’s look perfectly.
Credit: jenwoodhouse.com
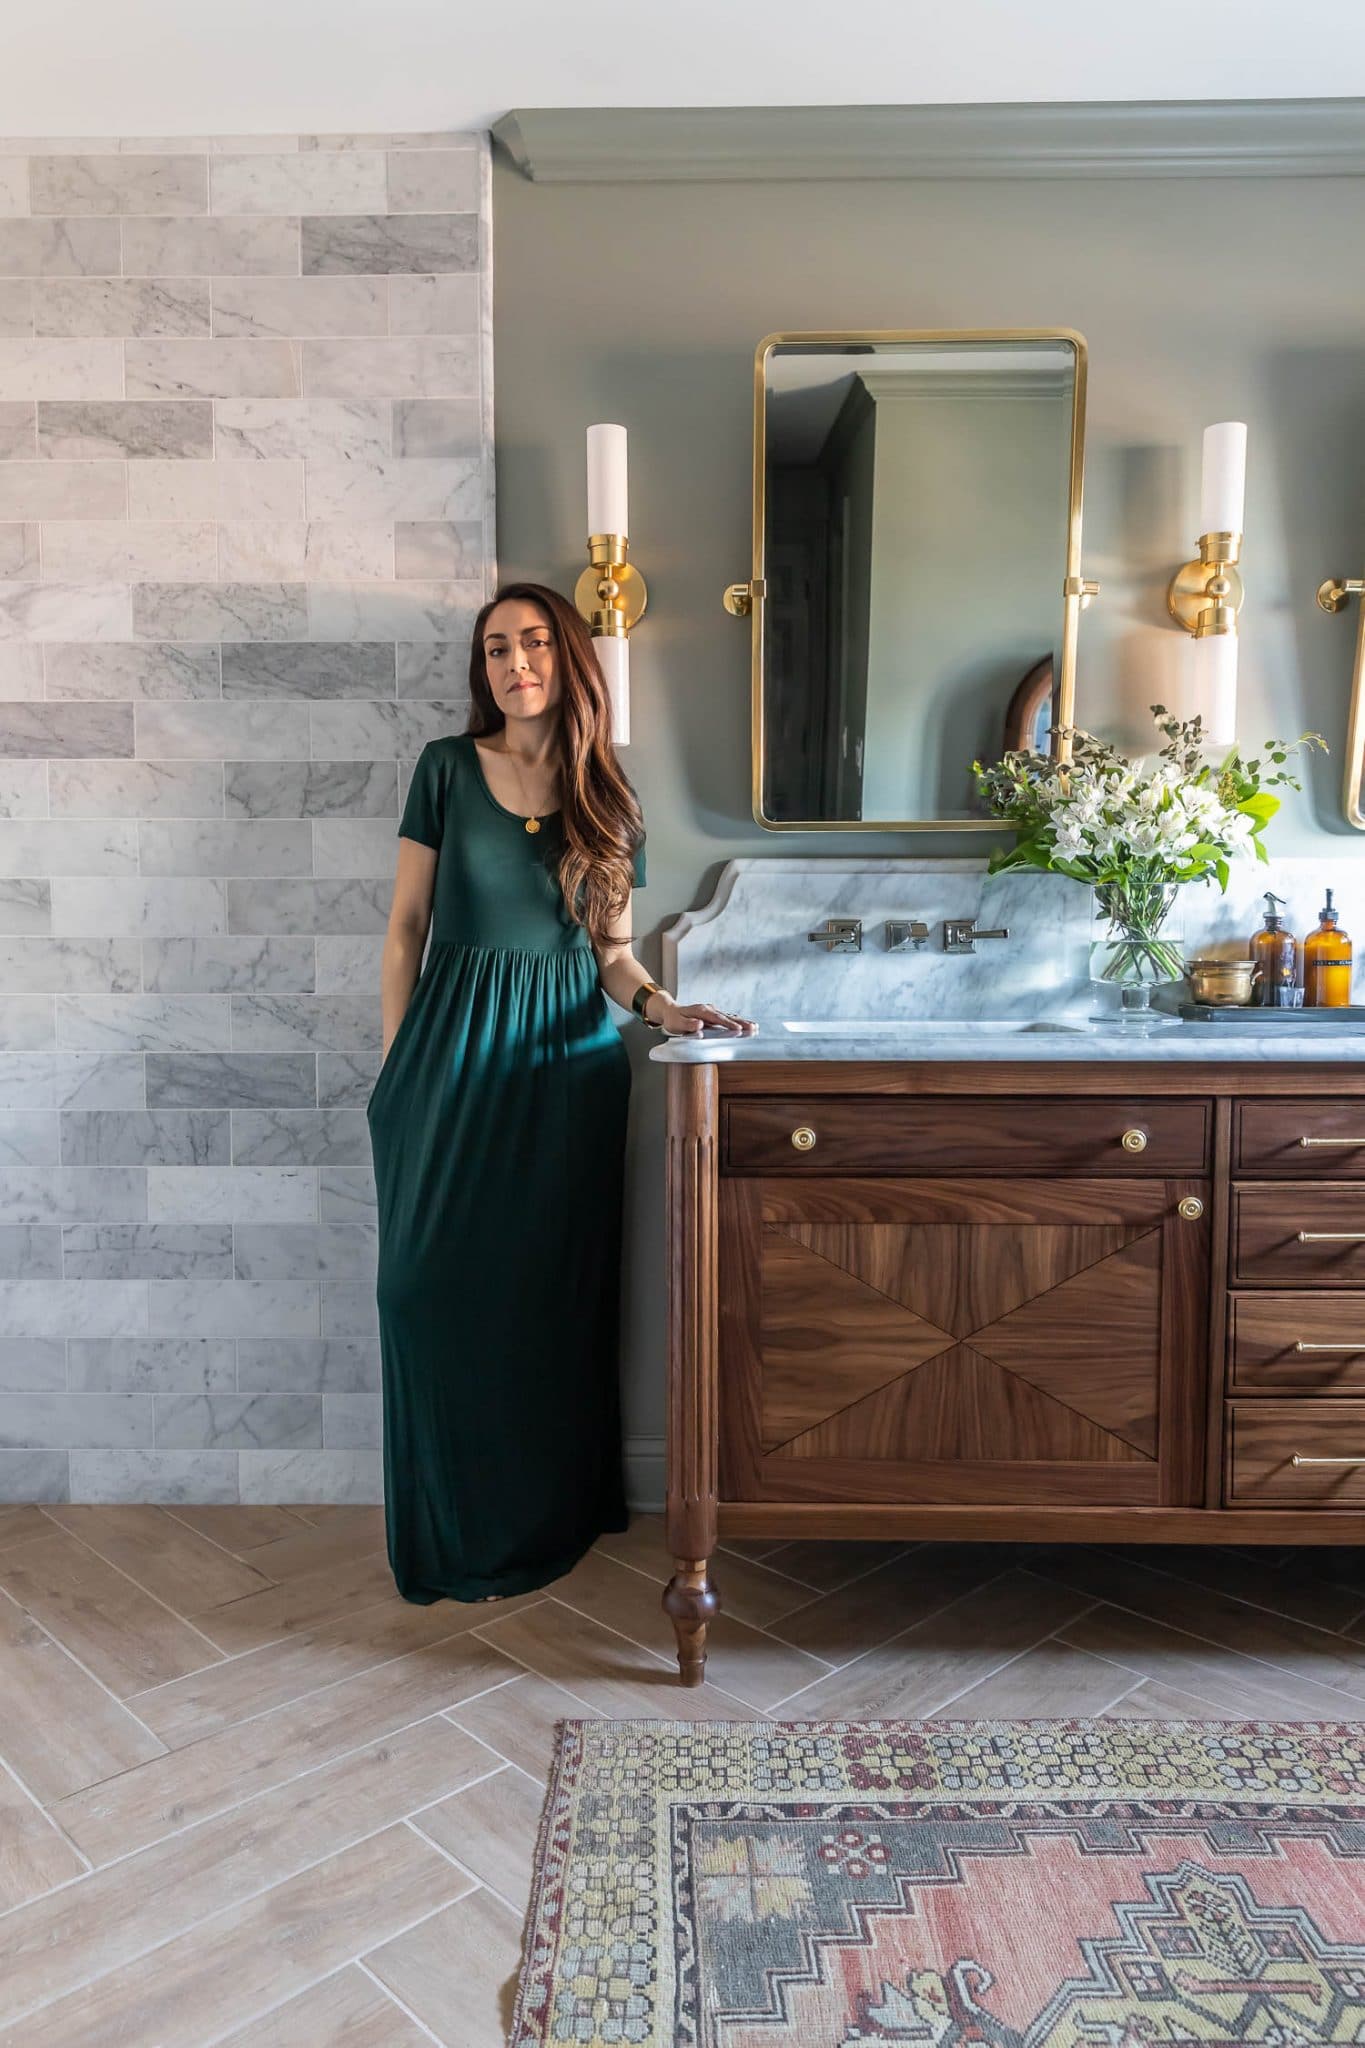
Installing The Vanity Top
Installing the vanity top is a key step in building a double vanity cabinet. It gives the bathroom a clean, finished look. The right countertop also adds function and style. Proper installation ensures the top stays secure and lasts long.
Selecting The Countertop
Choose a countertop that fits your vanity size and style. Common materials include granite, quartz, marble, and laminate. Each has different costs and care needs. Pick one that matches your budget and bathroom design. Measure your vanity carefully to get the right size.
Consider the sink type you want. Some countertops come with pre-cut holes for sinks. Others need custom cutting. Make sure the material can handle water and daily use without damage.
Securing The Vanity Top
Place the countertop on the vanity cabinet. Check it fits well and lines up with edges. Use a level to make sure it is even. If needed, adjust the cabinet or countertop.
Apply a bead of silicone caulk along the top edge of the cabinet. This seals and holds the countertop in place. Carefully lower the countertop onto the caulk. Press down gently but firmly. Wipe away any extra caulk that squeezes out.
Use clamps or weights to hold the countertop while the caulk dries. Leave it untouched for a few hours. This helps create a strong bond. Once dry, the vanity top should feel stable and secure.
Connecting Plumbing Fixtures
Connecting plumbing fixtures is a key step in building a double vanity cabinet. Proper connections ensure the sinks work well without leaks. Take your time to follow each step carefully. This helps avoid costly repairs later and keeps your bathroom neat.
Use the right tools and parts for a secure fit. Check each connection for tightness. Test the water flow before finishing the installation.
Installing Faucets
Start by placing the faucet on the sink holes. Make sure it fits snugly without wobbling. Use the rubber gasket or plumber’s putty to seal the base. Tighten the mounting nuts under the sink. Avoid over-tightening to prevent damage.
Attach the faucet handles and spout according to the instructions. Check the alignment and smooth operation. A well-installed faucet looks good and works smoothly.
Hooking Up Water Supply
Connect the water supply lines to the faucet valves. Use flexible hoses for easier installation. Hand-tighten the connections first, then use a wrench for a firm fit. Avoid overtightening to prevent cracks.
Turn on the main water valve slowly. Check for leaks around all connections. Tighten any loose fittings immediately. Properly connected supply lines keep water flowing without drips.
Credit: thriftdiving.com
Maintenance Tips
Maintaining your double vanity cabinet keeps it looking new and lasting longer. Simple care routines prevent damage and preserve its beauty. Follow these easy tips to keep your cabinet clean and strong.
Cleaning And Care
Wipe the cabinet with a soft, damp cloth regularly. Use mild soap and water for tougher spots. Avoid harsh chemicals that can harm the finish. Dry the surface completely after cleaning. Keep the cabinet dry to stop water stains and mold.
Preventing Damage
Place mats or coasters under toiletries to catch spills. Avoid placing heavy items on the countertop edge. Tighten loose handles or hinges quickly to prevent more damage. Protect the wood from direct sunlight to stop fading. Check for leaks under sinks often and fix them fast.
Frequently Asked Questions
What Materials Are Best For A Double Vanity Cabinet?
Solid wood like oak or maple offers durability and a classic look. Plywood is budget-friendly and moisture-resistant. Choose materials that handle bathroom humidity well and match your style.
How Much Space Is Needed For A Double Vanity?
A minimum of 60 inches width and 21 inches depth is ideal. Ensure enough room for two sinks and comfortable movement around the cabinet.
Can I Install A Double Vanity Myself?
Yes, if you have basic carpentry and plumbing skills. Follow detailed instructions and use proper tools. For complex plumbing, consider hiring a professional.
How Do I Maintain A Double Vanity Cabinet?
Clean with mild soap and water regularly. Avoid harsh chemicals that damage finishes. Check seals and caulking to prevent water damage and prolong cabinet life.
Conclusion
Building a double vanity cabinet takes time and care. Follow each step to ensure a strong, useful piece. Choose the right materials for durability and style. Take measurements twice to avoid mistakes. Work carefully and stay patient throughout the process.
A well-built cabinet adds value and convenience to any bathroom. Enjoy the pride of creating something with your own hands. Keep tools and workspace organized for easier work. Your bathroom will look fresh and neat with this new vanity. Simple effort brings great results.


