Are you looking for a smart way to save space and add a fun touch to your home? Building a simple bunk bed might be the perfect solution for you.
Imagine creating a cozy spot that your kids will love, while freeing up room for play or study. You don’t need to be a woodworking expert to make this happen. In this guide, you’ll discover easy steps and practical tips that will help you build a sturdy, stylish bunk bed with confidence.
Keep reading, and you’ll soon have a project that’s both rewarding and useful.
Materials And Tools Needed
Building a simple bunk bed starts with gathering the right materials and tools. The quality of wood and the tools you use affect the strength and safety of the bed. Proper safety gear keeps you protected during the project. This section explains what you need before you begin.
Choosing The Right Wood
Use strong, durable wood like pine or oak. Pine is affordable and easy to work with. Oak is harder and lasts longer but costs more. Avoid soft woods like cedar or spruce. They can bend or break easily. Make sure the wood is smooth and free of cracks. Boards should be straight and thick enough to hold weight safely.
Essential Tools For The Project
Gather basic tools for cutting and assembling wood. You will need a saw to cut boards to size. A drill helps make holes and drive screws. Sandpaper smooths rough edges for safety. A tape measure ensures precise cuts. A screwdriver or power driver speeds up assembly. Clamps hold pieces steady while you work. A pencil is useful for marking measurements.
Safety Gear To Use
Wear safety glasses to protect your eyes from dust and wood chips. Gloves protect your hands from splinters and sharp tools. Use a dust mask to avoid breathing sawdust. Hearing protection reduces noise from power tools. Work in a well-ventilated area. Keep a first aid kit nearby in case of minor injuries.
Credit: www.arroceriadagusto.es
Planning Your Bunk Bed
Planning your bunk bed is the first and most important step. It helps you avoid mistakes and build a safe bed. Careful planning saves time and money.
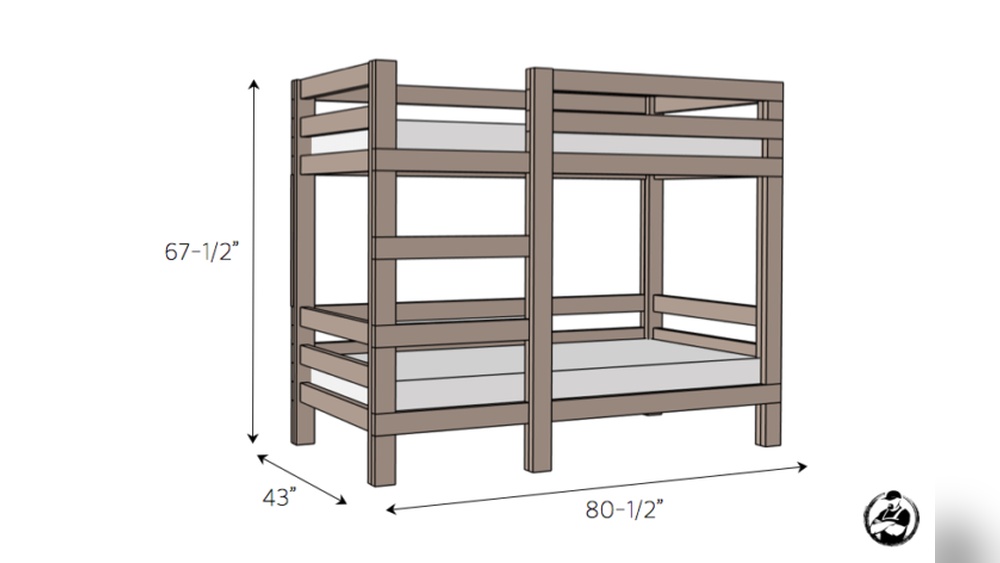
Think about the space where the bunk bed will go. Take exact measurements. Picture the final look. Know the weight the bed must hold. These details guide your project.
Measuring The Space
Measure the room’s length, width, and height. Make sure there is enough space for the bed and movement. Check for doors, windows, and heaters that might block the bed.
Leave extra space above the top bunk for sitting up. Measure the ceiling height to avoid hitting your head. Accurate measurements prevent problems later.
Designing The Frame
Choose a simple design that fits your space. Decide on the bed size: twin, full, or custom. Plan for sturdy legs and strong side rails.
Think about ladder placement and guardrails for safety. Use basic shapes like rectangles and squares for easier building. A clear design reduces confusion during construction.
Setting Weight Limits
Determine who will use the bunk bed. Calculate the total weight it must support. Include mattress weight and extra safety margin.
Use strong wood and secure joints to handle the load. Setting weight limits ensures the bed stays safe and stable. Don’t skip this step.
Cutting And Preparing Wood
Cutting and preparing wood is the first step in building a simple bunk bed. It sets the foundation for a strong and safe structure. Careful preparation helps prevent mistakes and ensures all pieces fit well. Proper wood cutting makes assembly easier and faster.
Marking Measurements
Start by measuring your wood pieces with a tape measure. Use a pencil to mark exact lengths clearly. Double-check each measurement before making any cuts. Marking straight lines ensures clean, accurate cuts. Accurate marks help avoid wasting wood and effort.
Cutting Techniques
Use a saw suitable for the type of wood you have. A handsaw or circular saw works well for most cuts. Cut slowly and follow the marked lines closely. Keep your hands steady and away from the blade. Smooth, straight cuts make assembly easier and safer.
Sanding For Smooth Edges
After cutting, sand all edges with sandpaper or a sanding block. Sanding removes splinters and rough spots on the wood. Smooth edges prevent injuries and give a clean look. Spend time sanding corners and surfaces that will be touched often.

Credit: www.youtube.com
Assembling The Frame
Assembling the frame is a key step in building a simple bunk bed. This part gives the bed its shape and strength. Take your time to make sure every piece fits well. A sturdy frame means a safe and durable bunk bed.
Building The Bed Rails
Start by cutting the bed rails to the right length. These rails hold the mattress in place. Attach the rails to the head and foot boards using strong screws. Make sure the rails are level and tight. This prevents the mattress from sliding off.
Constructing The Ladder
Use sturdy wood for the ladder steps and sides. Cut the steps evenly for easy climbing. Attach each step securely between the ladder sides. Space the steps evenly to fit small feet. Fix the ladder to the bed frame firmly for safety.
Securing The Supports
Supports keep the bed steady and stop it from wobbling. Place vertical supports at the corners of the frame. Add horizontal supports under the bed rails. Use screws and brackets to hold supports tightly. Check all supports are straight and strong before moving on.
Adding Safety Features
Adding safety features to your bunk bed is very important. It keeps kids safe while they sleep and play. Small safety measures can prevent many accidents. Focus on guardrails, bed stability, and ladder safety.
Installing Guardrails
Guardrails stop sleepers from falling out of bed. Use strong wood for the rails. Fix them tightly to the bed frame. The rails should be high enough to cover the mattress edge. Check for gaps where a child might get stuck. Smooth all edges to avoid splinters.
Checking Stability
Stable beds do not wobble or shake. Test the bed by pushing it gently from different sides. Tighten all screws and bolts firmly. Use corner braces for extra support. Place the bed on a flat floor. Add floor pads to prevent slipping. Double-check the frame after assembly.
Ensuring Ladder Safety
The ladder must be sturdy and easy to climb. Attach it securely to the bed frame. Make sure the steps are wide enough for small feet. Leave enough space between steps for comfort. Sand the ladder to remove rough spots. Teach children to climb carefully and hold the rails.
Finishing Touches
Finishing touches make your bunk bed look complete and ready to use. This step adds beauty and safety. It also helps protect the wood for a longer life. Take time to do these final steps carefully.
Applying Paint Or Stain
Choose a paint or stain that fits your room style. Paint adds color and hides marks. Stain shows the wood grain and gives a natural look. Use a brush or cloth to apply evenly. Let it dry fully before the next step. One or two coats usually work well.
Adding Mattresses And Bedding
Pick mattresses that fit your bunk bed perfectly. Make sure they are firm and safe for children. Add soft bedding like sheets, pillows, and blankets. Keep bedding simple and clean for comfort. This makes the bed cozy and inviting for sleep.
Final Inspection
Check all screws and joints. Tighten any loose parts. Look for sharp edges or rough spots. Sand these areas smooth to avoid splinters. Confirm the ladder is strong and safe. This step ensures the bunk bed is safe and sturdy for use.
Maintenance Tips
Keeping your bunk bed safe and sturdy takes regular care. Simple maintenance helps the bed last longer and stay secure. Follow these tips to keep your bunk bed in good shape.
Regular Tightening Of Screws
Check screws and bolts every few weeks. Tighten them with a screwdriver or wrench. Loose screws can make the bed unsafe. Regular tightening keeps the frame strong.
Cleaning And Care
Dust the bed often using a soft cloth. Clean with mild soap and water for stains. Avoid harsh chemicals that can damage the wood or paint. Dry the bed completely after cleaning to prevent damage.
Monitoring Wear And Tear
Look for cracks, splits, or broken parts regularly. Check the ladder and guardrails for damage. Replace any worn or broken parts quickly. Early fixes stop small problems from getting worse.

Credit: www.instructables.com
Frequently Asked Questions
What Materials Are Needed To Build A Simple Bunk Bed?
You need wood planks, screws, nails, wood glue, sandpaper, a saw, drill, measuring tape, and a safety rail. Choose durable, quality wood for safety and longevity. Proper tools ensure precise cuts and sturdy assembly.
How Long Does It Take To Build A Bunk Bed?
Building a simple bunk bed typically takes 8 to 12 hours. Time varies based on your experience and tools available. Planning and preparation reduce construction time significantly.
What Safety Features Should A Bunk Bed Include?
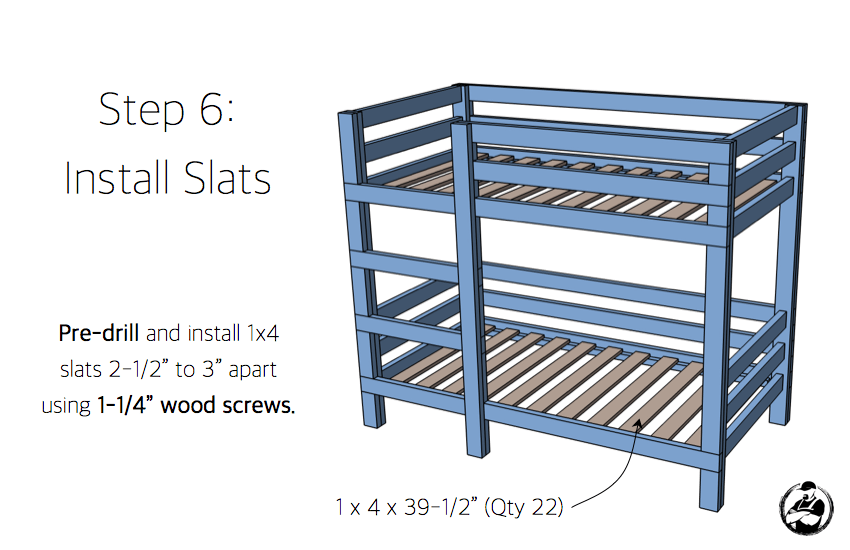
Include guardrails on the top bunk, secure ladders, and sturdy slats. Ensure all joints are tight and edges are smooth. Proper safety features prevent falls and injuries, especially for children.
Can Beginners Build A Bunk Bed Easily?
Yes, beginners can build a simple bunk bed with clear instructions. Start with basic designs and use quality materials. Take safety precautions and measure carefully for best results.
Conclusion
Building a simple bunk bed can save space and add style. Follow each step carefully to keep it safe and sturdy. Use the right tools and materials for the best results. Take your time and double-check your work as you go.
Soon, you will have a practical bed that fits your room well. Enjoy the satisfaction of making something useful with your own hands. This project suits beginners and helps develop basic woodworking skills. Start building today and create a cozy space for rest or guests.