Looking to add a touch of style to your home without spending a fortune? Building a simple console table might be exactly what you need.
Imagine having a beautiful, custom-made piece that fits perfectly in your space and shows off your personality. In this guide, you’ll discover easy steps to create your own console table, even if you’ve never built anything before. By the end, you’ll feel proud of your new furniture and ready to impress your friends.
Ready to get started? Let’s dive in!
Choosing Materials
Choosing the right materials is key to building a sturdy console table. The quality of wood and tools affects the table’s look and durability. Picking simple, good materials makes the project easier and more enjoyable.
Focus on wood that fits your style and budget. Gather basic tools to keep the work smooth and safe. This section guides you through selecting wood types and collecting necessary supplies.
Selecting Wood Types
Choose wood that is easy to work with and strong. Pine is soft and affordable, perfect for beginners. Oak is harder and lasts longer, but costs more. Plywood offers a smooth surface and resists warping. Consider the wood’s color and grain for the table’s look. Avoid wood with many knots or cracks to ensure stability.
Gathering Tools And Supplies
Basic tools keep the building process simple. You need a saw for cutting wood to size. Sandpaper smooths rough edges and surfaces. Wood glue helps join pieces firmly. Screws and a drill secure parts together. A measuring tape ensures accurate cuts and fits. Having all tools ready saves time and frustration.

Credit: farmhouseishblog.com
Designing Your Table
Designing your console table is the first step to a successful build. Good design makes your table fit well in your space. It also helps you use the right materials and tools. Take time to plan carefully. This saves effort and ensures a nice result.
Think about the table’s purpose. Will it hold keys, books, or decorations? The design should match your needs. Keep it simple and functional for the best outcome.
Determining Dimensions
Start by measuring the space where you want the table. Note the width, height, and depth available. A console table is usually narrow and tall. Common sizes are about 30 inches high and 12 to 18 inches deep. Choose dimensions that fit your room comfortably. Leave room to walk around the table easily.
Consider the items you will place on the table. Make sure the surface is big enough. Also, think about the table’s height. It should be easy to reach and use.
Sketching The Layout
Draw a simple sketch of your table design. Include the top, legs, and any shelves. Use a ruler to keep lines straight. Label the parts with their sizes. This helps visualize the final product.
Keep the design clean and balanced. Avoid too many details that make building hard. A good sketch guides your work and keeps you on track.
Cutting The Wood
Cutting the wood is one of the first steps in building a simple console table. This step shapes the pieces that will form the table. Taking care during cutting helps ensure the pieces fit well. It also keeps the work safe and smooth.
Use the right tools and follow clear steps for good results. Focus on measuring and marking first, then practice safe cutting techniques.
Measuring And Marking
Measure the wood pieces carefully. Use a tape measure for accuracy. Mark the cut lines clearly with a pencil. Double-check each measurement before cutting. Marking straight lines helps make clean cuts. Use a square tool for straight edges. Accurate marks prevent mistakes later. Take your time with this step.
Safe Cutting Techniques
Wear safety goggles and gloves before cutting. Use a stable surface to place the wood. Keep your hands away from the blade. Cut slowly and steadily along the marked lines. Use clamps to hold the wood in place. Do not rush the cutting process. Check your tools before starting. Sharp blades cut better and safer.
Assembling The Table
Assembling the table is the step where your project starts to take shape. This part needs attention to detail. The legs and top must fit tightly. Proper assembly ensures the table is strong and stable. Follow the steps carefully for the best results.
Joining The Legs And Top
Begin by positioning the legs at each corner of the table top. Make sure they line up straight and flush. Use clamps to hold the legs in place if needed. Check the alignment from different angles. This prevents wobbling later.
Mark the spots where the legs meet the top. These marks guide where to drill pilot holes. Pilot holes keep the wood from splitting. Drill these holes carefully and at the right depth. This step prepares the pieces for secure joining.
Securing With Screws And Glue
Apply wood glue on the contact areas between the legs and top. Glue adds strength to the joint. After applying glue, attach the legs using screws. Drive screws into the pilot holes slowly. Tighten screws firmly but avoid overdriving.
Wipe away any excess glue quickly. Let the glue dry as per instructions. Drying time helps the table become solid and durable. After drying, check for stability. Your simple console table is ready for finishing touches.
Sanding And Finishing
Sanding and finishing give your console table a smooth, polished look. This step protects the wood and makes it last longer. Proper sanding removes rough spots and prepares the surface for stain or paint. Finishing adds color and seals the wood from damage.
Smoothing Surfaces
Start with medium-grit sandpaper to remove rough areas. Sand evenly along the wood grain to avoid scratches. Use fine-grit sandpaper for a smooth finish. Wipe dust off with a clean cloth before moving on. Smooth surfaces help stains and paints stick better.
Applying Stain Or Paint
Choose a stain or paint color that fits your style. Use a brush or cloth to apply stain evenly. Let the stain soak in for a few minutes, then wipe off extra. For paint, apply thin, even coats to avoid drips. Let each coat dry fully before adding another. Finish with a clear sealant for protection and shine.

Credit: www.instructables.com
Adding Final Touches
Adding final touches to your console table gives it a polished, professional look. These small steps protect your table and make it stand out. Simple details can make a big difference in the table’s durability and style.
Attaching Protective Pads
Protective pads keep your table safe from scratches and damage. Place felt pads under each leg. This prevents marks on your floor and stops the table from sliding. Choose pads that match your floor type for best results. Attach them firmly for lasting protection.
Decorative Enhancements
Decorative touches add personality to your console table. Use stencils or paint to create patterns on the surface. Add small metal or wooden accents for extra charm. A fresh coat of clear varnish can enhance color and protect the wood. Keep decorations simple to match your room’s style.
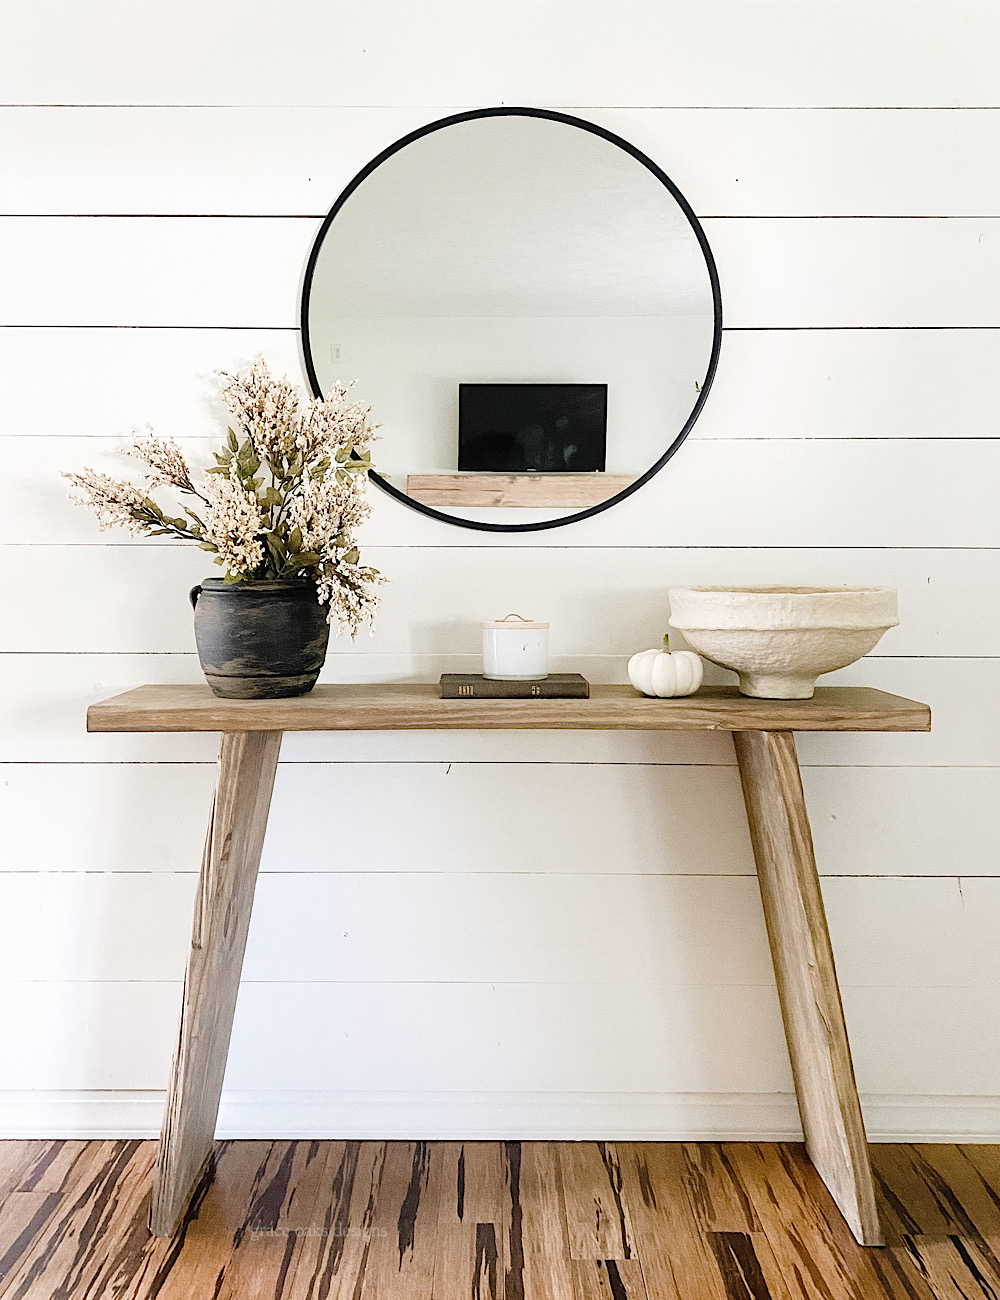
Credit: graceoaksdesigns.com
Frequently Asked Questions
What Materials Are Needed To Build A Simple Console Table?
You need wood planks, screws, wood glue, sandpaper, and a finish like paint or stain. Basic tools include a saw, drill, screwdriver, and measuring tape. These materials are affordable and easy to find at local hardware stores.
How Long Does It Take To Build A Console Table?
Building a simple console table usually takes 3 to 5 hours. This time includes measuring, cutting, assembling, sanding, and finishing. Beginners may take longer, but the process is straightforward with clear instructions.
Can I Customize The Size Of My Console Table?
Yes, you can easily customize the size of your console table. Adjust the length, width, and height measurements to fit your space. Just ensure the proportions remain balanced for stability and aesthetic appeal.
What Type Of Wood Is Best For Console Tables?
Pine, oak, and plywood are popular wood choices for console tables. Pine is affordable and easy to work with. Oak offers durability and a classic look. Plywood provides a smooth surface and budget-friendly option.
Conclusion
Building a simple console table can be fun and rewarding. You only need basic tools and a few materials. Follow each step carefully to create a sturdy table. Personalize it with paint or decorations to match your style. This project saves money and adds charm to your space.
Try it yourself and enjoy the satisfaction of making something useful. A simple table can brighten any room. Start small, and watch your skills grow with each project.