Are you looking for a stylish and practical piece of furniture that fits perfectly in your space? Building your own extendable console table might be exactly what you need.
Imagine having a table that can expand when guests arrive and shrink back when you want to save space. In this guide, you’ll discover simple steps to create a beautiful, functional console table tailored just for you. Ready to add a personal touch to your home and impress everyone with your DIY skills?
Let’s dive in and make your dream table a reality.
Materials And Tools Needed
Building your own extendable console table needs the right materials and tools. Choosing quality supplies makes the project easier and the final product stronger. Knowing what to gather before starting saves time and effort. This section covers the wood, hardware, and tools you will need for a smooth build.
Wood Selection
Pick wood that is strong and easy to work with. Pine, oak, or maple are good options. Pine is softer and cheaper but less durable. Oak is very sturdy and looks great. Maple offers a smooth finish and strong support. Choose wood boards that are straight and free of cracks. The size depends on your table design and dimensions. Sand the wood well for a smooth surface before assembly.
Hardware Essentials
Hardware holds your console table together and makes it extendable. Use quality screws and wood glue for strong joints. Buy drawer slides or extension runners that fit your table size. These allow smooth sliding of the extendable parts. Pick screws that match the wood thickness. Consider corner brackets for added stability. Sandpaper and finishing nails help with the final touches.
Tools Checklist
Gather all tools before starting your project. A saw is essential to cut the wood pieces accurately. Use a drill for making holes and driving screws. A measuring tape and square ensure precise measurements. Sandpaper or an electric sander smooths rough edges. Clamps hold parts together while glue dries. A screwdriver, hammer, and pencil complete the toolkit.
Design Planning
Design planning is the first step to build your own extendable console table. It helps to create a clear idea before starting the project. Careful planning saves time and materials. It also ensures the table fits perfectly in your space.
Focus on the table’s size, shape, and functionality. Think about how it will extend and how much space it needs. Planning well makes the building process smooth and enjoyable.
Measuring Space
Start by measuring the area where the table will go. Use a tape measure for accuracy. Note the width, length, and height limits. Check for any obstacles like doors or vents nearby. Leave extra space for easy movement around the table. Good measurements prevent problems later.
Choosing Dimensions
Decide the table size based on your space measurements. Choose a length that works when the table is both closed and extended. Pick a height that matches other furniture in the room. The width should allow comfortable use without blocking walkways. Keep proportions balanced for a nice look.
Sketching The Table
Draw a simple sketch of your table design. Include the extendable parts and how they slide out. Mark the dimensions clearly on the sketch. This visual guide helps understand the structure. It also shows where joints and supports go. You can adjust the design before building.
Cutting And Preparing Wood
Cutting and preparing wood is a key step in building your extendable console table. Precise cuts make sure the parts fit together well. Smooth surfaces help the table look good and last longer. Take your time during this stage for the best results.
Marking Cut Lines
Begin by measuring your wood pieces carefully. Use a pencil to draw clear, straight cut lines. Double-check each measurement before marking. Clear lines guide your saw and prevent mistakes. Mark every part you need to cut to avoid confusion.
Safe Cutting Techniques
Wear safety goggles and gloves before cutting wood. Use a sharp saw for clean cuts and less effort. Keep your hands away from the blade at all times. Cut slowly and steadily along the marked lines. Secure the wood firmly using clamps or a workbench to stop movement.
Sanding And Smoothing
After cutting, sand the edges with fine-grit sandpaper. Smooth all surfaces to remove splinters and rough spots. Sand in the direction of the wood grain for a clean finish. Wipe away dust with a dry cloth before assembly. Smooth wood helps the table parts slide and fit better.
Credit: expandfurniture.com
Assembling The Base
Assembling the base of your extendable console table is the first important step. This part supports the entire table, so it must be strong and stable. Take your time to follow each step carefully. A solid base means a durable and safe table.
Building The Frame
Start by cutting the wood pieces for the frame. Use sturdy wood for better support. Join the pieces using screws or wood glue. Make sure the frame is square by measuring the corners. A square frame keeps the table balanced. Double-check all connections before moving on.
Attaching Legs
Select legs that match the style and height of your table. Attach each leg securely to the corners of the frame. Use brackets or strong screws to hold the legs tight. Check that all legs are the same length. Uneven legs will make the table wobble.
Ensuring Stability
Test the base by gently rocking it on a flat surface. Tighten any loose screws or joints. Add corner braces if the frame feels weak. A stable base prevents accidents and extends the table’s life. Stability is key for a practical console table.
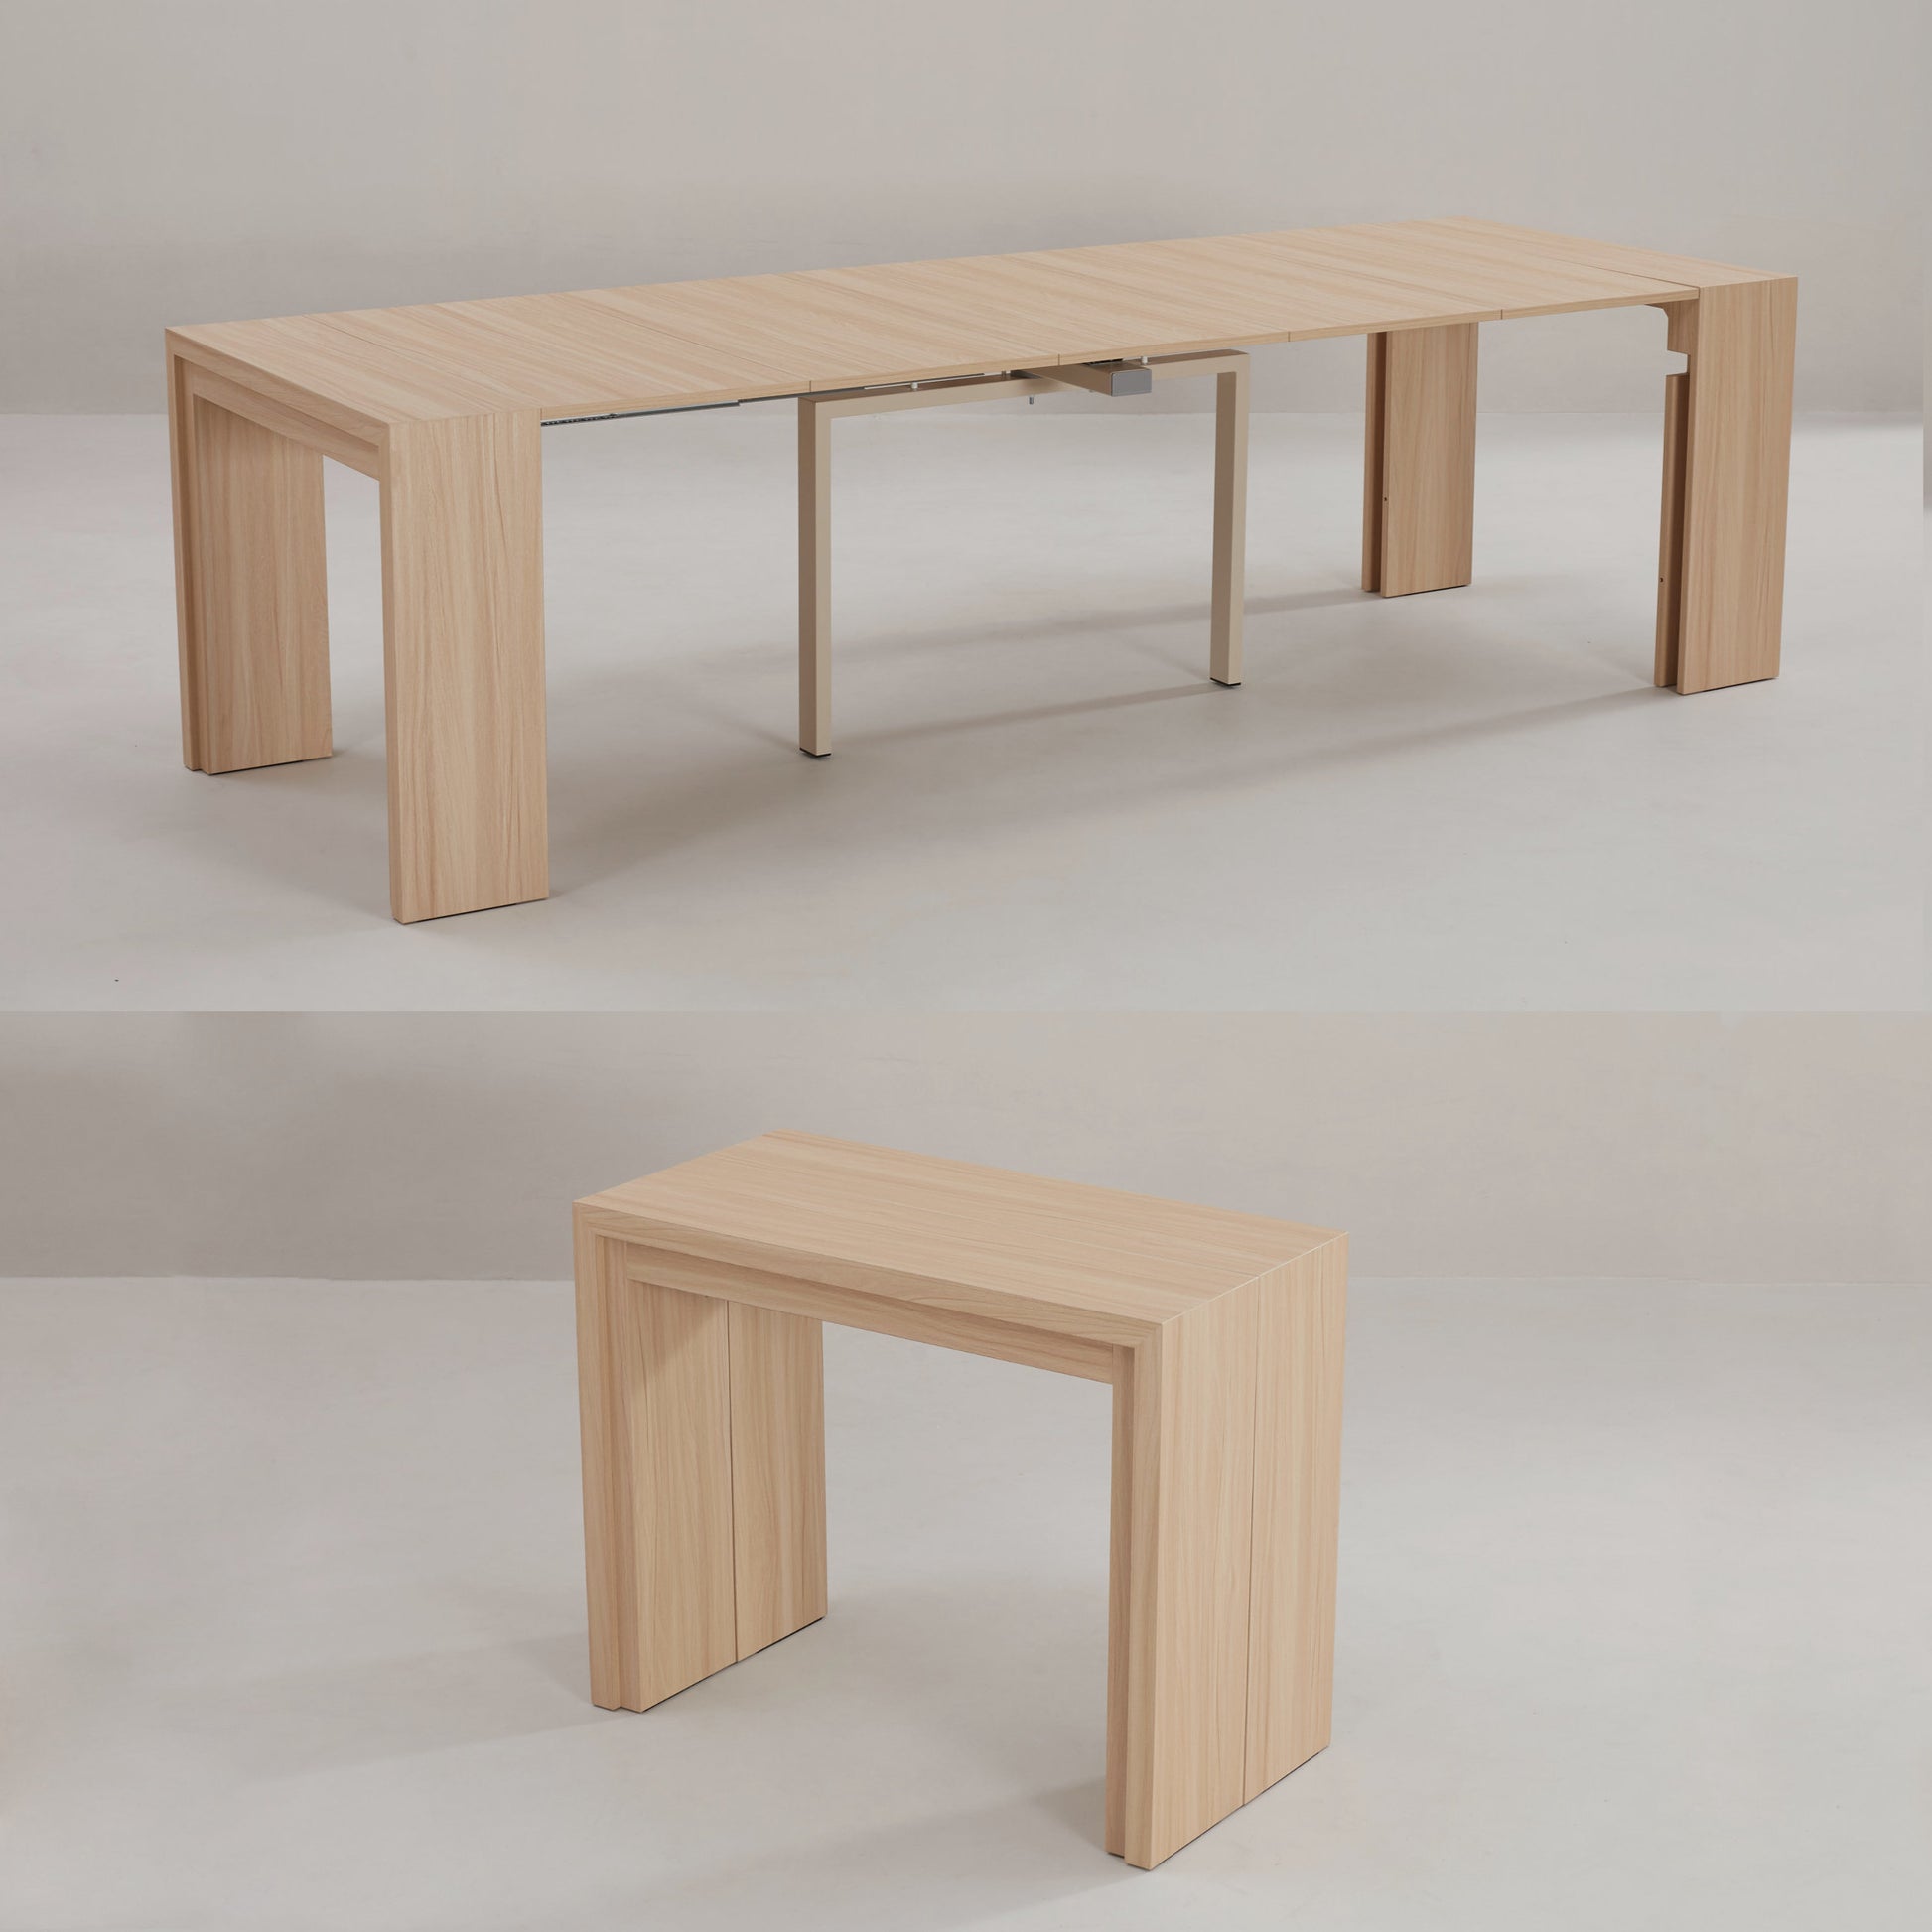
Creating The Extendable Mechanism
Creating the extendable mechanism is key to a functional console table. This part lets the table grow or shrink easily. The mechanism must work smoothly and hold the parts firmly. Careful steps make sure your table extends without trouble.
Installing Sliding Rails
Start by choosing good sliding rails. These rails guide the table parts. Attach the rails under the table top and the extendable pieces. Use screws to fix the rails tightly. Make sure the rails are straight and level. Proper installation helps the table parts slide well.
Aligning Extendable Parts
Align the extendable parts carefully with the main table. Check that edges match perfectly. Use clamps to hold pieces in place. This alignment stops gaps and uneven surfaces. Measure twice to be sure everything fits. Good alignment keeps the table stable.
Testing Movement
Slide the extendable parts in and out slowly. Listen and feel for any sticking or rough spots. Adjust the rails or parts if needed. Test several times to ensure smooth motion. The table should extend easily without wobbling. Smooth movement means your mechanism works well.
Credit: dutchcraftfurniture.com
Finishing Touches
Finishing touches give your extendable console table a polished look. These steps protect the wood and add style. Small details make a big difference in your project.
Painting Or Staining
Choose paint or stain to match your room’s style. Paint covers the wood fully and offers many color options. Stain shows the wood’s natural grain and enhances its beauty. Apply thin, even coats and let each dry well. Use a brush or cloth for smooth results. Test colors on scrap wood first to avoid mistakes.
Sealing For Durability
Seal your table to protect it from spills and scratches. Use a clear polyurethane or varnish for strong protection. Apply thin layers with a clean brush, letting each dry before the next. Sand lightly between coats for a smooth finish. Sealing keeps the wood looking good longer and makes cleaning easier.
Adding Decorative Elements
Decorative touches add personality to your table. Consider adding metal handles or knobs for style and function. Small wood carvings or stencils can create unique patterns. Use tape to mark designs and keep lines neat. Keep decorations simple to match your table’s look and avoid clutter.
Maintenance Tips
Maintaining your extendable console table keeps it looking fresh and working smoothly. Regular care helps the table last longer and stay beautiful. Small efforts in cleaning, lubricating, and fixing damages save time and money later.
Cleaning Guidelines
Dust the table often using a soft cloth. Avoid harsh chemicals that may damage the finish. Use a mild soap mixed with water for deeper cleaning. Wipe gently and dry the surface immediately. Clean spills right away to prevent stains.
Lubricating Sliding Parts
Sliding parts need regular lubrication to move smoothly. Use a silicone spray or light oil. Apply a small amount on the tracks and joints. Wipe off any excess to avoid dirt build-up. Test the movement after lubrication to ensure easy extension.
Repairing Minor Damages
Fix small scratches using wood filler or wax sticks. Match the color to your table for a neat look. Tighten loose screws to keep the table stable. Replace damaged parts early to avoid bigger problems. Regular checks help spot issues before they grow.

Credit: www.castlery.com
Frequently Asked Questions
What Materials Do I Need For An Extendable Console Table?
You need wood, screws, drawer slides, wood glue, sandpaper, and finish. Choose hardwood for durability. Measure precisely to ensure smooth extension and sturdy construction.
How Do I Make The Table Extend Smoothly?
Install high-quality drawer slides or telescopic runners. Align them properly and lubricate if necessary. This ensures easy and smooth extension without wobbling.
Can I Customize The Size Of My Console Table?
Yes, you can adjust length, width, and extension size. Plan measurements based on your space and needs before cutting materials for the best fit.
How Long Does Building An Extendable Console Table Take?
It typically takes 1-3 days depending on skill level. Allow time for cutting, assembly, sanding, and finishing for a professional look.
Conclusion
Building your own extendable console table brings pride and style to your home. You control the size and design to fit your space perfectly. Each step is simple and clear, making the project fun. Using basic tools and materials keeps costs low.
Customizing lets you add personal touches that match your decor. Enjoy the process and watch your creation come to life. A handmade table adds warmth and charm to any room. Start today and create something useful and beautiful with your own hands.