Are you tired of cluttered spaces and looking for a simple way to organize your favorite books? Building a small bookshelf out of wood might be the perfect solution for you.
Imagine having a sturdy, custom-made shelf that fits perfectly in your room and showcases your collection just the way you want. In this guide, you’ll discover easy steps to create your own bookshelf, even if you’ve never worked with wood before.
By the end, you’ll not only have a practical piece of furniture but also the satisfaction of making it yourself. Ready to get started? Let’s dive in!
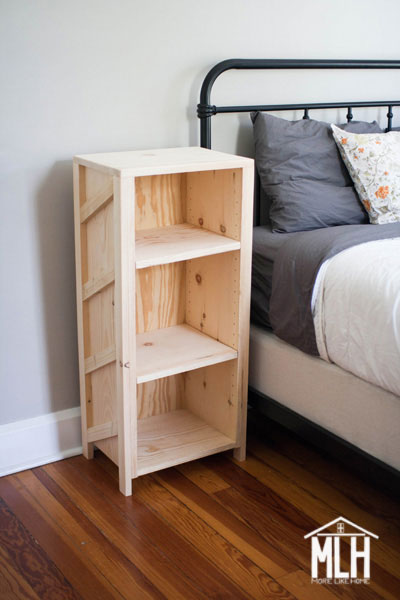
Credit: www.morelikehome.net
Choosing The Right Wood
Choosing the right wood is key to building a sturdy small bookshelf. The wood affects the shelf’s strength, look, and lifespan. Picking the best wood type makes your project easier and more rewarding.
Wood comes in many types and qualities. Knowing the differences helps you select the best fit for your bookshelf. Also, choosing sustainable wood protects the environment and supports responsible forestry.
Types Of Wood For Bookshelves
Softwoods like pine are easy to cut and affordable. They work well for light to medium loads. Hardwoods such as oak and maple are stronger and last longer. They suit shelves meant to hold heavy books. Birch and poplar offer a smooth finish and good strength. Choose wood that matches your style and budget.
Wood Quality And Durability
Look for wood without cracks or knots. These flaws weaken the structure. Solid wood is more durable than plywood or MDF. It resists warping and can hold weight better. Check for smooth surfaces to avoid splinters. Quality wood ensures your bookshelf stays stable for years.
Sustainable Wood Options
Using sustainable wood helps reduce environmental harm. Certified woods from sources like FSC guarantee responsible forest management. Bamboo is a fast-growing, eco-friendly choice. It is strong and looks great. Choosing sustainable wood supports nature and future wood supplies.
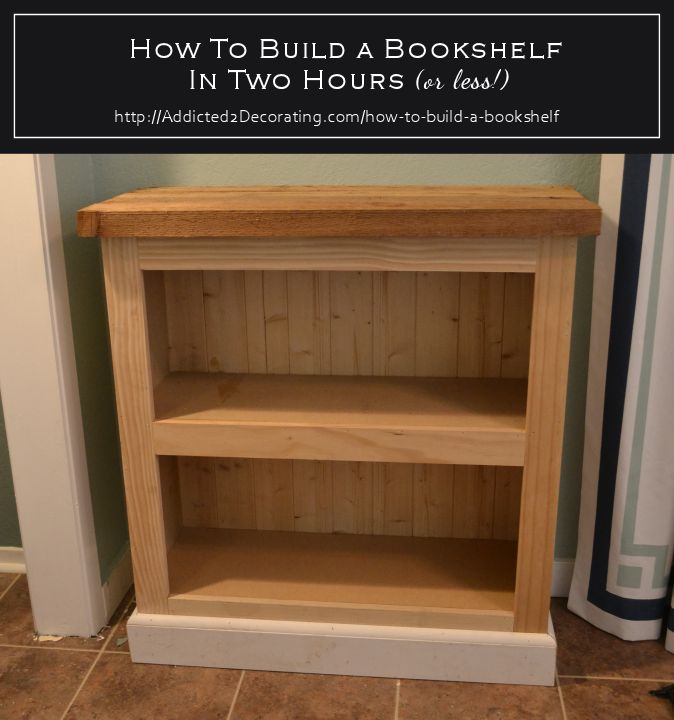
Credit: www.addicted2decorating.com
Tools And Materials Needed
Building a small bookshelf out of wood is a fun and practical project. Having the right tools and materials makes the work easier and safer. This section lists everything needed to start your woodworking journey. Prepare well to enjoy the building process and get great results.
Basic Carpentry Tools
You need simple tools to cut and join wood. A handsaw or circular saw helps cut pieces to size. A hammer drives nails or taps wood parts together. Use a measuring tape to get exact lengths. A carpenter’s square keeps your cuts straight and corners square. Sandpaper smooths rough edges for a clean finish.
Safety Gear
Safety is very important in woodworking. Wear safety goggles to protect your eyes from dust and wood chips. Use ear protection if using loud tools like saws. Gloves protect your hands from splinters and sharp edges. A dust mask keeps you from breathing in fine wood dust. Dress in close-fitting clothes to avoid accidents.
Additional Supplies
Besides tools, some supplies help finish your bookshelf. Wood glue strengthens joints and holds parts firmly. Nails or screws fix pieces together securely. Wood stain or paint adds color and protects the wood. Brushes or rags apply stain or paint smoothly. Sanding blocks or power sanders speed up the smoothing process.
Planning Your Bookshelf Design
Planning your bookshelf design is the first step in building a small wooden bookshelf. This stage helps you visualize the final product. It also saves time and materials. Careful planning ensures the bookshelf fits your space and needs perfectly.
Determining Size And Dimensions
Measure the area where you want to place the bookshelf. Decide how tall and wide it should be. Keep in mind the height of your room and nearby furniture. The bookshelf should fit comfortably without blocking anything. Choose dimensions that suit your storage needs and space.
Selecting Shelf Number And Spacing
Think about the number of shelves you need. More shelves hold more books but reduce space for tall items. Decide the height between each shelf. Leave enough space for different book sizes. Adjustable shelves offer flexibility for future changes.
Sketching Your Design
Draw a simple sketch of your bookshelf plan. Include the overall dimensions and shelf placement. Label the measurements clearly. This sketch guides your cutting and assembly. It helps avoid mistakes during construction. Keep the sketch handy for reference as you build.
Cutting The Wood Pieces
Cutting the wood pieces is the first step in building a small bookshelf. It sets the foundation for your project. Precise cuts make sure the parts fit well. This part needs focus and care. The right techniques keep you safe and improve results.
Measuring And Marking
Start by measuring each piece carefully. Use a tape measure for accuracy. Mark the wood with a pencil. Draw clear, straight lines where you will cut. Double-check all measurements before cutting. Accurate marks help avoid mistakes later.
Safe Cutting Techniques
Wear safety glasses to protect your eyes. Use a stable surface to cut on. Hold the wood firmly but not too tight. Cut slowly and steadily with the saw. Follow your marked lines closely. Keep your fingers away from the blade. Safety first keeps accidents away.
Preparing Pieces For Assembly
After cutting, smooth the edges with sandpaper. Remove splinters and rough spots carefully. Check each piece against your design. Make sure all cuts are straight and even. Clean the pieces from dust before assembly. Well-prepared wood fits better and lasts longer.
Assembling The Bookshelf
Assembling the bookshelf is an exciting step. It brings all your wood pieces together. This process needs care and patience. Follow the steps to make your bookshelf strong and neat.
Joining Techniques
Choose the right way to join wood parts. Common techniques include butt joints and dado joints. Butt joints are simple and fast to make. Dado joints give extra strength and hold shelves better. Use wood glue for extra bonding. It helps keep parts from moving.
Using Nails And Screws
Nails are quick to use but less strong. Screws hold wood tightly and last longer. Pre-drill holes to avoid wood splitting. Use a screwdriver or drill for screws. Sink nails or screws below the wood surface. Fill holes with wood filler for a smooth look.
Ensuring Stability
Check the bookshelf for wobbling after assembly. Add corner braces or brackets if needed. Tighten all screws and nails firmly. Make sure shelves sit level and straight. Place the bookshelf against a wall for extra support. Stability keeps your books safe and shelf durable.
Sanding And Finishing
Sanding and finishing are key steps to make your wooden bookshelf look great. Sanding smooths the wood and removes rough spots. Finishing protects the wood and adds color or shine. These steps help your bookshelf last longer and look more polished.
Sanding Tips For Smooth Surfaces
Start with coarse sandpaper to remove rough edges. Use even strokes along the wood grain. Change to finer sandpaper to smooth the surface. Check for splinters or rough patches. Wipe the dust off with a clean cloth before finishing.
Choosing Paint Or Stain
Paint covers the wood and adds bright color. Stain soaks into the wood and shows the grain. Pick paint for a bold, solid look. Choose stain for a natural, warm tone. Test on a small area to see the true color.
Applying Protective Coating
Protective coating keeps the wood safe from damage. Use clear varnish, polyurethane, or wax. Apply thin, even layers with a brush or cloth. Let each layer dry before adding more. This adds shine and protects from scratches and moisture.
Installing And Decorating
Installing and decorating your small wooden bookshelf completes the project. This step makes the bookshelf both safe and attractive. Proper installation keeps it steady. Decorating turns it into a stylish part of your room.
Securing The Bookshelf In Place
Place the bookshelf against a wall for support. Use brackets or anchors to fix it firmly. This prevents tipping or falling. Check that the shelf stands straight and steady. Tighten all screws and fittings well. Safety matters, especially in homes with children or pets.
Organizing Books And Items
Arrange books by size or subject. Place heavier books on lower shelves. Use vertical or horizontal stacking to save space. Add small boxes or baskets for loose items. Keep frequently used books easy to reach. Avoid overloading shelves to maintain balance.
Adding Decorative Touches
Use plants or small sculptures to add life. Place photo frames for a personal touch. Choose colors that match your room’s style. Add a small lamp for warmth and light. Use decorative bookends to keep books neat. These details make the bookshelf inviting and unique.

Credit: www.youtube.com
Frequently Asked Questions
What Wood Types Are Best For A Small Bookshelf?
Pine, oak, and plywood are ideal for small bookshelves. Pine is affordable and easy to work with. Oak is strong and durable. Plywood offers stability and smooth surfaces. Choose wood based on budget, durability, and desired finish.
How Do I Measure For A Small Bookshelf?
Measure the available wall space first. Decide shelf height, width, and depth based on book sizes. Ensure enough clearance for easy access. Accurate measurements prevent fitting issues. Use a tape measure and record dimensions clearly.
What Tools Are Needed To Build A Wooden Bookshelf?
Basic tools include a saw, drill, screwdriver, measuring tape, and sandpaper. A level and clamps help with precision. Optional tools are a wood glue and paintbrush. These tools ensure a sturdy, smooth, and well-finished bookshelf.
How Long Does It Take To Build A Small Bookshelf?
Building a small bookshelf typically takes 2 to 5 hours. Time varies with skill level and design complexity. Preparation and finishing add extra time. Planning well helps streamline the process and ensures a quality build.
Conclusion
Building a small wooden bookshelf is simple and fun. You only need basic tools and wood pieces. Measure carefully, cut straight, and join parts firmly. Take your time to sand and finish the surface. A handmade bookshelf adds charm and saves money.
Plus, it gives you pride in your work. Try this project to enjoy woodworking and organize your books. Small steps lead to great results. Start now and see your shelf come to life.