Are you ready to add a stunning, modern piece to your home? Building a waterfall console table might sound tricky, but with the right steps, you can create a sleek and stylish table that turns heads.
Imagine a table where the top flows smoothly down the sides, giving your space a fresh, elegant look. In this guide, you’ll discover simple techniques and smart tips that make the process easy and enjoyable. Keep reading, and by the end, you’ll have the confidence to build a waterfall console table that feels uniquely yours.
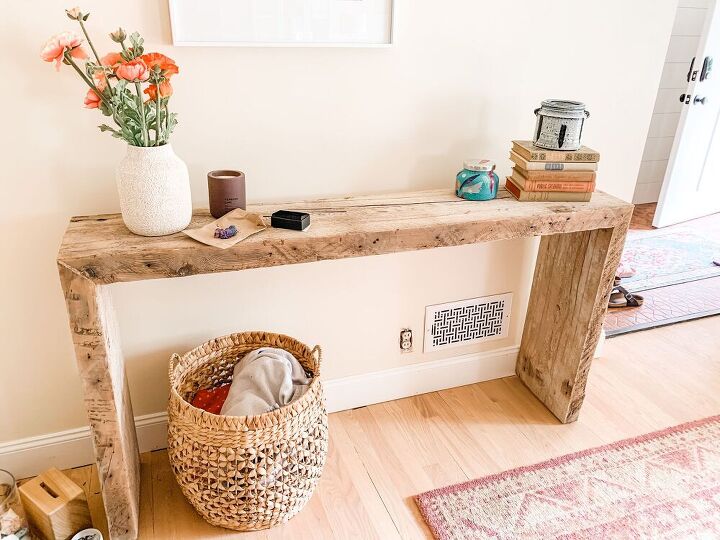
Credit: www.hometalk.com
Materials And Tools Needed
Building a waterfall console table needs careful preparation. Gathering the right materials and tools helps the project go smoothly. Each item plays a role in creating a strong and beautiful table. Knowing what to get saves time and frustration. Below, find key details about the wood, tools, and other supplies needed.
Choosing The Right Wood
Pick wood that is strong and looks good. Hardwoods like oak, walnut, or maple work best. These woods hold shape and resist damage. Avoid softwoods because they can dent easily. Check for smooth, straight boards without cracks or knots. Proper wood makes your table last longer.
Essential Tools For The Project
Use tools that make cutting and assembling easy. A table saw or circular saw cuts wood precisely. A sander smooths rough edges for a clean finish. Clamps hold parts tight while glue dries. A drill and screws help join pieces firmly. Measuring tape and square ensure accurate cuts and angles.
Additional Supplies
Besides wood and tools, some supplies are important. Wood glue strengthens joints between parts. Sandpaper refines surfaces before finishing. Wood filler hides small holes or cracks. Finish products like varnish or oil protect the wood and enhance its look. Safety gear like goggles and gloves keeps you safe.
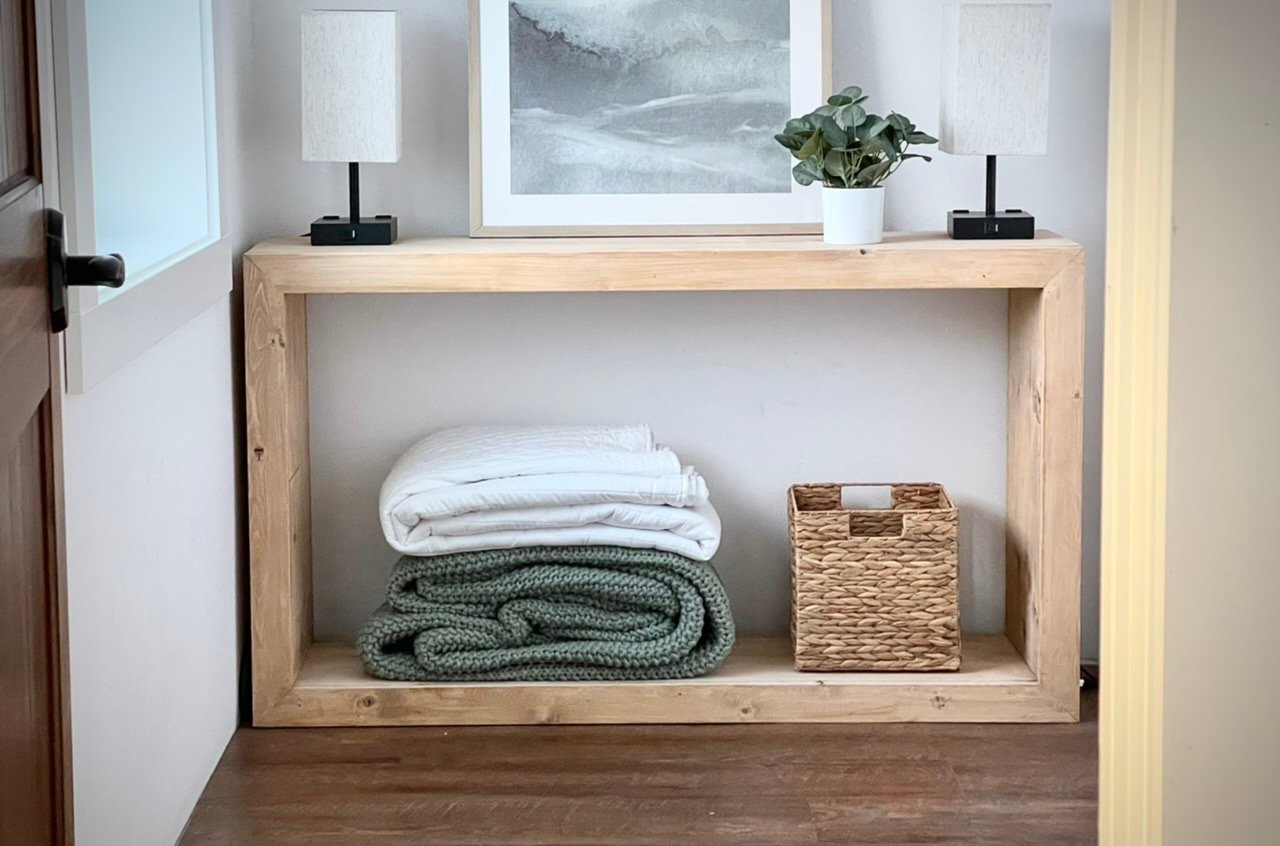
Credit: www.ana-white.com
Designing Your Console Table
Preparing the wood pieces is the first key step in building your waterfall console table. Careful preparation ensures each part fits perfectly. It also creates a smooth and beautiful finish. This section covers cutting, sanding, and shaping the wood for the waterfall curve.
Take your time here. Quality preparation leads to a strong and stylish table.
Cutting To Size
Measure the wood pieces carefully. Use a pencil to mark exact lengths. Cut the wood with a saw suited for fine cuts. Straight, clean cuts make assembly easier. Double-check each piece after cutting. Accurate size helps the table look neat and balanced.
Sanding For Smooth Edges
Sanding removes rough spots and splinters. Start with medium-grit sandpaper for quick smoothing. Then, switch to fine-grit for a polished surface. Sand all edges and surfaces evenly. Smooth wood feels nice and looks professional. It also helps the finish stick better.
Creating The Waterfall Curve
The waterfall curve gives this table its unique style. Mark the curve shape on the wood side panels. Use a jigsaw or bandsaw to cut the curve carefully. Sand the cut edges to soften and smooth the curve. A gentle, even curve improves the table’s flow and beauty.
Preparing The Wood Pieces
Assembling the table frame is the key step in building your waterfall console table. This part gives the table its shape and strength. Follow each step carefully to create a solid base. A strong frame ensures your table lasts long and looks great.
Joining The Legs And Supports
Start by attaching the legs to the side supports. Use wood glue for a tight bond. Then, secure the pieces with screws or dowels. Check that each leg is straight and flush with the support. This forms the basic structure of your table frame.
Attaching The Tabletop
Place the tabletop on the assembled frame. Align the edges to match perfectly. Use clamps to hold the tabletop in place. Screw it down from underneath to hide the fasteners. This step connects the frame to the surface you will see.
Ensuring Stability
Test the table for wobbles by pressing on each corner. Tighten screws if you find any loose parts. Add corner braces if needed for extra support. A stable frame keeps your table safe and sturdy for daily use.
Assembling The Table Frame
Creating the waterfall effect is the key to making a beautiful console table. This style features a smooth edge that flows down the sides, like a waterfall. The design gives a modern and elegant look without extra parts. Crafting this effect takes care and some special techniques. Focus on shaping, surface finishing, and joining edges for the best result.
Shaping The Table Edges
Start by cutting the table top with a straight edge. Use a router with a round-over bit to shape the edges. This makes the wood curve gently down the sides. Sand the edges well to remove rough spots. Smooth curves help the waterfall effect look natural and clean.
Using Veneers Or Laminate
Veneers or laminate cover the wood surface for a sleek finish. Thin wood veneers match the grain and color of the table top. Laminate offers many colors and patterns for a modern look. Apply them carefully to avoid bubbles or wrinkles. Press the surface flat and trim extra material along the edges.
Seamless Edge Joining Techniques
Joining edges smoothly is essential for a waterfall table. Use wood glue along the edges and clamp firmly until dry. For extra strength, add biscuits or dowels inside the joints. Sand the joined area to blend the seam with the rest of the surface. A seamless joint makes the waterfall effect flow without breaks.
Creating The Waterfall Effect
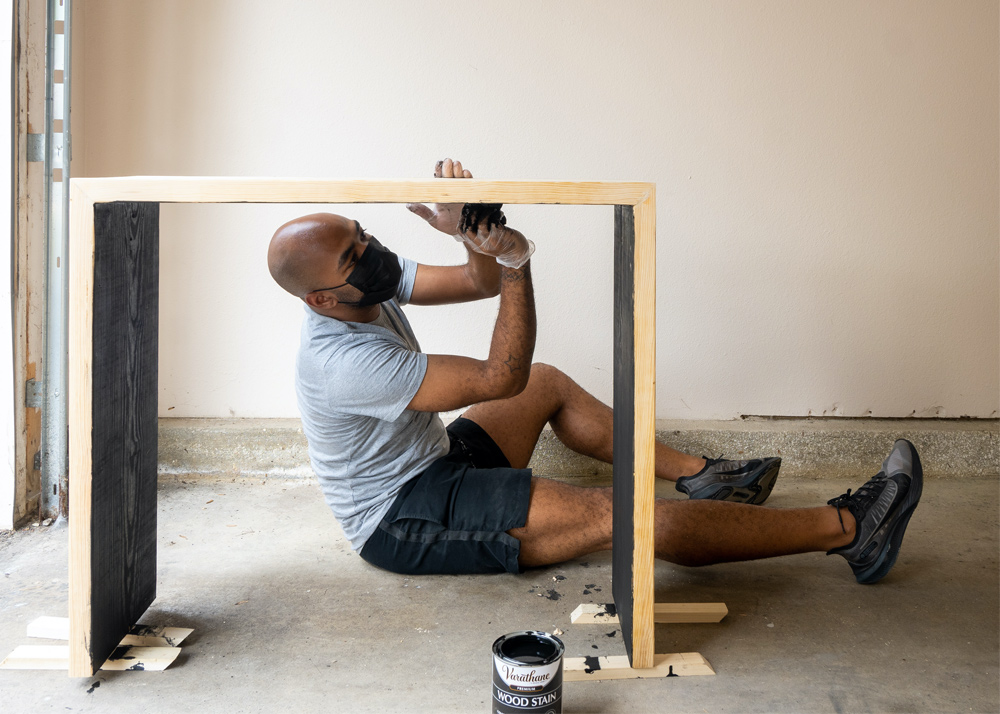
Finishing touches bring your waterfall console table to life. They protect the wood and make your table look great. This final step gives the table a smooth and polished surface. It also helps the table last longer, keeping it safe from scratches and spills. Let’s explore how to finish your table with care and style.
Applying Stain Or Paint
Choose a stain or paint that fits your room’s style. Stains show the wood grain and add warmth. Paint covers the wood for a fresh, solid color. Use a brush or cloth to apply evenly. Let the first coat dry fully before adding more. Sand lightly between coats for a smooth finish. This step makes your table unique and beautiful.
Sealing For Durability
Seal your table with a clear coat to protect it. Polyurethane or varnish works well for durability. Apply thin layers with a clean brush. Wait for each layer to dry before the next. This seal stops water damage and scratches. It also keeps the stain or paint from fading. A sealed surface makes your table stronger and longer-lasting.
Adding Decorative Elements
Add small decorations to give your table character. Use metal handles, decorative trim, or inlays. These details highlight the table’s style and design. Keep decorations simple to avoid clutter. Attach elements securely with glue or screws. Decorative touches make your table more personal and inviting.
Finishing Touches
Keeping your waterfall console table looking fresh and new takes some care. Regular maintenance helps protect the wood and finish. Small habits prevent big problems later. This section covers simple tips for cleaning, avoiding damage, and periodic upkeep.
Cleaning Recommendations
Use a soft cloth to dust your table often. Avoid rough materials that can scratch the surface. For deeper cleaning, dampen the cloth slightly with water. Never use harsh chemicals or abrasive cleaners. Wipe spills immediately to stop stains. Gentle cleaning keeps the wood and finish bright.
Preventing Damage
Place coasters under drinks to avoid water rings. Use felt pads under decorative items to stop scratches. Avoid direct sunlight, which can fade the wood. Do not drag heavy objects across the table. Keep pets’ nails trimmed to prevent marks. Protect your table with simple daily habits.
Periodic Upkeep
Check the table every few months for any damage. Apply a suitable wood polish or oil to nourish the surface. Tighten loose screws or joints to keep it stable. Light sanding can fix minor scratches if needed. Regular upkeep extends the life of your console table.
Credit: www.homedepot.com
Frequently Asked Questions
What Materials Are Needed For A Waterfall Console Table?
You need plywood or solid wood, wood glue, clamps, sandpaper, paint or stain, and finishing nails. Optional tools include a saw, drill, and paintbrush. Choose quality materials for durability and smooth edges.
How Do You Create The Waterfall Edge Effect?
The waterfall edge is made by bending wood panels down the sides. Cut flexible plywood, soak or steam to bend, then attach to the table top and sides. Clamp and glue until dry for a seamless flow.
How Long Does It Take To Build This Table?
It typically takes 4 to 6 hours, including cutting, bending, assembly, and finishing. Drying time for glue or paint may add extra hours. Plan for a full day to ensure quality results.
Can Beginners Build A Waterfall Console Table?
Yes, beginners can build it with basic woodworking skills and patience. Follow detailed instructions and use simple tools. Start with affordable materials and practice bending wood before assembly.
Conclusion
Building a waterfall console table can be a fun and rewarding project. It adds style and function to any room. With the right tools and steps, anyone can create this beautiful piece. Take your time and follow the guide carefully.
Enjoy the process and the final result. Your handmade table will impress guests and last for years. Start your project today and bring a fresh look to your space.