Looking for a simple way to add style and storage to your space? Building a low bookshelf might be just what you need.
Imagine having a custom piece that fits perfectly in your room, holds your favorite books, and showcases your personal touch. You don’t need to be a woodworking expert to create something like this. In this guide, you’ll discover easy steps that make building your own low bookshelf both fun and rewarding.
Ready to transform your space with a project you’ll be proud of? Let’s get started!
Materials And Tools
Gathering the right materials and tools is the first step to build a low bookshelf. Proper preparation saves time and ensures good results. This section covers the essential wood types, tools, and safety gear needed for the project.
Wood Selection
Choose wood that is strong and easy to work with. Pine is affordable and lightweight, perfect for beginners. Oak is sturdy and lasts longer but costs more. Plywood offers a smooth finish and resists warping. Select wood pieces free of cracks and knots for the best outcome.
Required Tools
A saw is necessary to cut the wood pieces to size. A drill helps make holes for screws and fasteners. Sandpaper smooths rough edges and surfaces. A screwdriver or power driver tightens screws securely. A tape measure and pencil help mark accurate measurements. Clamps hold pieces steady while working.
Safety Gear
Protect your eyes with safety goggles. Wear gloves to avoid splinters and cuts. Use a dust mask to prevent inhaling sawdust. Hearing protection reduces noise from power tools. Work in a well-ventilated area to stay safe and comfortable.
Credit: www.reddit.com
Design Planning
Design planning is the first step in building a low bookshelf. It helps you create a clear idea of what you want. Careful planning saves time and materials. It also ensures the bookshelf fits your space and needs perfectly.
Think about size, style, and how much storage you require. These details guide your building process. Good design planning makes your project smooth and satisfying.
Choosing Dimensions
Measure the space where you will place the bookshelf. Decide on the height, width, and depth. Low bookshelves usually stand between 24 to 36 inches tall. Keep the depth around 10 to 12 inches to hold books securely. Choose dimensions that fit your room and keep the shelf easy to reach.
Style And Finish Options
Pick a style that matches your room decor. Simple, clean lines suit modern spaces. Rustic or vintage styles use rough wood or distressed paint. Choose a finish that protects the wood. Paint, stain, or clear varnish are popular options. The finish also adds color and texture to your shelf.
Storage Needs
Think about what you will store on the shelf. Books, plants, or decorative items need different shelf heights. Adjustable shelves offer more flexibility. Add extra compartments for small items or magazines. Plan enough space so items do not look crowded.
Cutting The Wood
Cutting the wood is a key step in building a low bookshelf. It shapes the pieces you will join. Accurate cuts make the assembly easier and the shelf stronger. Take your time and prepare well before cutting. Use the right tools for safe and clean cuts.
Measuring And Marking
Measure the wood carefully with a tape measure. Mark the cut lines clearly using a pencil. Double-check each measurement to avoid mistakes. Mark both sides of the wood for better accuracy. Use a square tool to draw straight lines.
Cutting Techniques
Choose a saw that fits your skill level and wood type. A circular saw works well for straight cuts. Cut slowly to keep the line straight. Hold the wood firmly to stop it from moving. Follow the marked lines precisely for a clean cut.
Sanding Edges
Sanding smooths rough edges after cutting. Use medium-grit sandpaper first to remove splinters. Then, use fine-grit sandpaper for a soft finish. Sand along the edge, not across it, to keep it even. Clean dust off before assembling your bookshelf.
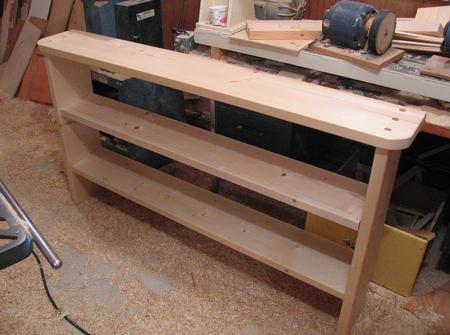
Credit: woodgears.ca
Assembling The Frame
Building the frame is the first big step in making a low bookshelf. The frame holds everything together. It sets the shape and size of the shelf. Taking time here makes the shelf strong and neat.
Follow clear steps to put the parts together. Use the right tools and pieces. This keeps the frame steady and ready for the shelves and back panel.
Joining Techniques
Use screws or nails to join wood pieces tightly. Drilling pilot holes stops wood from splitting. Wood glue adds extra hold at the joints.
Butt joints are simple and quick for corners. For stronger hold, try pocket holes. These hide screws and keep the frame neat.
Ensuring Stability
Check the frame edges with a square tool. Make sure corners are exactly 90 degrees. This keeps the shelf balanced and straight.
Clamp pieces while the glue dries. Clamps hold parts tight and stop movement. A stable frame lasts longer and holds weight well.
Adding Support
Add extra wood strips inside corners for more strength. These help stop wobbling or bending. Place them where shelves will carry heavy items.
Use a back panel or cross braces to keep the frame rigid. These supports stop side-to-side movement. They protect the shelf from tipping over.
Adding Shelves
Adding shelves is a key step in building a low bookshelf. Shelves hold your books and other items. They also define the style and function of the shelf. Careful planning helps make shelves strong and useful.
Think about shelf size, height, and spacing. Choose the right method to fix shelves in place. You can also create adjustable shelves for more flexibility. Each choice affects how the bookshelf looks and works.
Shelf Placement
Decide the number of shelves you want. Measure the height of your tallest books. Space shelves to fit these books comfortably. Leave some extra room for future items. Even spacing creates a neat look. Odd spacing can add style and interest.
Securing Shelves
Use strong brackets or support cleats to hold shelves. Attach them firmly to the side panels. Drill pilot holes to avoid wood splitting. Use screws that match your wood type. Check that shelves stay level and stable. This ensures safety and durability.
Adjustable Options
Install shelf pins or metal tracks for adjustable shelves. These allow you to move shelves up or down easily. Adjustable shelves adapt to different book sizes. They give your bookshelf more flexibility over time. Choose hardware that fits your design and wood thickness.

Credit: www.instructables.com
Finishing Touches
Finishing touches give your low bookshelf a polished, complete look. These steps protect the wood and add style. Small details make a big difference in the final result.
Painting And Staining
Choose paint or stain based on your room’s style. Paint offers bright, solid colors and covers wood grain. Stain enhances the wood’s natural texture and color. Apply thin coats to avoid drips. Let each coat dry before the next. Sand lightly between coats for smoothness.
Protective Coating
A protective coat shields your bookshelf from scratches and spills. Use clear varnish, polyurethane, or wax. Polyurethane is strong and water-resistant. Varnish adds shine and durability. Wax gives a soft, natural finish but needs more care. Apply evenly with a brush or cloth. Let the coating dry fully before use.
Decorative Elements
Decorative touches personalize your bookshelf. Add trim or molding for a classic look. Use stencils or decals for patterns and designs. Consider small knobs or handles on shelves for style. These elements make your bookshelf unique. Keep decorations simple to avoid clutter.
Placement And Styling
Choosing the right place for your low bookshelf affects both its look and use. Placement helps make the room feel balanced and organized. Styling adds personality and ties the bookshelf to the room’s theme. Both parts work together to create a neat and inviting space.
Ideal Room Spots
Low bookshelves fit well under windows or along empty walls. They do not block views or light. Next to a reading chair, they keep books close and handy. In a hallway, they add storage without crowding the path. In living rooms, place them near sofas to hold magazines and décor.
Organizing Books
Sort books by size or color for a tidy look. Stack some horizontally and stand others vertically. Leave space between books for small items or plants. Group similar subjects together to find books fast. Keep favorite reads at eye level for easy access.
Complementary Decor
Add small plants or candles on top for a fresh feel. Use picture frames or art pieces to add charm. Keep décor simple to avoid cluttering the shelf. Choose items that match your room’s colors and style. Use baskets or boxes on lower shelves for extra storage.
Frequently Asked Questions
What Materials Are Best For Building A Low Bookshelf?
Plywood and solid wood are ideal for low bookshelves. They provide durability and a smooth finish. Choose quality wood for stability and aesthetics. Avoid particleboard as it may sag over time. Use wood screws and wood glue for strong joints.
How Do I Measure Space For A Low Bookshelf?
Measure the width, height, and depth of the intended spot. Allow extra space for ventilation and easy access. Check the floor level to ensure stability. Accurate measurements prevent fitting issues and ensure the bookshelf complements your room.
What Tools Do I Need To Build A Low Bookshelf?
Basic tools include a saw, drill, screwdriver, measuring tape, and clamps. Sandpaper or a sander smooths edges. A level ensures straight assembly. Safety gear like goggles and gloves is essential during construction.
How Can I Finish My Low Bookshelf For Durability?
Apply primer and paint or wood stain for protection and style. Use a clear sealant to shield against moisture and scratches. Sand between coats for a smooth finish. Proper finishing extends the bookshelf’s lifespan.
Conclusion
Building a low bookshelf can be simple and fun. Start with basic tools and materials. Follow clear steps to cut, assemble, and finish your shelf. Take your time to measure twice and cut once. Personalize the shelf with paint or stain.
A sturdy bookshelf helps keep your space neat and organized. Enjoy the satisfaction of making something useful yourself. This project fits well in any room or style. Try building one to add charm and storage to your home.
