Are you looking to add a stylish and practical touch to your space? Building a low bookshelf might be the perfect project for you.
Imagine having a custom shelf that fits your room perfectly, holds your favorite books, and even adds character to your home. In this guide, you’ll discover simple steps to create your own low bookshelf, even if you’ve never built furniture before.
By the end, you’ll feel confident and excited to start—turning your ideas into something real and useful. Ready to transform your space? Let’s get started!
Materials And Tools
Building a low bookshelf requires the right materials and tools. Choosing good wood and having the right tools make the project easier. This section helps you prepare everything before starting your build.
Choosing The Right Wood
Pick wood that is strong and easy to work with. Pine is a good choice for beginners. It is soft and affordable. Oak and maple are harder woods but last longer. Make sure the wood is smooth and free of cracks. This helps the bookshelf look nice and stay sturdy.
Essential Tools Needed
Gather basic tools before you start building. A saw is needed to cut wood to size. Use a drill to make holes for screws. Sandpaper smooths rough edges. A measuring tape helps you get the right size. Screwdrivers help to fasten screws tightly. A level keeps your shelves straight and even.
Optional Finishes And Accessories
Finishing your bookshelf makes it look better and last longer. Paint or stain adds color and protects the wood. Clear sealant protects from scratches and water. You might want small brackets for extra support. Felt pads on the bottom prevent floor scratches. Choose finishes that match your room style.

Credit: www.instructables.com
Planning Your Bookshelf
Planning your low bookshelf is the first step to a successful build. Careful planning saves time and materials. It ensures your shelf fits perfectly and looks great. This section guides you through the key planning stages.
Measuring Space And Size
Start by measuring the space where the bookshelf will go. Use a tape measure for accuracy. Note the height, width, and depth available. Consider any obstacles like baseboards or outlets. Choose a size that fits well without crowding the room.
Designing The Shelf Layout
Think about what you want to store on the bookshelf. Books, decor, or both? Decide how many shelves you need and their spacing. Keep in mind the height of your tallest books. Plan some adjustable shelves for flexibility.
Sketching Your Blueprint
Draw a simple sketch of your bookshelf design. Include all measurements and shelf positions. Use graph paper or a digital tool for neatness. This blueprint guides your cuts and assembly. It helps avoid mistakes during building.
Cutting And Preparing Wood
Cutting and preparing wood is the first step in building a low bookshelf. This step sets the foundation for a strong, neat piece of furniture. Accurate cutting and smooth edges help the bookshelf look good and last longer.
Careful preparation of each wooden piece makes assembly easier. It also ensures the shelves fit perfectly and hold weight safely. Use the right tools and follow safety rules to work well and avoid accidents.
Marking Cut Lines
Start by measuring each board carefully. Use a pencil and a ruler to draw straight lines. Mark the exact points where you will cut. Double-check your measurements before cutting. Clear, visible lines help you cut accurately.
Safe Cutting Techniques
Always wear safety glasses and gloves before cutting. Use a saw that fits your skill level and the wood type. Hold the wood firmly on a stable surface. Cut slowly and follow the marked lines. Keep your fingers away from the blade.
Sanding And Smoothing Edges
After cutting, use sandpaper to smooth the edges. Sand in one direction for a clean finish. Remove any splinters or rough spots. Smooth edges prevent injuries and improve the bookshelf’s look. Wipe the dust off before assembling.
Assembling The Frame
Assembling the frame is the key step in building your low bookshelf. It creates the basic shape and holds everything together. A strong frame means a sturdy bookshelf that lasts. This section explains how to join the parts and make sure the frame stands firm.
Joining Side Panels And Shelves
Start by attaching the side panels to the shelves. Position the shelves evenly between the two side panels. Use clamps to hold pieces steady for easy joining. Align the edges carefully for a neat look. This step forms the skeleton of your bookshelf.
Using Screws And Wood Glue
Apply wood glue to the edges before joining parts. The glue strengthens the bond and prevents wobbles. Drill pilot holes first to avoid splitting the wood. Insert screws into these holes for a firm hold. Screws and glue work together to keep the frame solid.
Ensuring Stability
Check that all parts fit tightly with no gaps. Use a level to make sure shelves sit straight. Tighten screws evenly on both sides. Add corner braces if needed for extra support. A stable frame keeps your bookshelf safe and durable.
Adding Finishing Touches
Adding finishing touches to your low bookshelf is important. These steps improve its look and protect it for longer use. This section covers how to paint or stain, apply protective coats, and attach decorative elements.
Painting Or Staining
Choose paint or stain that fits your room’s style. Paint gives bright, solid colors. Stain shows the wood grain for a natural look. Use a brush or cloth for smooth application. Apply thin, even layers for best results. Let each layer dry before the next.
Applying Protective Coats
Protective coats keep your bookshelf safe from scratches and water. Polyurethane is a common choice for strong protection. Apply with a clean brush in thin coats. Wait for each coat to dry fully. Sand lightly between coats for a smooth finish.
Attaching Decorative Elements
Decorative elements add personality to your bookshelf. Use trim, molding, or corner brackets for extra style. Attach with wood glue or small nails. Choose pieces that match your design theme. Keep decorations simple to avoid clutter.
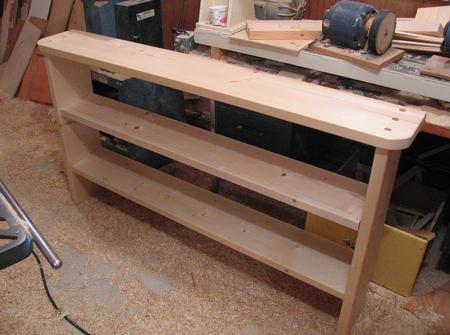
Credit: woodgears.ca
Placement And Styling Tips
Placing and styling a low bookshelf can change a room’s look and feel. It is not just about filling a space. Thoughtful placement improves use and style. Styling adds personality without clutter.
Consider the room’s layout and purpose. This helps choose the best spot for your low bookshelf. Style it to match your taste and room design. Here are useful tips to guide you.
Positioning For Functionality
Place the bookshelf where it is easy to reach. Near seating areas works well for grabbing books or decor. Avoid blocking natural light or walkways. Low bookshelves fit nicely under windows or TV units. Use them as room dividers in open spaces. Think about what you store and how often you use it.
Decor Ideas For Low Bookshelves
Mix books with decorative items like plants, candles, or photos. Keep some space empty to avoid crowding. Use baskets or boxes on lower shelves for neat storage. Arrange books by color or size for a clean look. Rotate items seasonally to refresh the style. Small art pieces add interest without overpowering.
Maintaining Your Bookshelf
Dust shelves regularly to keep them clean. Check for loose screws or parts to ensure stability. Avoid placing heavy items on top to prevent damage. Wipe spills immediately to protect the surface. Organize books and items often to keep the shelf tidy. Proper care extends your bookshelf’s life and beauty.
Credit: www.reddit.com
Frequently Asked Questions
What Materials Are Needed To Build A Low Bookshelf?
To build a low bookshelf, you need wood boards, screws, wood glue, sandpaper, and paint or stain. Use plywood or solid wood for durability. Also, gather tools like a saw, drill, measuring tape, and clamps to ensure precise assembly and a sturdy finish.
How Long Does It Take To Build A Low Bookshelf?
Building a low bookshelf typically takes 3 to 5 hours for beginners. This includes measuring, cutting, assembling, sanding, and finishing. Experienced builders may complete it faster. Time varies depending on design complexity and drying times for paint or stain.
What Is The Best Wood For A Low Bookshelf?
Pine, oak, and plywood are popular choices for low bookshelves. Pine is affordable and easy to work with. Oak is durable and attractive but costs more. Plywood offers strength and a smooth surface for painting or staining.
How Can I Customize My Low Bookshelf Design?
Customize your low bookshelf by adjusting height, width, and shelf spacing. Add paint, stain, or decorative trim for style. Incorporate baskets or bins for extra storage. Personal touches make the bookshelf fit your space and decor perfectly.
Conclusion
Building a low bookshelf is simpler than it seems. You only need basic tools and materials. Follow the steps carefully and take your time. A sturdy, useful bookshelf will add charm to any room. Enjoy organizing your books and items neatly.
This project gives you a sense of pride and accomplishment. Start building today and create a space that feels truly yours.
